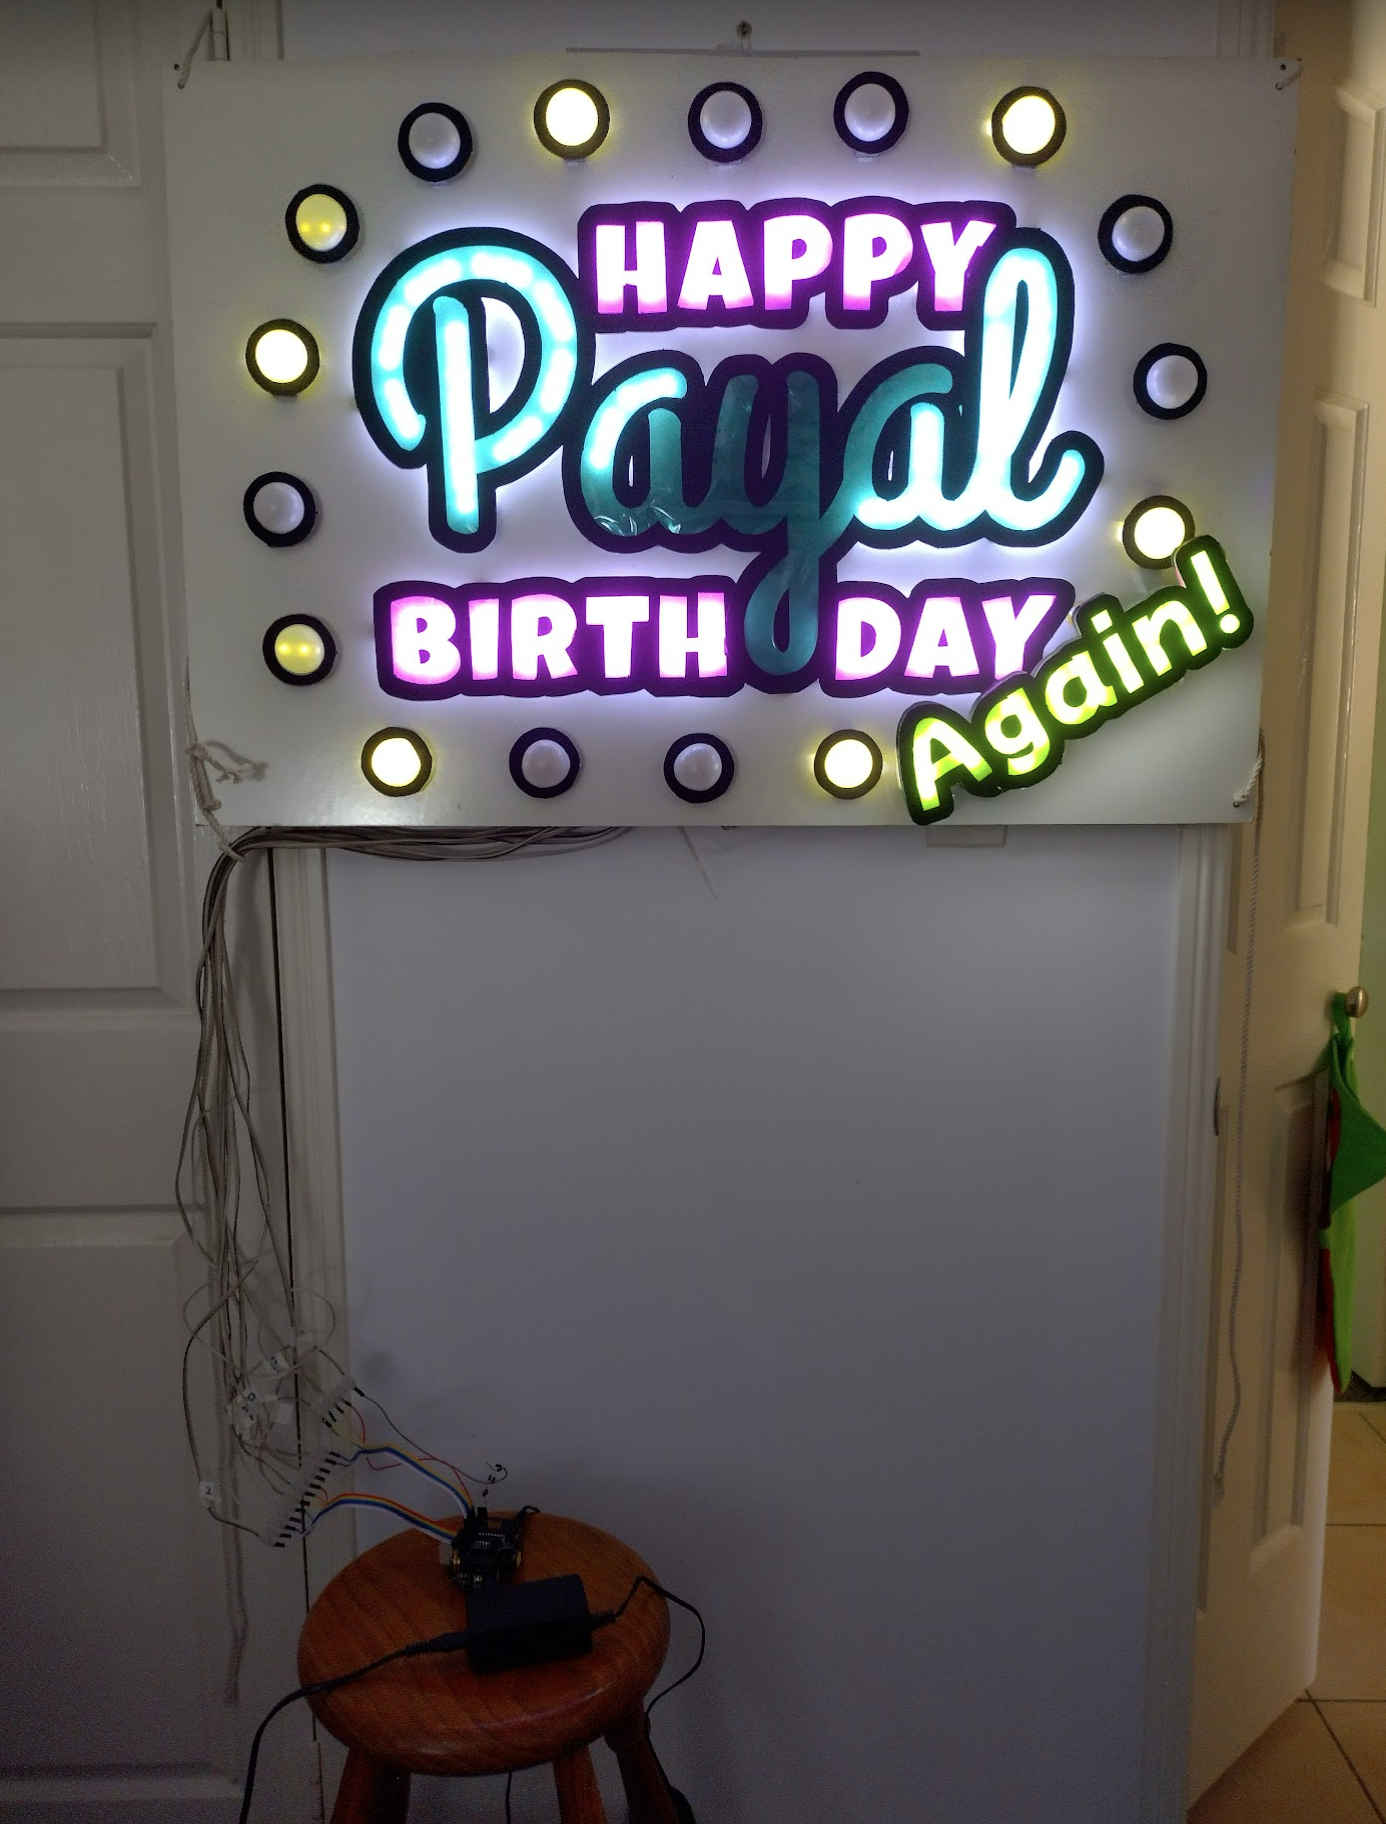
The plan was to make a sign that would feel like the neon vegas style signs for a birthday. I had some parts on hand such as a 12v led strip, and I had just created a MOSFET board which needed a good test, so along with my ATTiny85 arduino board this was the perfect application.
How will it look
A number of factors were at play for this. The thickness of the material to make the letters from. The bulbs around the outside and what to use to make them look more bulb-like. The correct font to give it a cursive appearance and have everthing fit. So with a lot of measuring, testing, fonts, this ended up being the design drawn up using inkscape.

With that all decided it was on to getting it all changed to outlines and printed so that it could be cut. Many a4 sheets and careful positioning later I had the templates for the words.


Due to the complexity of the cutting of the curves and the size of each word, the material to outline each word had to be fairly robust but also easy to work with. It couldn’t be wood as that would require a lot of jigsaw or renovator/multi-tool work which would be difficult at such small sizes. Plastic was too difficult to work with using smaller tools like a stanley knife and scissors, so I settled on fairly thick cardstock. It would be strong enough to keep its shape when cut fairly thin, and would be easy enough to cut using a stanley knife and scissors.


Making it all fit


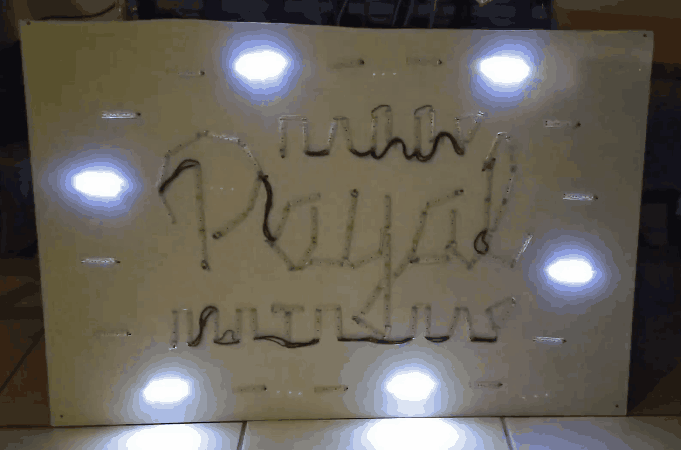
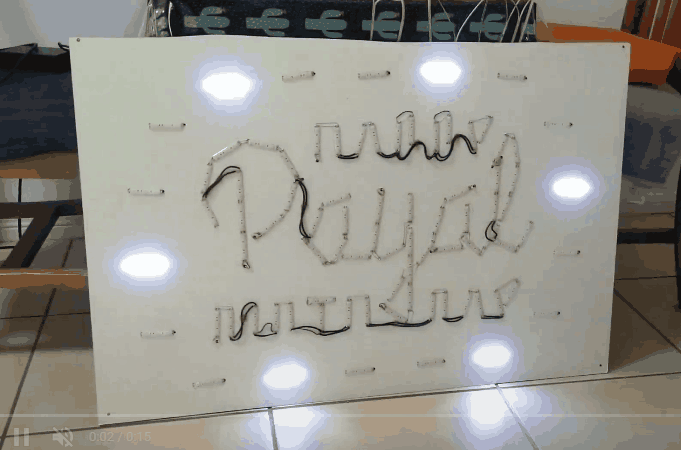
With the words all cut out it was time to see if my initial measurements were correct. I tried placing it all on the backboard and it seemed ok.
The bulbs were the last of the card to cut, and there were 18, and they had to hold half a ping pong ball. So I got to work on these fiddly pieces.
With all 18 cut, they were spaced out on the board to get the final arrangement.

Getting the leds in place
The first task was to outline where all the leds needed to sit between so they would light up the correct area of the words & bulbs.
This was followed by cutting the led strip in to the correctly sized lengths to allow for the words to appear as though they were lit up correctly. It was decided to break it down in to 3 led sections and some even smaller to allow the curves to appear better, and for the smaler words to be more evenly lit.
As the led strop was for outdoor use it was covered with a clear rubbery layer. To expose the contacts I had to cut each side of the rubber layer away ready for soldering.
The sticky side of these doesn’t always adhere correctly, so much of it had to be stuck down again with superglue


Wiring the leds in to channels
After testing the MOSFET boards I had 15 useable channels. These would be used as 3 for the chaser bulbs, 2 for happy and birthday, and 10 remaining for the name. So that meant I could light up around 4 led sections for each channel for the name. Time to get soldering!

I ran out of solid core jumper wire, so I had to rummage around for some decent wire to join the remaining led sections together while keeping it within the bounds of the covering layers so the wire would remain hidden.
I could also see I was running low on solder so I had my doubts this could be completed or it would be awfully close. So another order of solder was made hoping it would arrive in time.
Once soldered I tested all the different sections and discovered the two and one led cuts I made weren’t reliable. I disassembled a regular 3 led segment and discovered the underneath copper tracks weren’t designed to be cut in this way. There didn’t seem to be an easy way to resolve it with clever wiring, and I had just enough leds left to swap them all over to 3 led sections with a bit spare just incase. So they were all swapped and rewired.


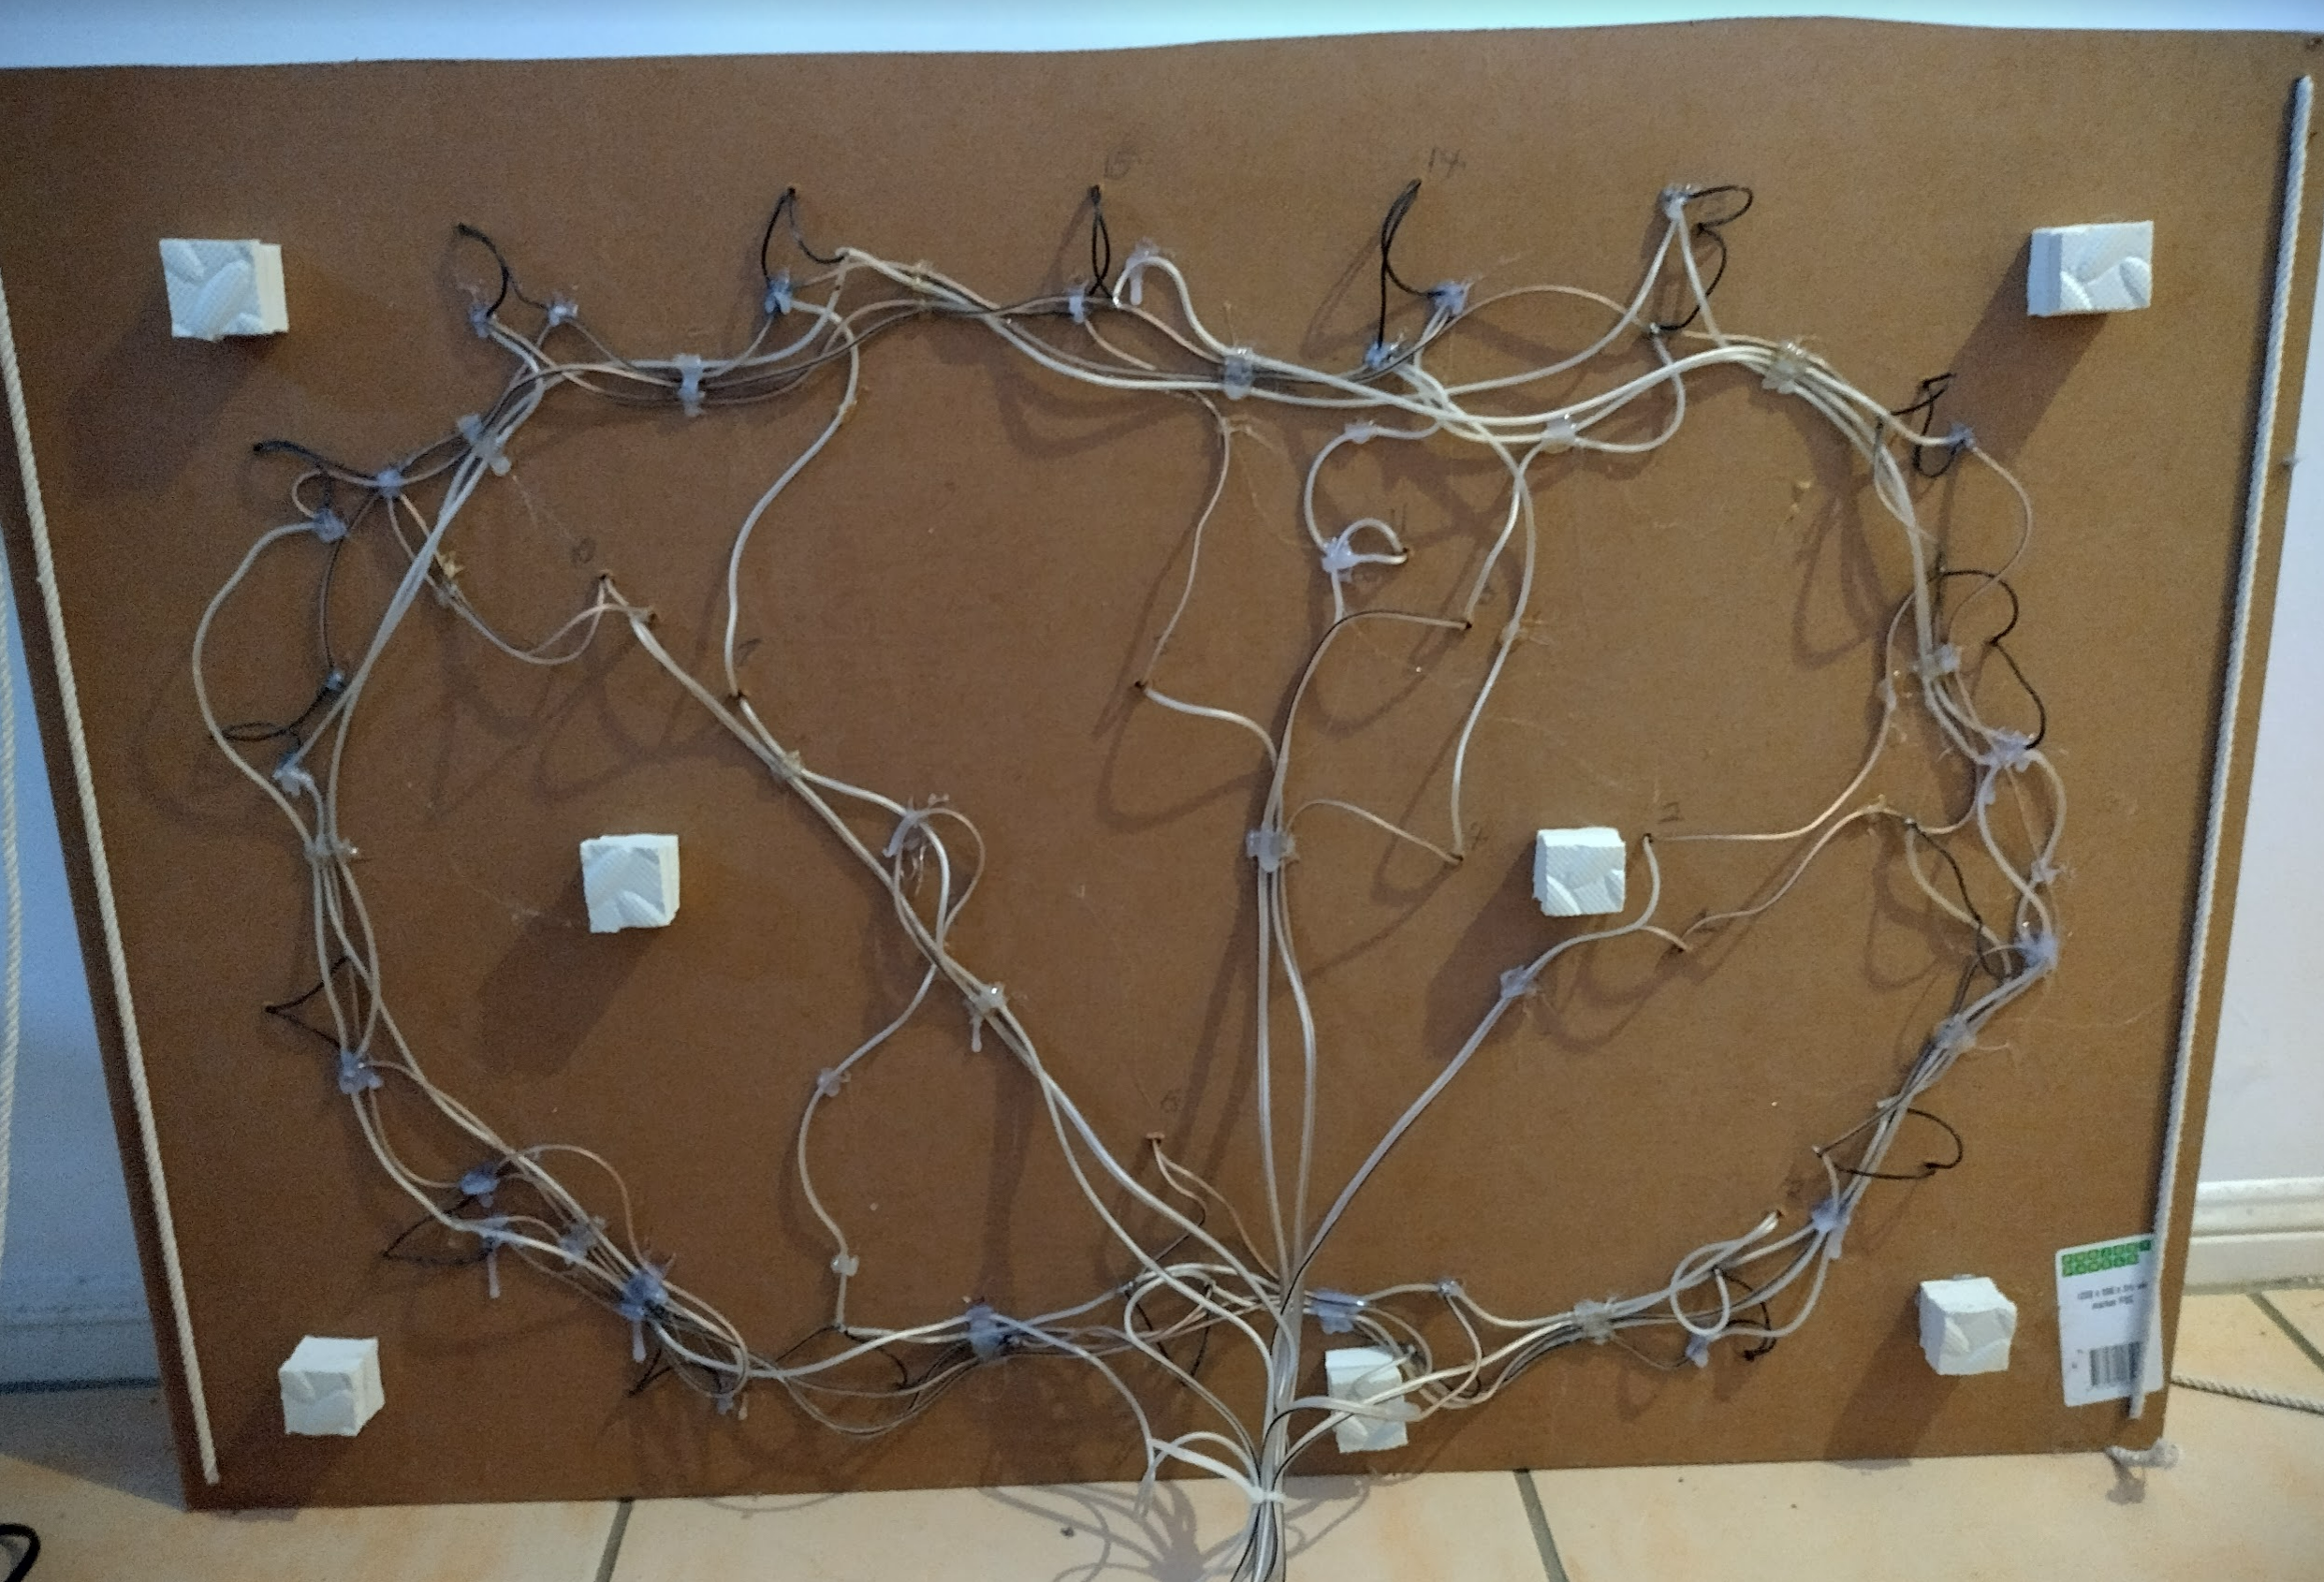
Wiring all the channels up
As I had all the bulb’s pre-wired from a previous project I decided to connect up the rings first. This involved 4 complete rings. One for each channel connecting each third bulb’s negative wires together, and the fourth ring creating a common positive for all the bulbs. This would also serve as a common positive for the entire sign saving a fair bit of wire.

I was down to my last bit of solder but my order luckily arrived right at this time so I continued on.
Next was to connect all the words and their segments. I pre-cut all the wires to a fairly long length, and got to soldering. I tried to keep all wire pairs close to eachother to make it a bit easier. As there were 15 channels to control, the 16th remaining wire from the pairs conveniently acted as the common positive.
All positive leads for the leds were connected to the common positive ring around the outside.
With it all glued down to hold it in place the soldering could be considered complete. It’s over to the crafty side.


Lighting it up

The idea was to have the outside bulbs chasing in a 3 step sequence, and have the “happy” and “birthday” words light up one after the other, then have the “payal” write along in cursive. Because all the channels are running on the same timing as eachother it meant I had to keep the outside bulb sequence going while the middle sequence was staying still for a while. To make this appear as though the outside bulbs were on their own timing I had to double up a lot of the pattern.
Initial tests were a little slow and didn’t show the writing of the name compared to the effort of splitting it in to 10 channels, so I decided to make the whole “lighting up” pattern reverse itself afterwards. This would end up as a seamlessly repeating pattern while also giving the amount of channels a decent showing.
The pattern works by using the lower or last 4 binary values of a character. To light up no leds the character of ` is used. To light up 4 leds the character of “o” is used.
This is the resulting pattern.
A=4:h```d```b```
B=2:i```e```c```
C=2:ih``eh``ch``
D=1:il``el``cn``in``eo``co``ioh`eoh`col`iol`eon`con`ioo`eoo`coohiooheoolcool
E=3:iooneooncooniooneooncooniooneooncoonih``eh``ch``
F=1:iooneooncooniooneooncooniooneooncoon
G=1:hoondoonbgonhgondconbconhaondaonb`onh`ond`gnb`gnh`cnd`cnb`anh`and``nb``nh``fd``fb``bh``bd```b```
- The initial A is the chaser sequence, with no inside lights on. It repeats 4 times.
- Then B lights up “happy” while still chasing for two repeats.
- C lights up “happy” and “birthday” still with the chaser.
- D writes the “payal” segments up in sequence, while continuing the chaser sequence around it.
- E keeps “payal” lit for 3 chaser rounds, then flicks it off for one round. This allows the name to flash.
- F allows all the inner words to be lit for 3 more chaser rounds to round off the flashing sequence nicely.
- Then G switches all the inner lights off in a reverse fashion to how they appeared.
I noticed a section of leds wasn’t connecting 100% at the end of the L, so I had to change those out at this point.
Making Teal
To be flexible with colouring I was using white led strip, and filtering it using cellophane film. This comes in a few primary colours which allows for mixing. The goal was to get teal out of the colours of blue, yellow, and green.


A few combinations and layers came close but the nicest teal appeared with two blue and one green layer, with the green sandwiched inbetween.
The diffusion of the leds was achieved by using common baking paper. In different projects I have used opal acrylic, but it is too difficult to cut for this timeframe. A much easier sign to make would be to cut the words out of opal acrylic only or diffused acrylic of the actual colour required.
Adding the colour and diffuse to the words
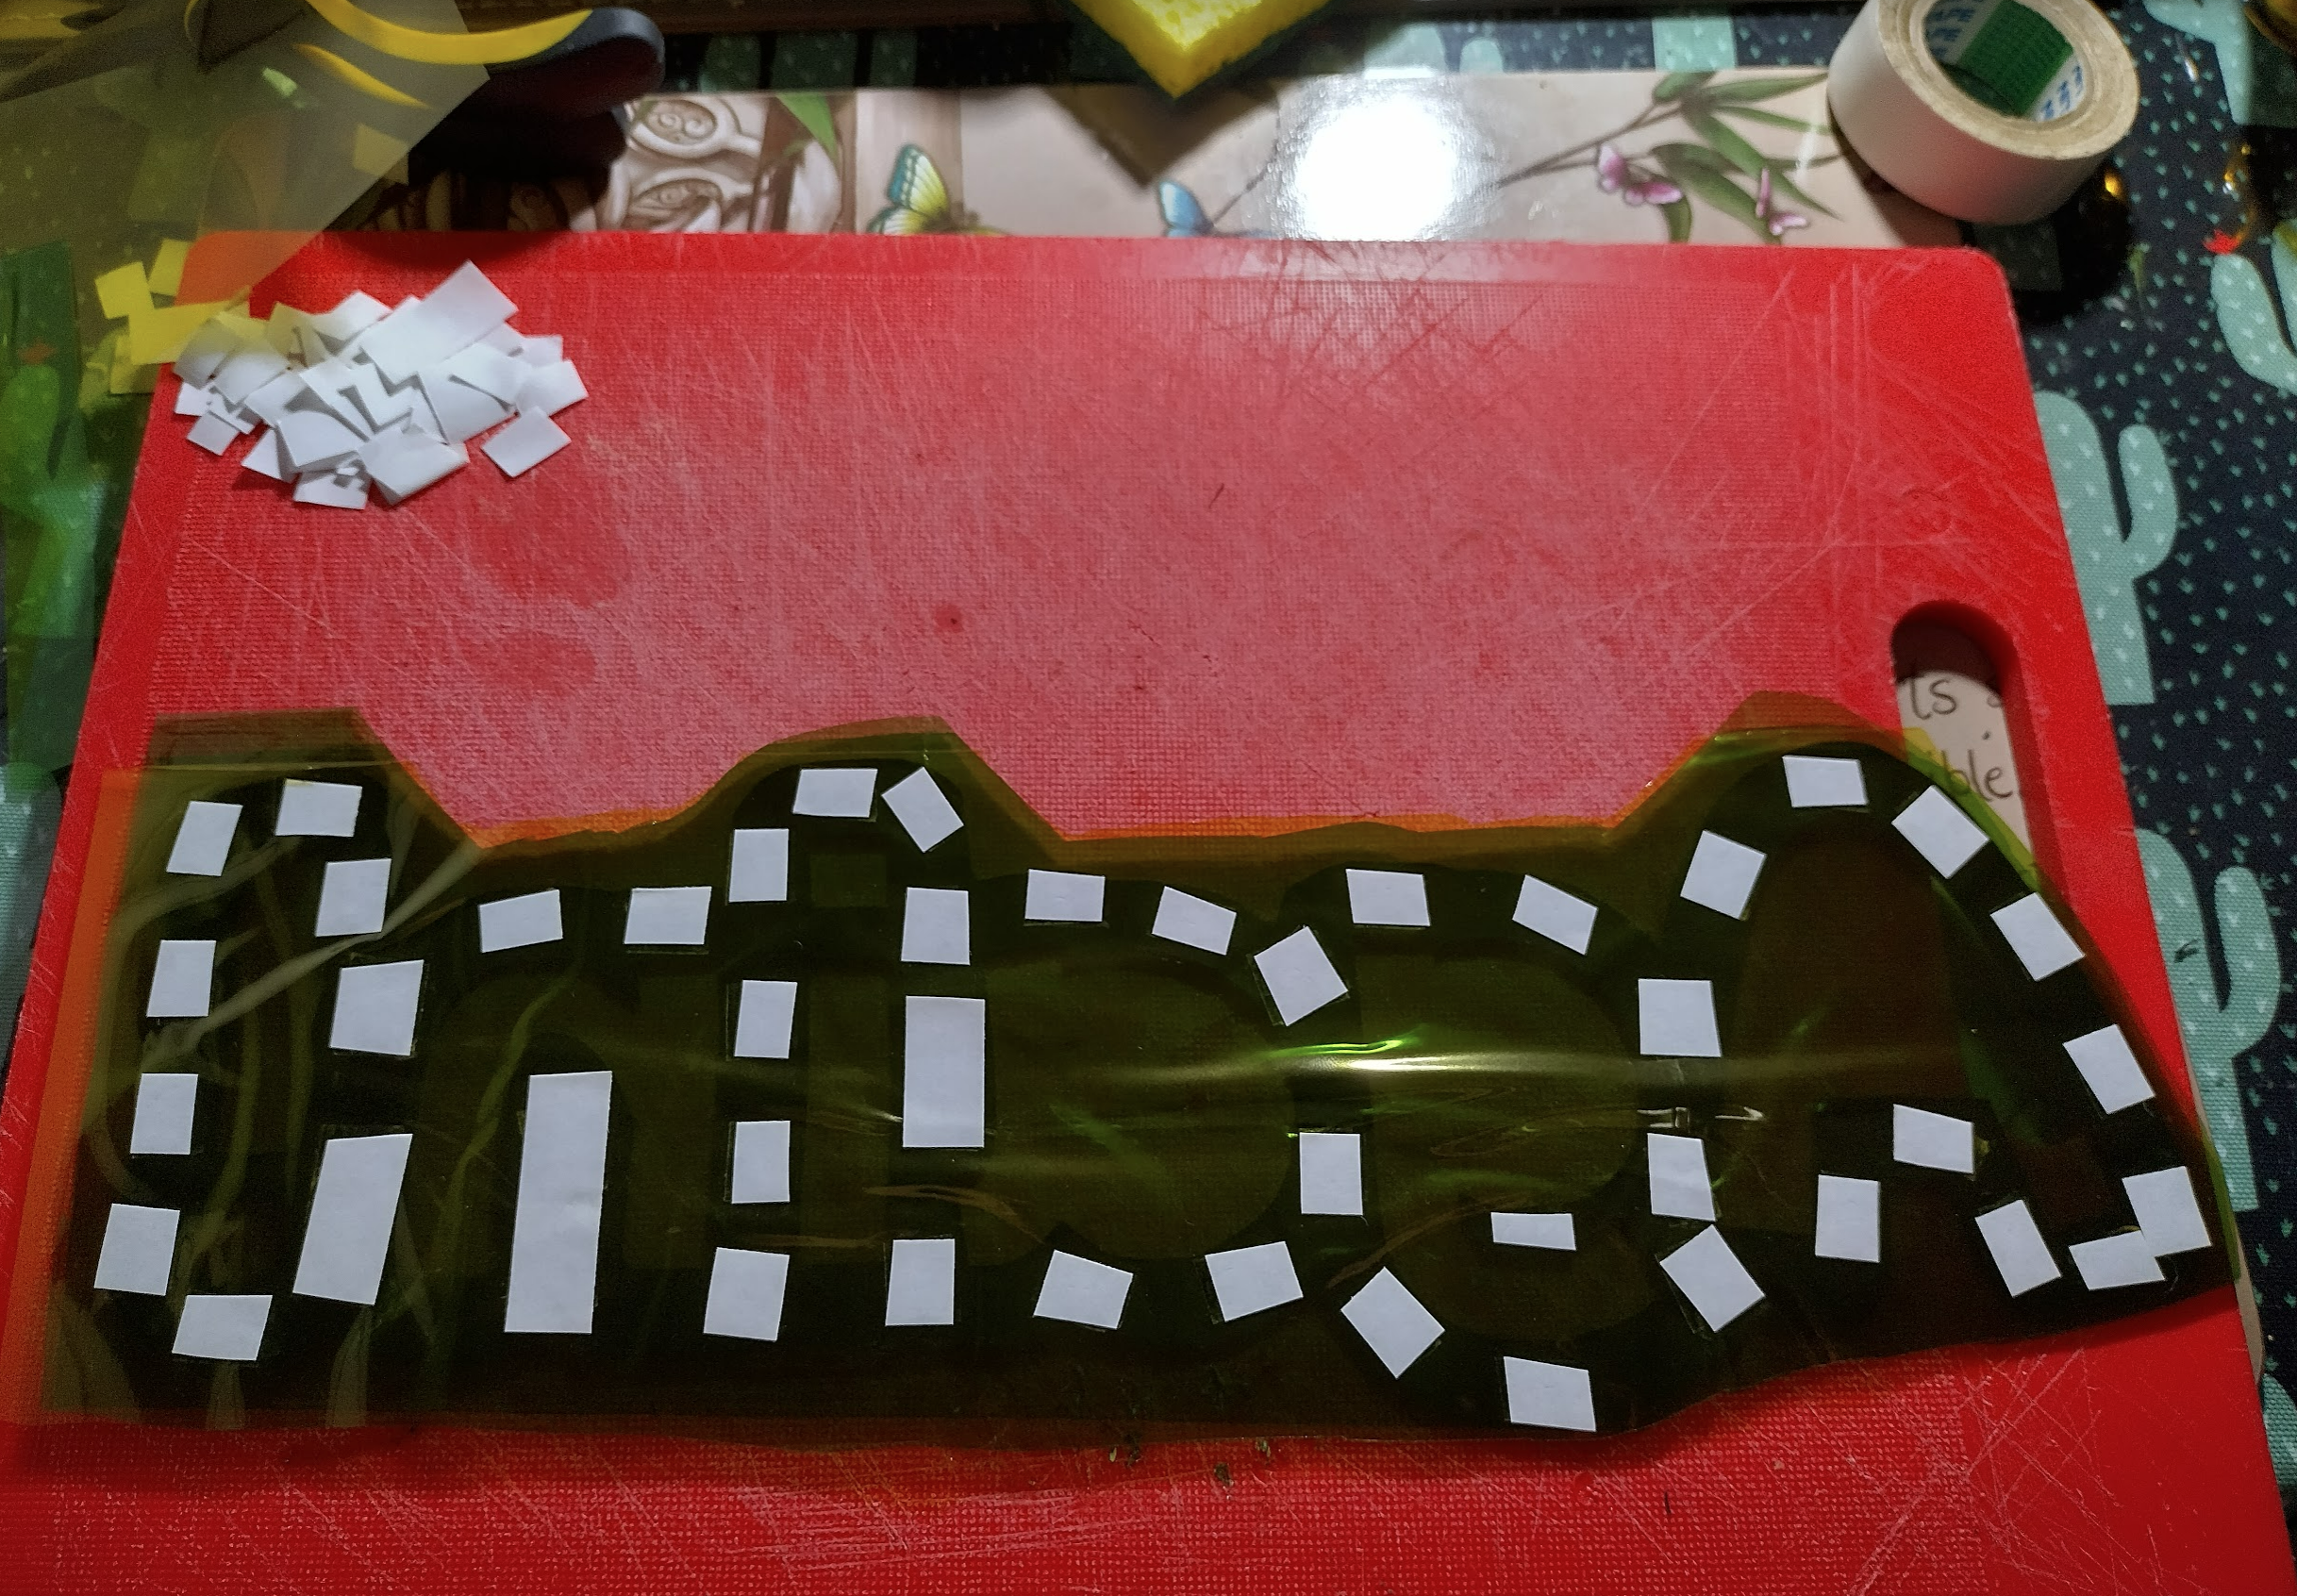
It was time to test whether the spacing theory would work, so the smaller easier words to work with were the guinea pigs for this as they were a single layer of each material.
I went with double sided tape blocks to attach the cellophane to the card words, with another round of double sided tape and baking paper to act as the lower diffuse layer. I tried to keep a gap around the outside to allow the words to stick better to the foam spacers.
The spacers were stuck down with hot melt glue, and the words glued to them in the same way. This gave them enough distance from the leds to allow more even lighting and for the diffuse layer to do what it needed.


With the foam spacer theory ticked, it was over to the most complex word which was the name. The teal test from earlier determined that 3 layers of cellophane would be needed for this, with a final layer of baking paper. This was incredibly time consuming as it required very careful cutting of a lot of tape and cellophane pulled tight. The cellophane does tear too I discovered.


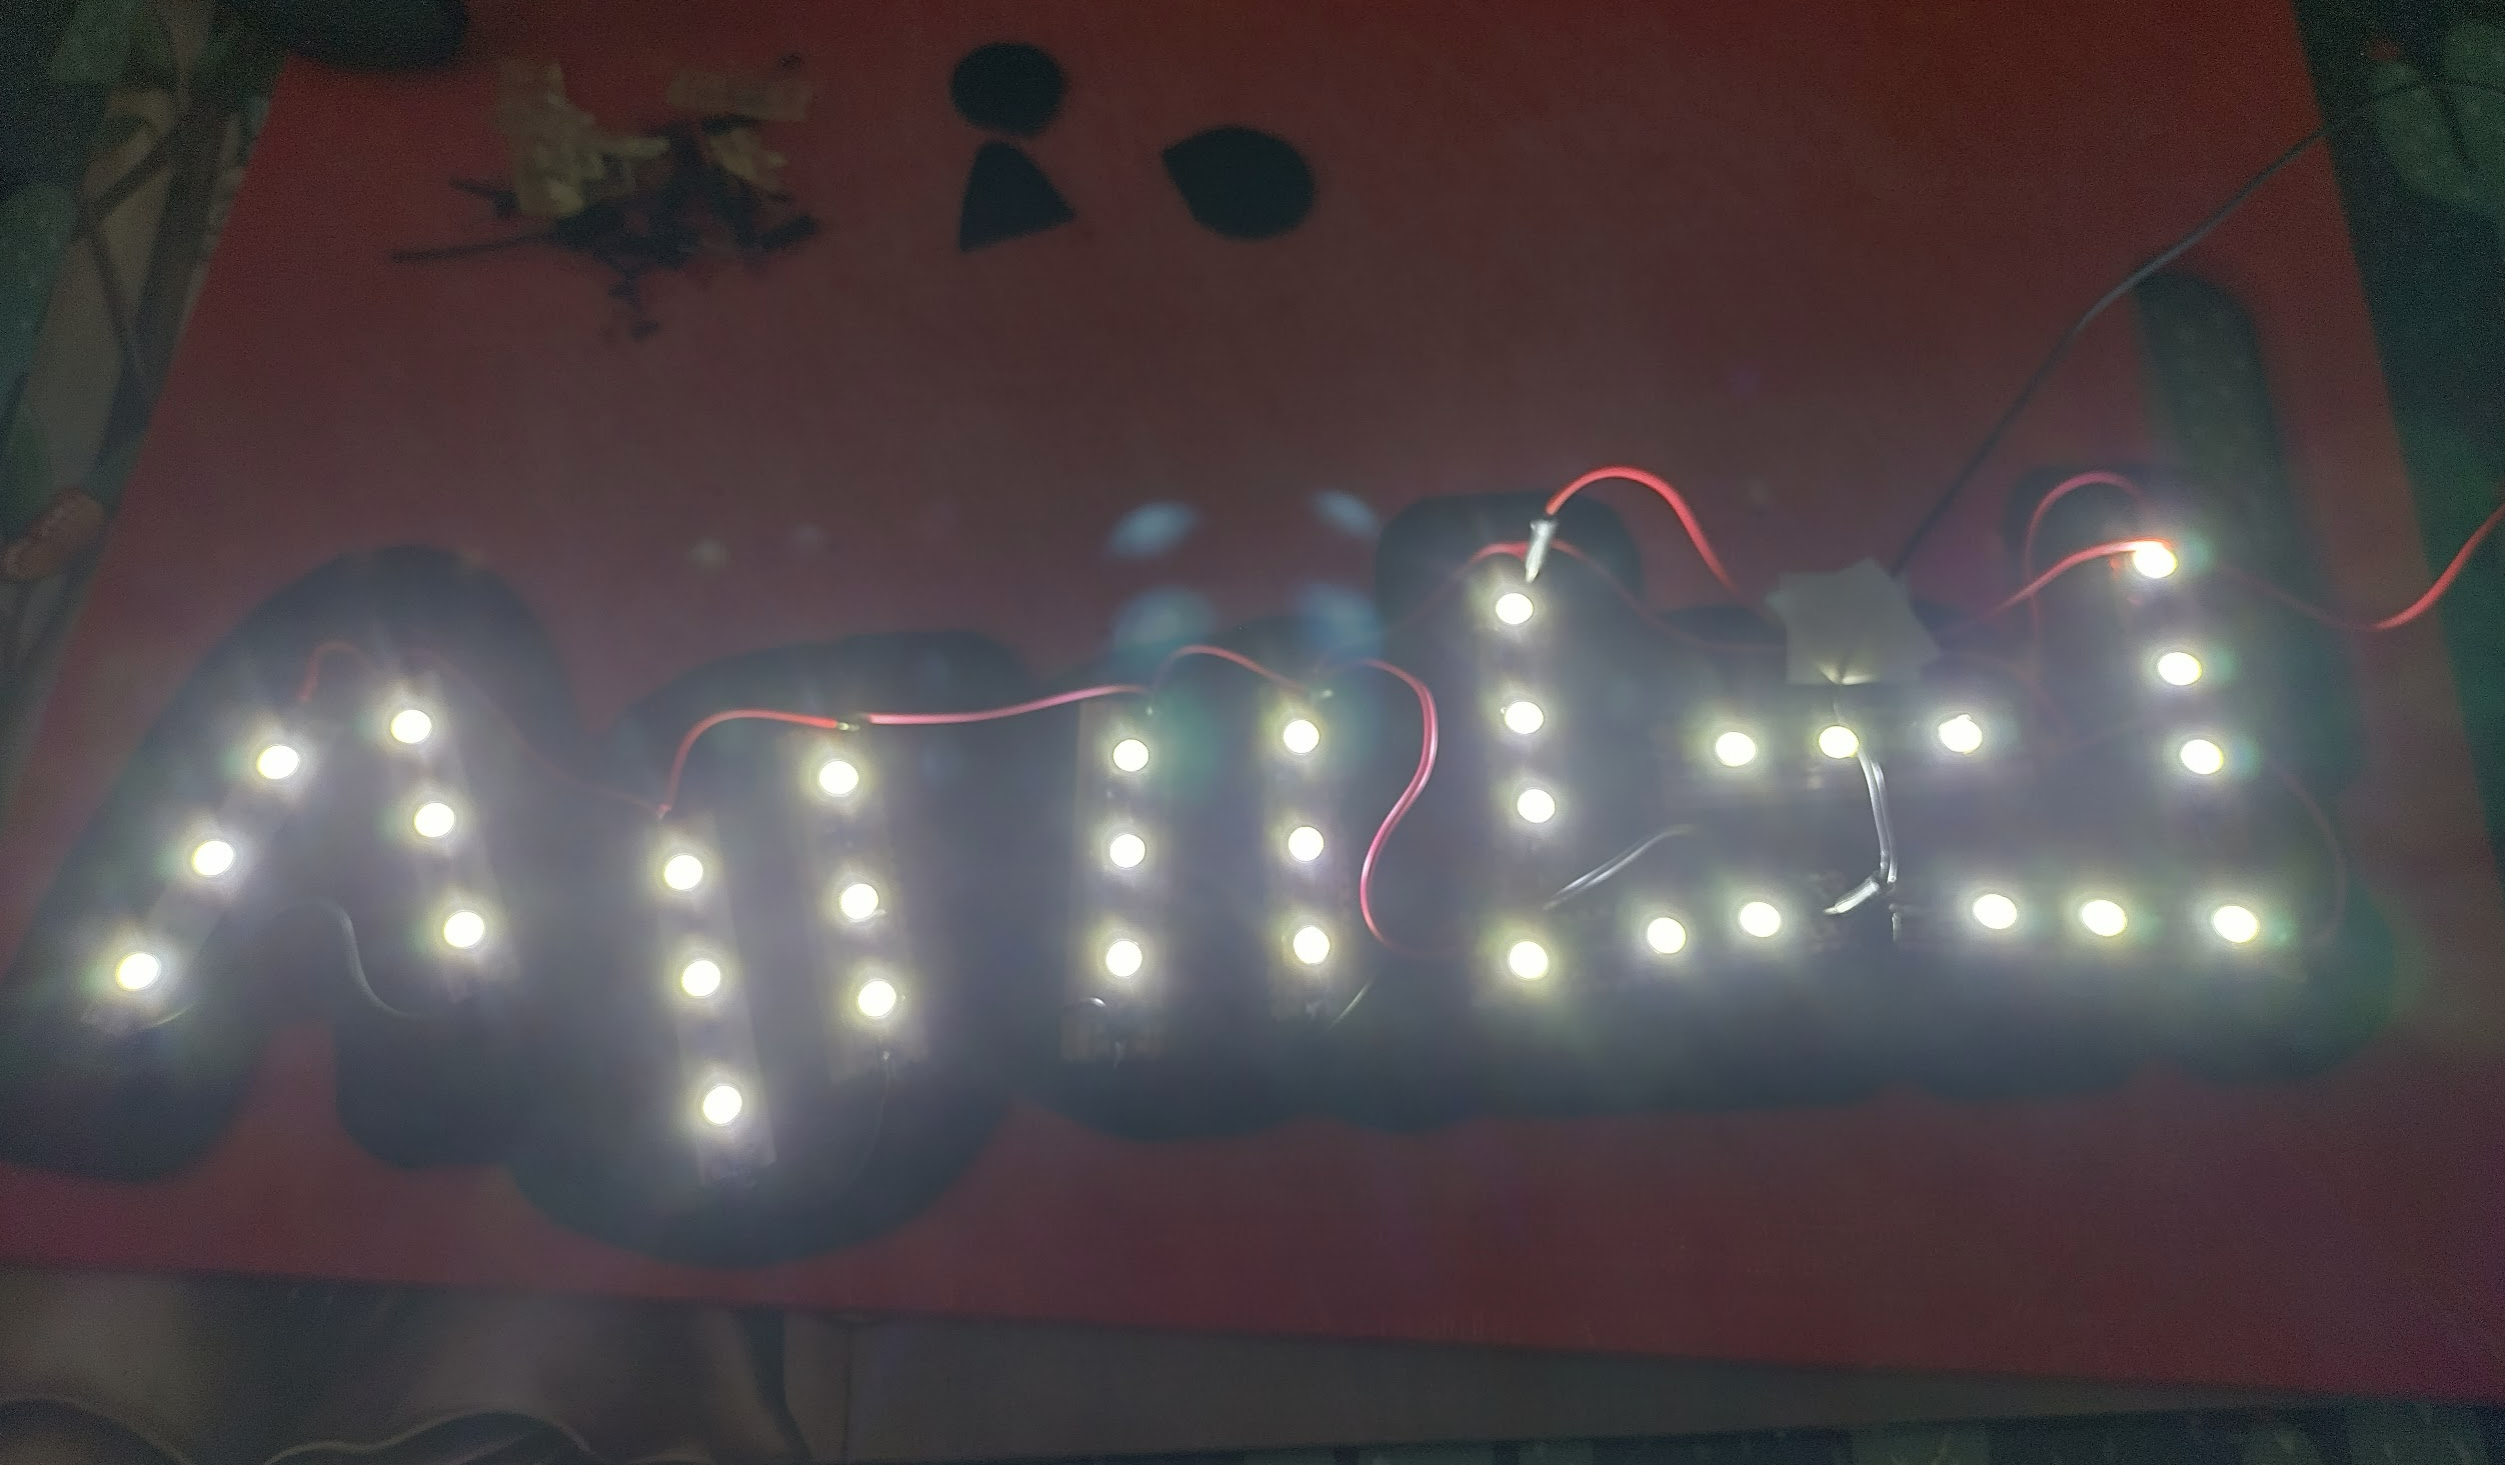
With all the words stuck down, we’re coming towards the end stretch! It was time for a colour test to see if it’s been successful.

Chaser bulbs
After the time needed to stick the cellophane layers to the words I was staring down a lot of time required to make 18 bulbs. Two layers of yellow were determined meaning if it took half an hour for each one, that’s 9 hours. So I decided to come up with a better way. The outside bulbs were using a different diffuse technique to the words so I didn’t need the baking paper, and I could stick the colour to the leds themselves. This would be far quicker so I went to work covering each of the 18 led segments around the outside with a folded cellophane layer.


With the yellow complete, it was over to making these look like bulbs. I was originally going to just glue these directly to the board but it wouldn’t take much longer to have them raised, and that would suit the rest better. So it was a bit of a production line cutting the ping pong balls in half, gluing the foam blocks, then gluing the inside of the ping pong balls to the stands.

With all the stands completed, it was fairly quick to attach these to the board. Once attached it was just the little middle floating sections of card for some letters to be stuck down and it would be complete.


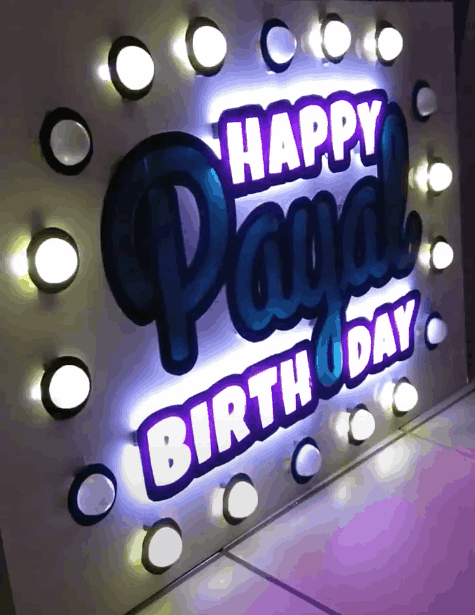
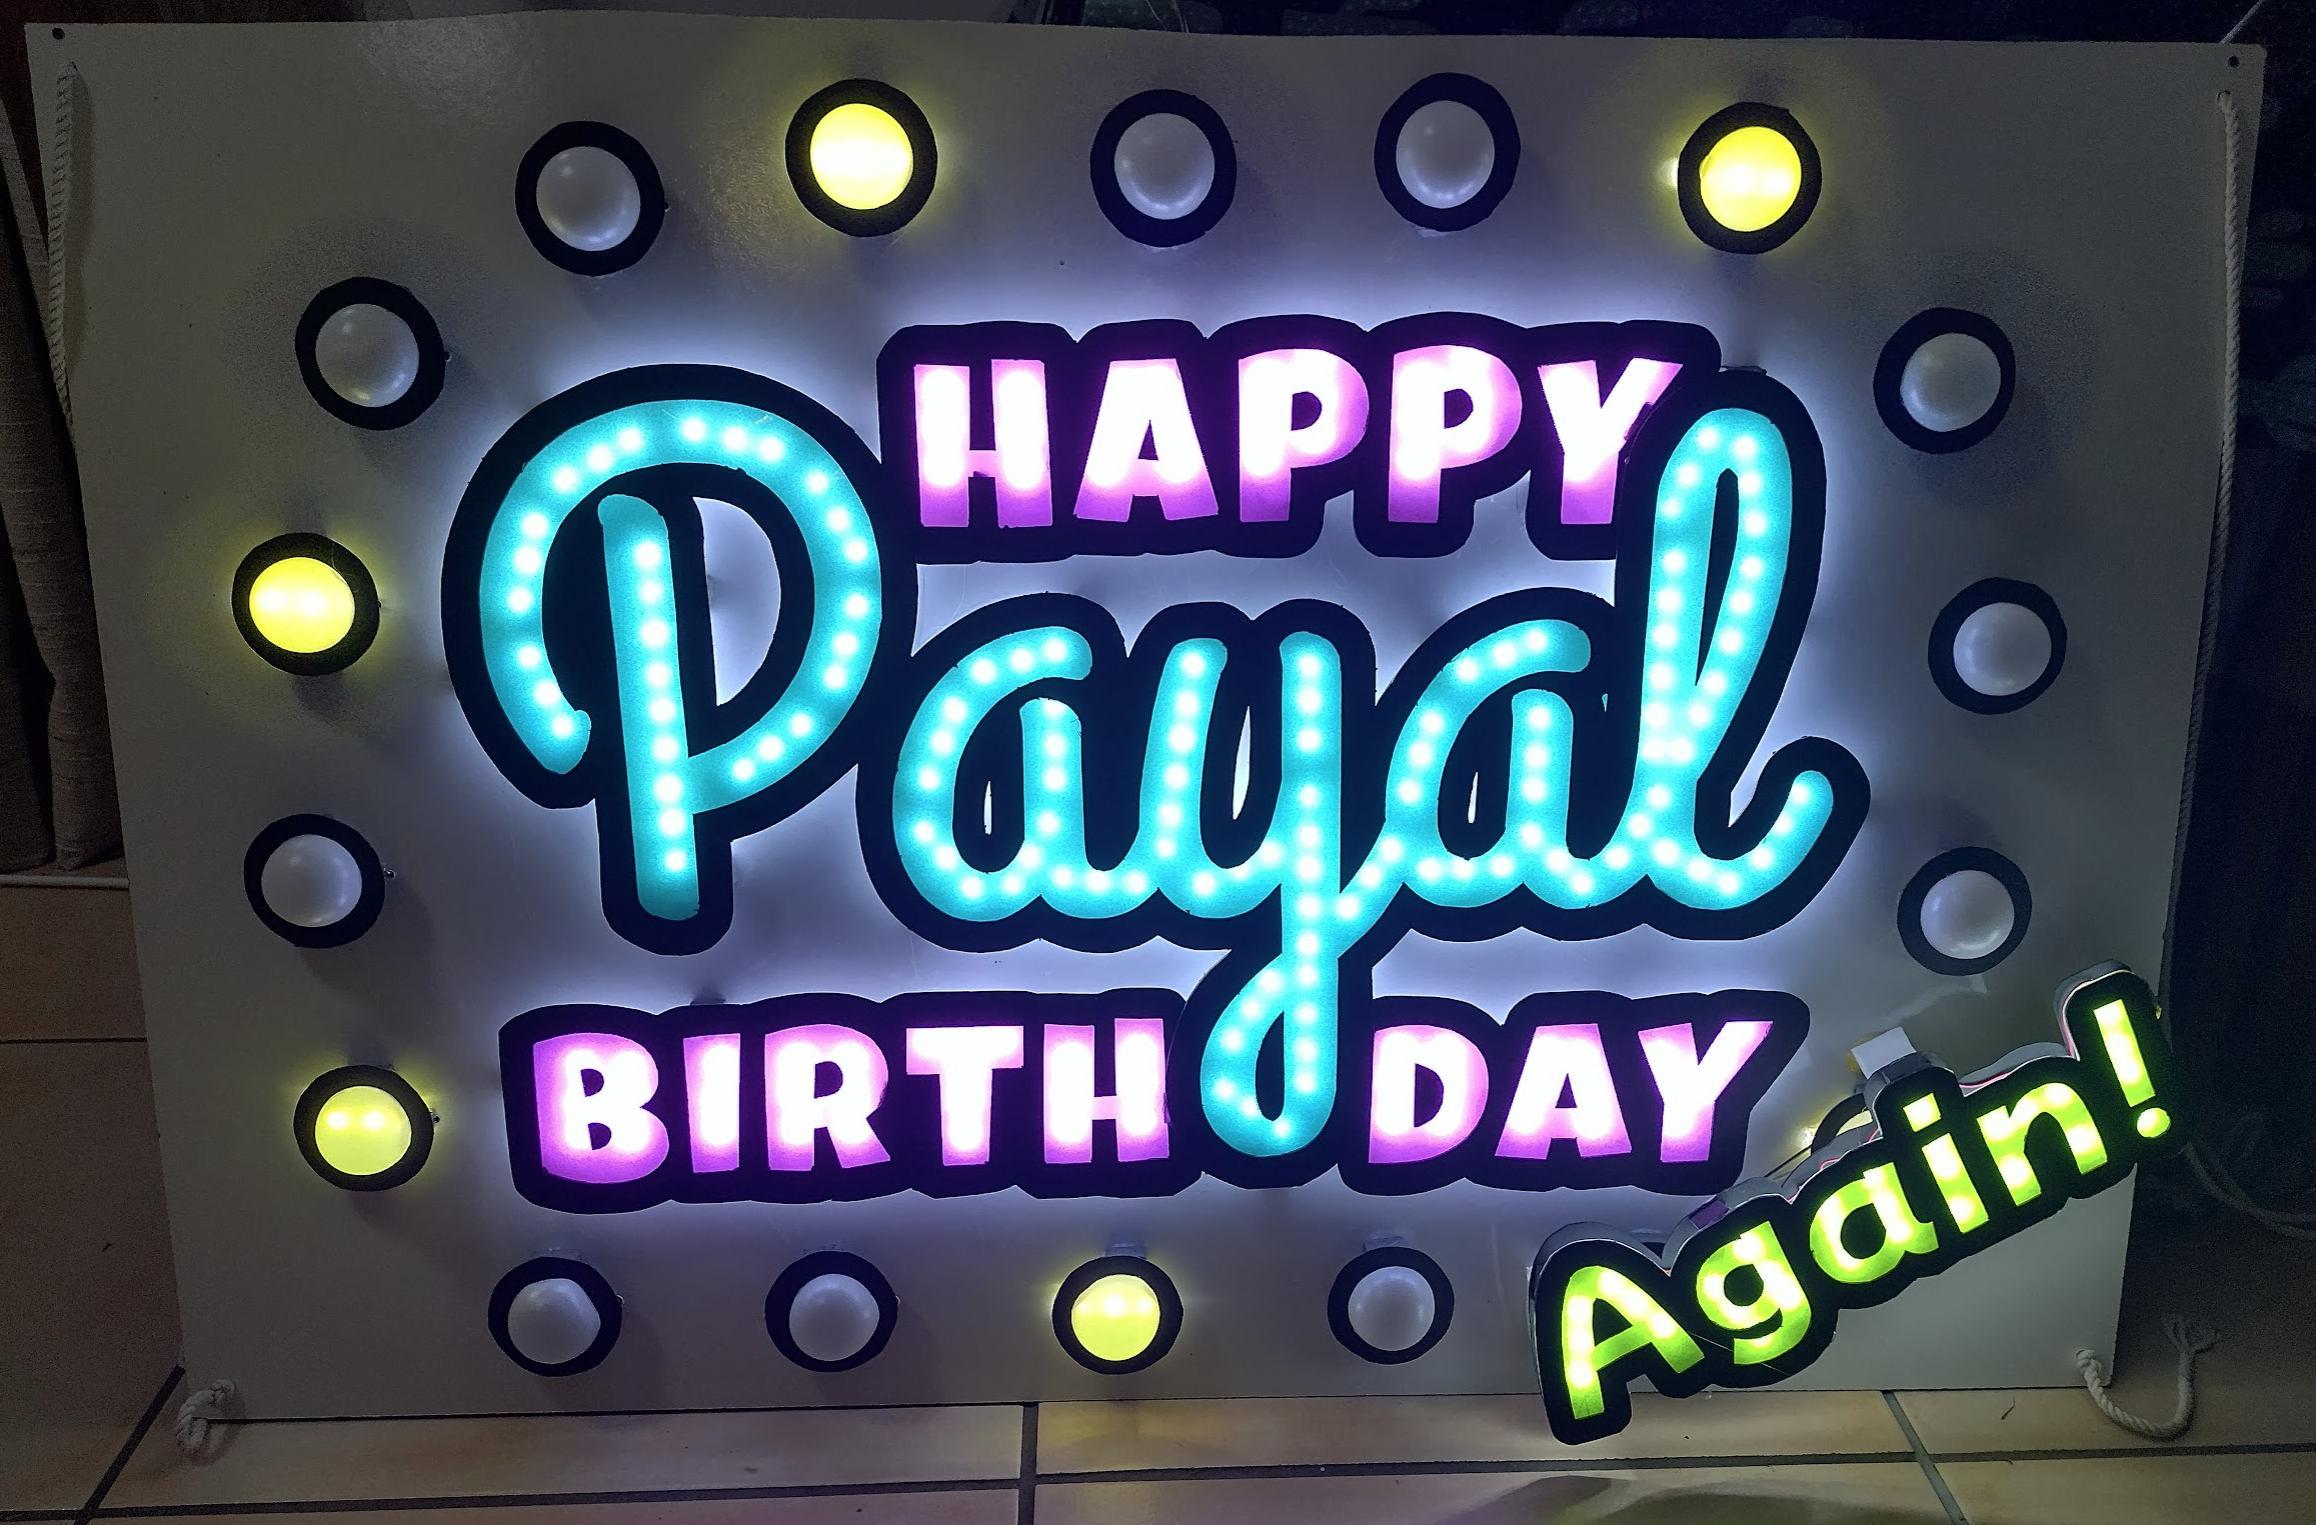
The final scene
As this was going to only be seen for a few minutes over webcam, it had to be worth it. Placing it on the wall was a fiddly event but it stayed put. I also tied in my previous large alphanumeric display to add to the effect.
It turned out exactly as I had hoped. Now to think of what to do next year!


It’s been another year
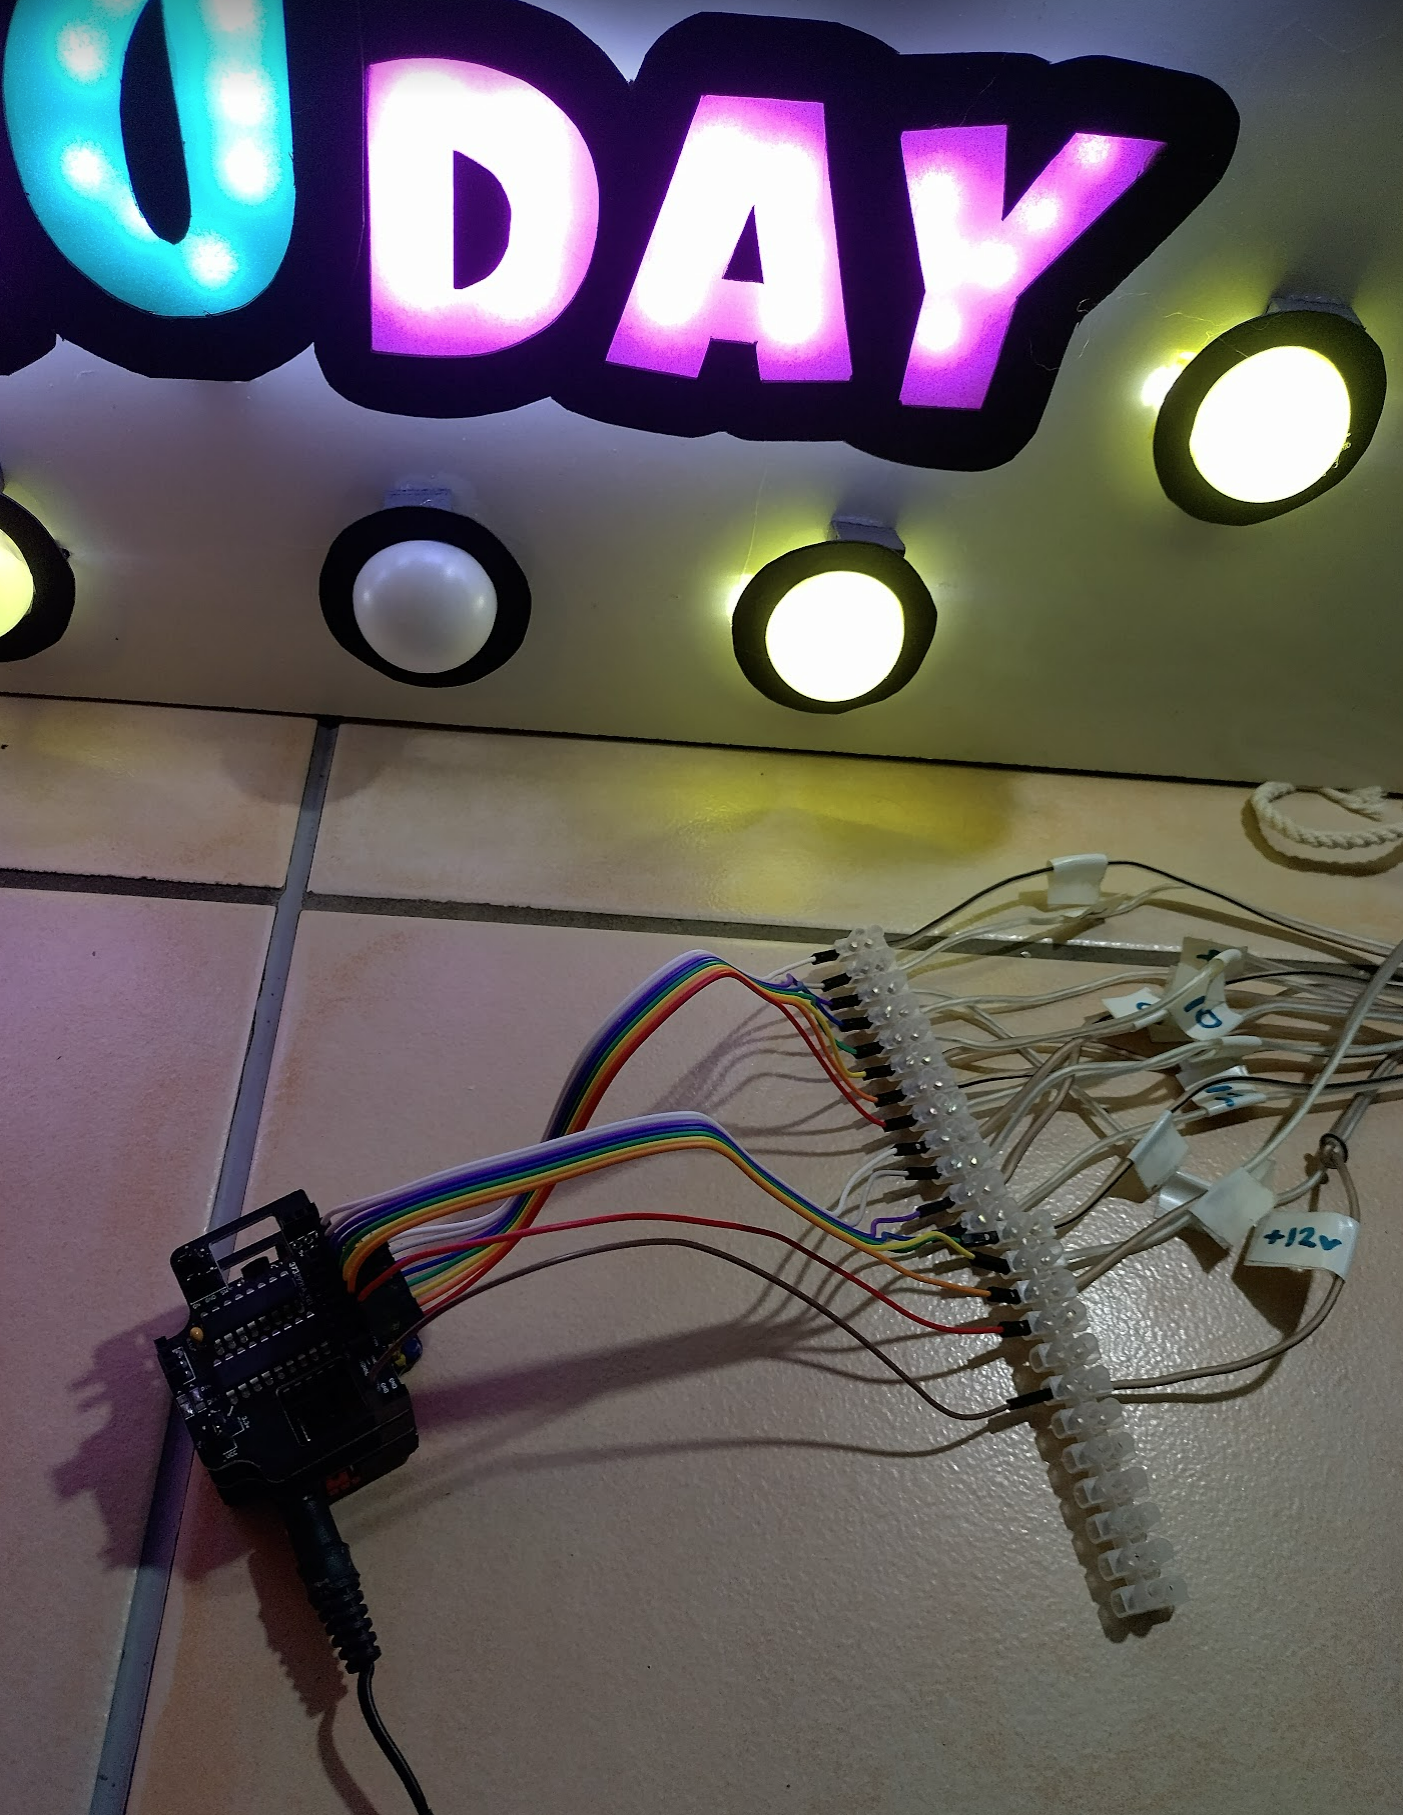
A year has passed and it was time to decide what to do. I had the sign sitting there for 11 months and it took so long to build that it was a shame to not use it. So I decided it would be amusing to add “Again!” to it to get another year out of it.
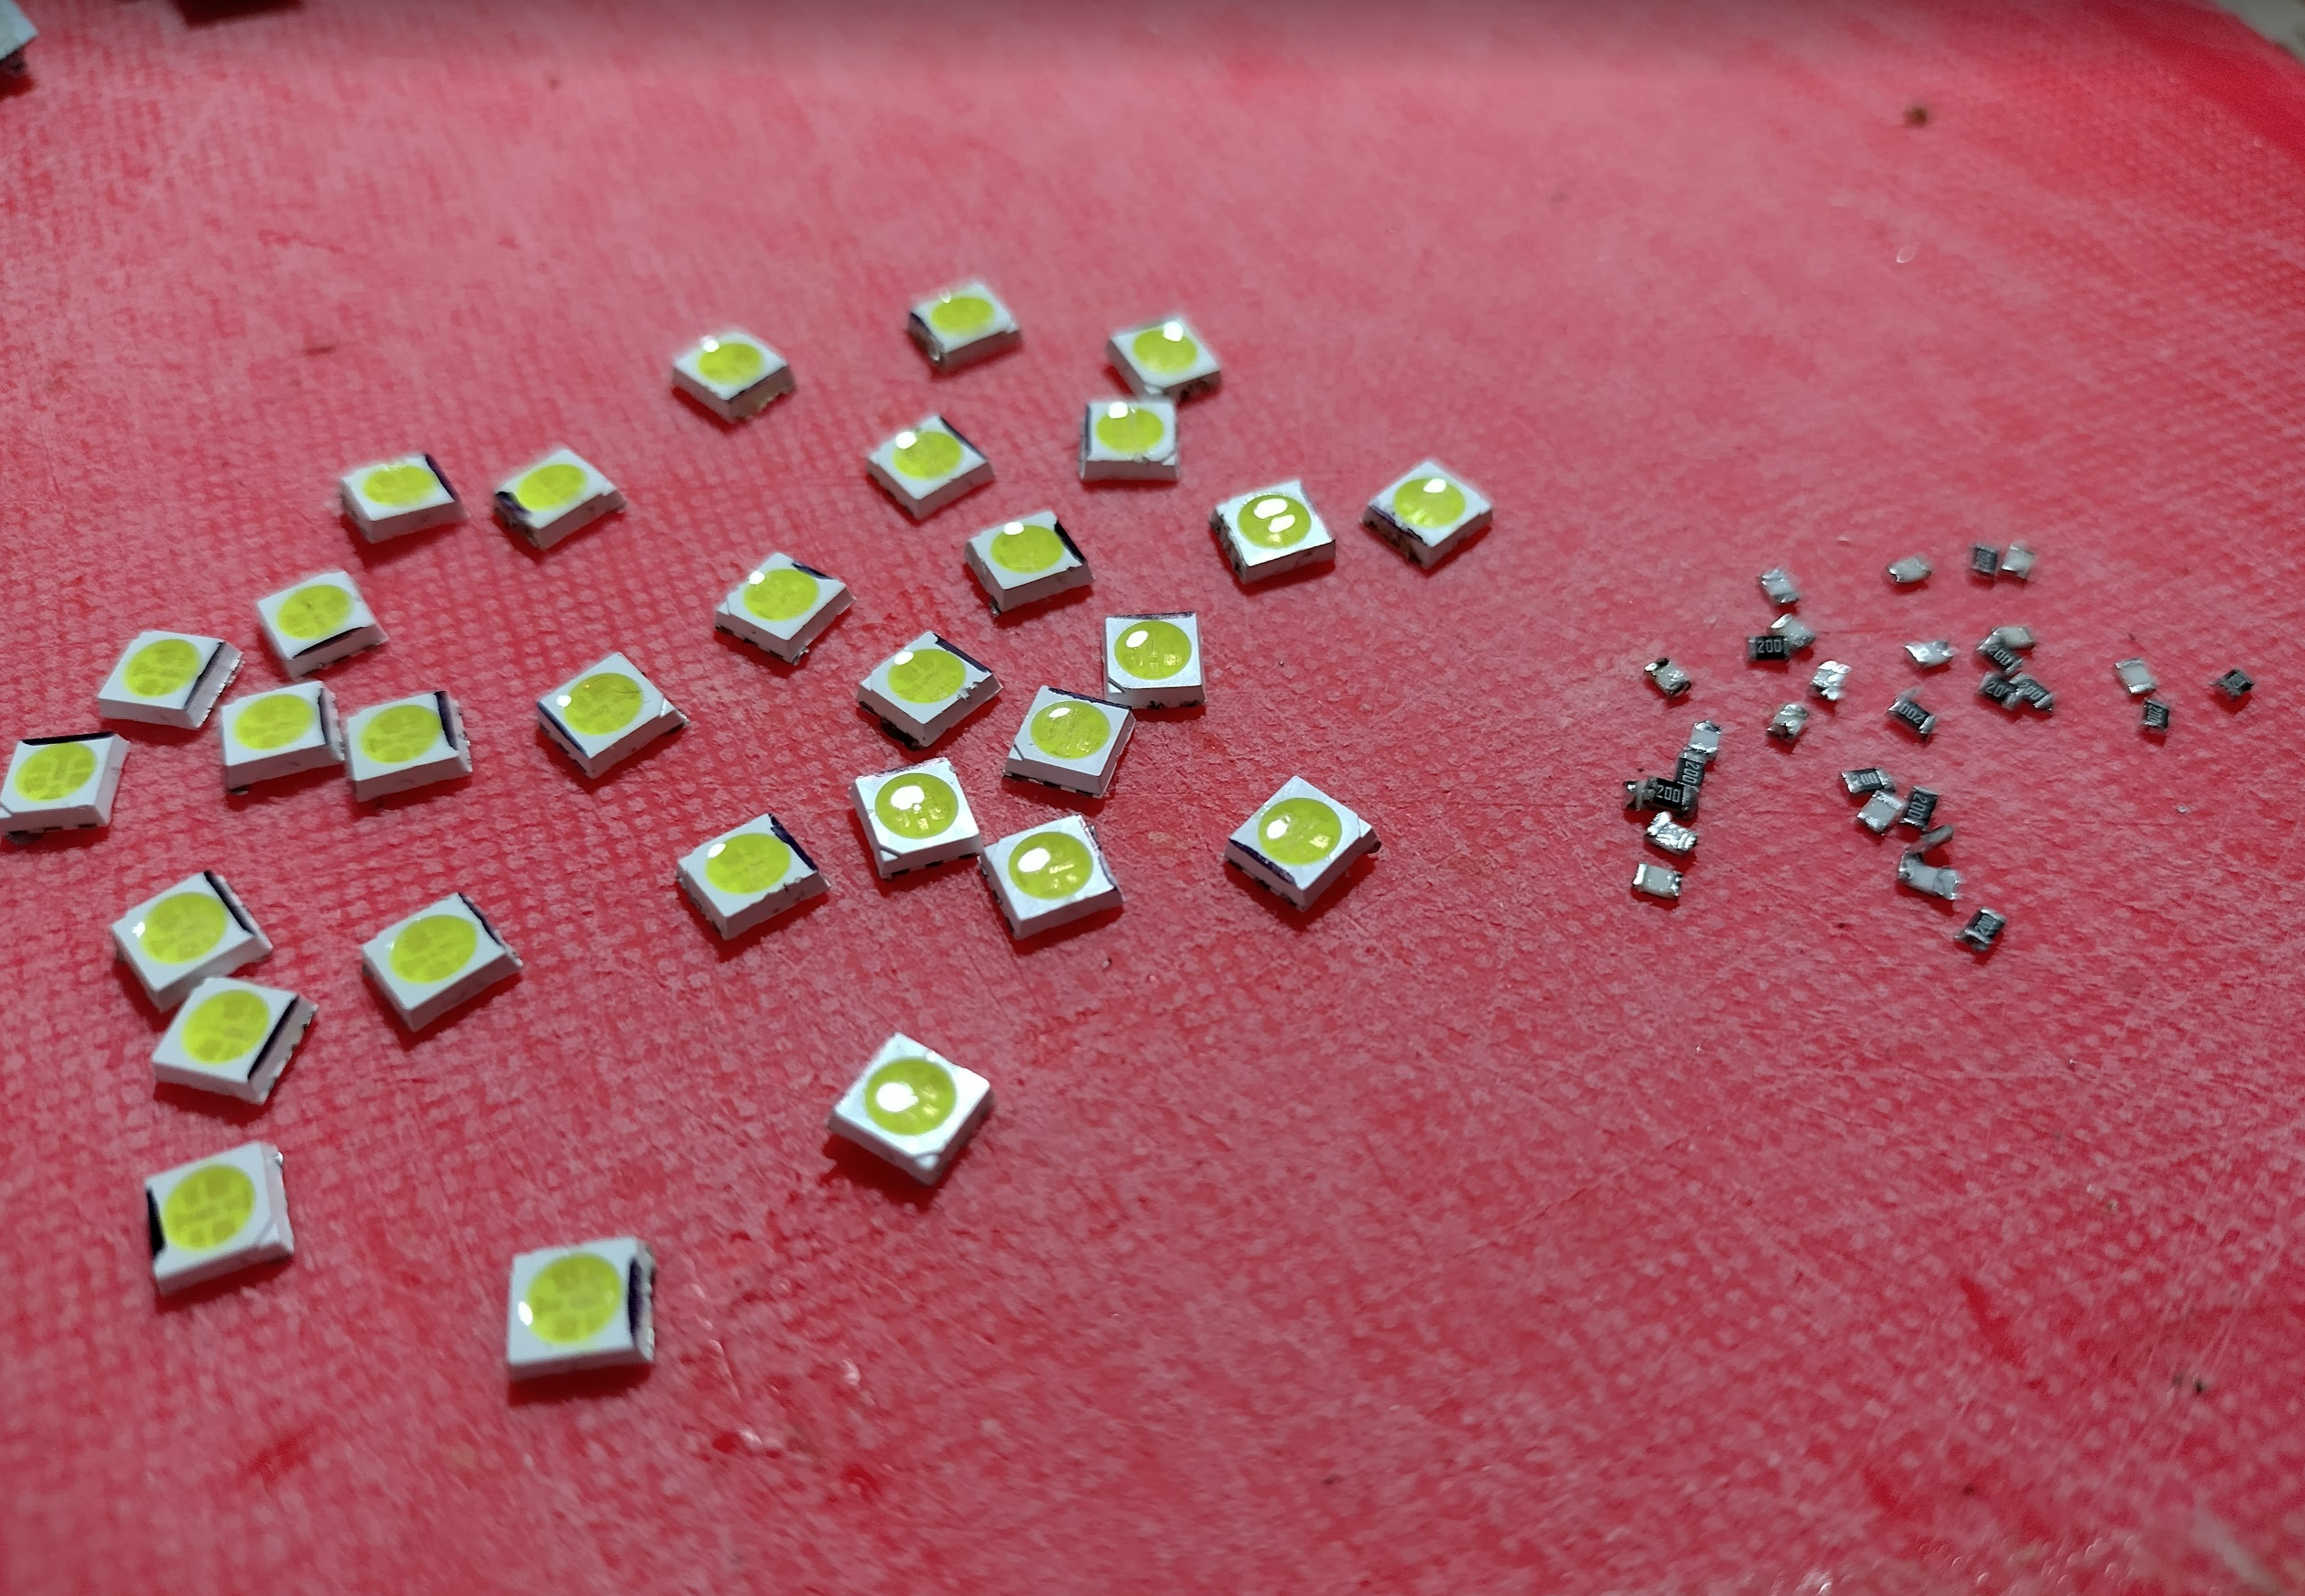
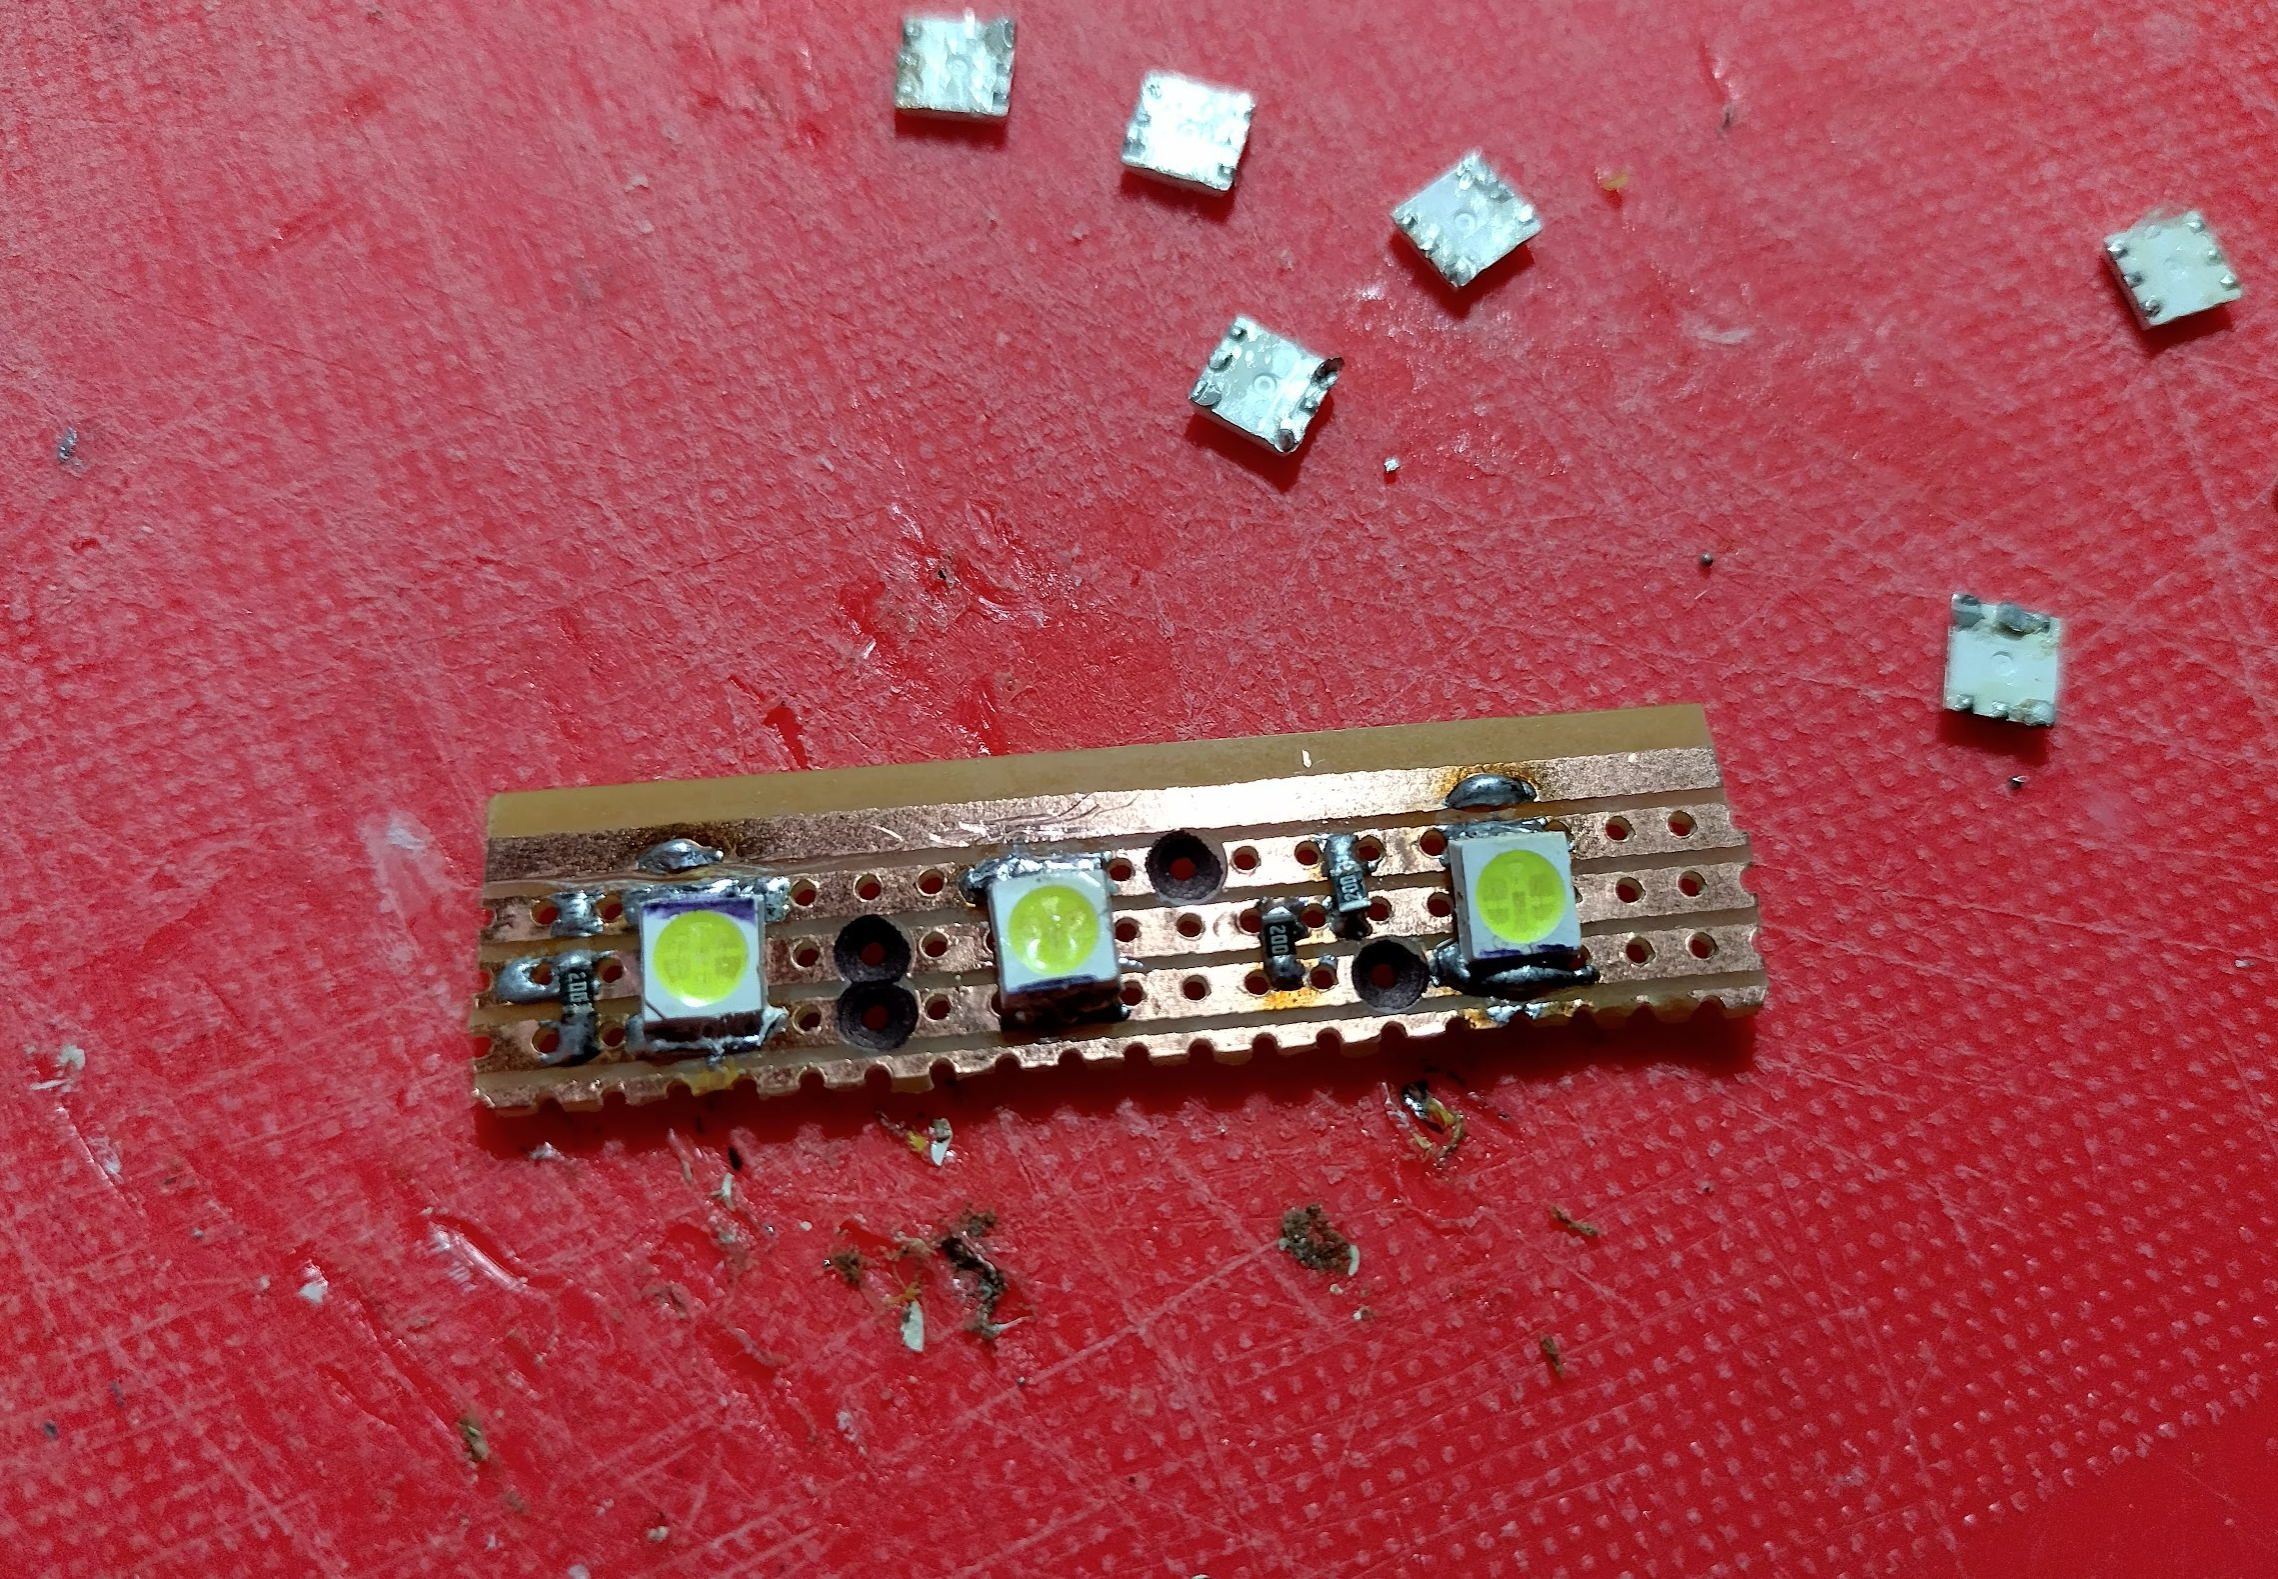
The first question was determining whether I had enough LED strip left. I had 6 working bits of 3 leds, but I calculated I would need probably 11 or 12 strips. I remembered I had mistakenly cut the strip in to segments of 1 and 2 leds which failed, but I kept those pieces. I discovered they couldn’t just be soldered back together as they are layered with a thin plastic membrane between the layers which dissolved when soldering.
I figured out the leds must be connected in series with a resistor each, with a white led being around 3v. This would make each 3 LED segment a simple 12v strip. Next best option – could I make my own DIY led strip segments?

With all the pieces ready its over to making the strip part out of veroboard. I worked out a way to do it with just 3 tracks and some careful drillouts. It doesn’t keep the led polarity the same throughout but it’ll do for this.
The initial one isn’t pretty or easy to do, but it worked! Time to make enough to see if I can succeed with this project without buying more LED strip.
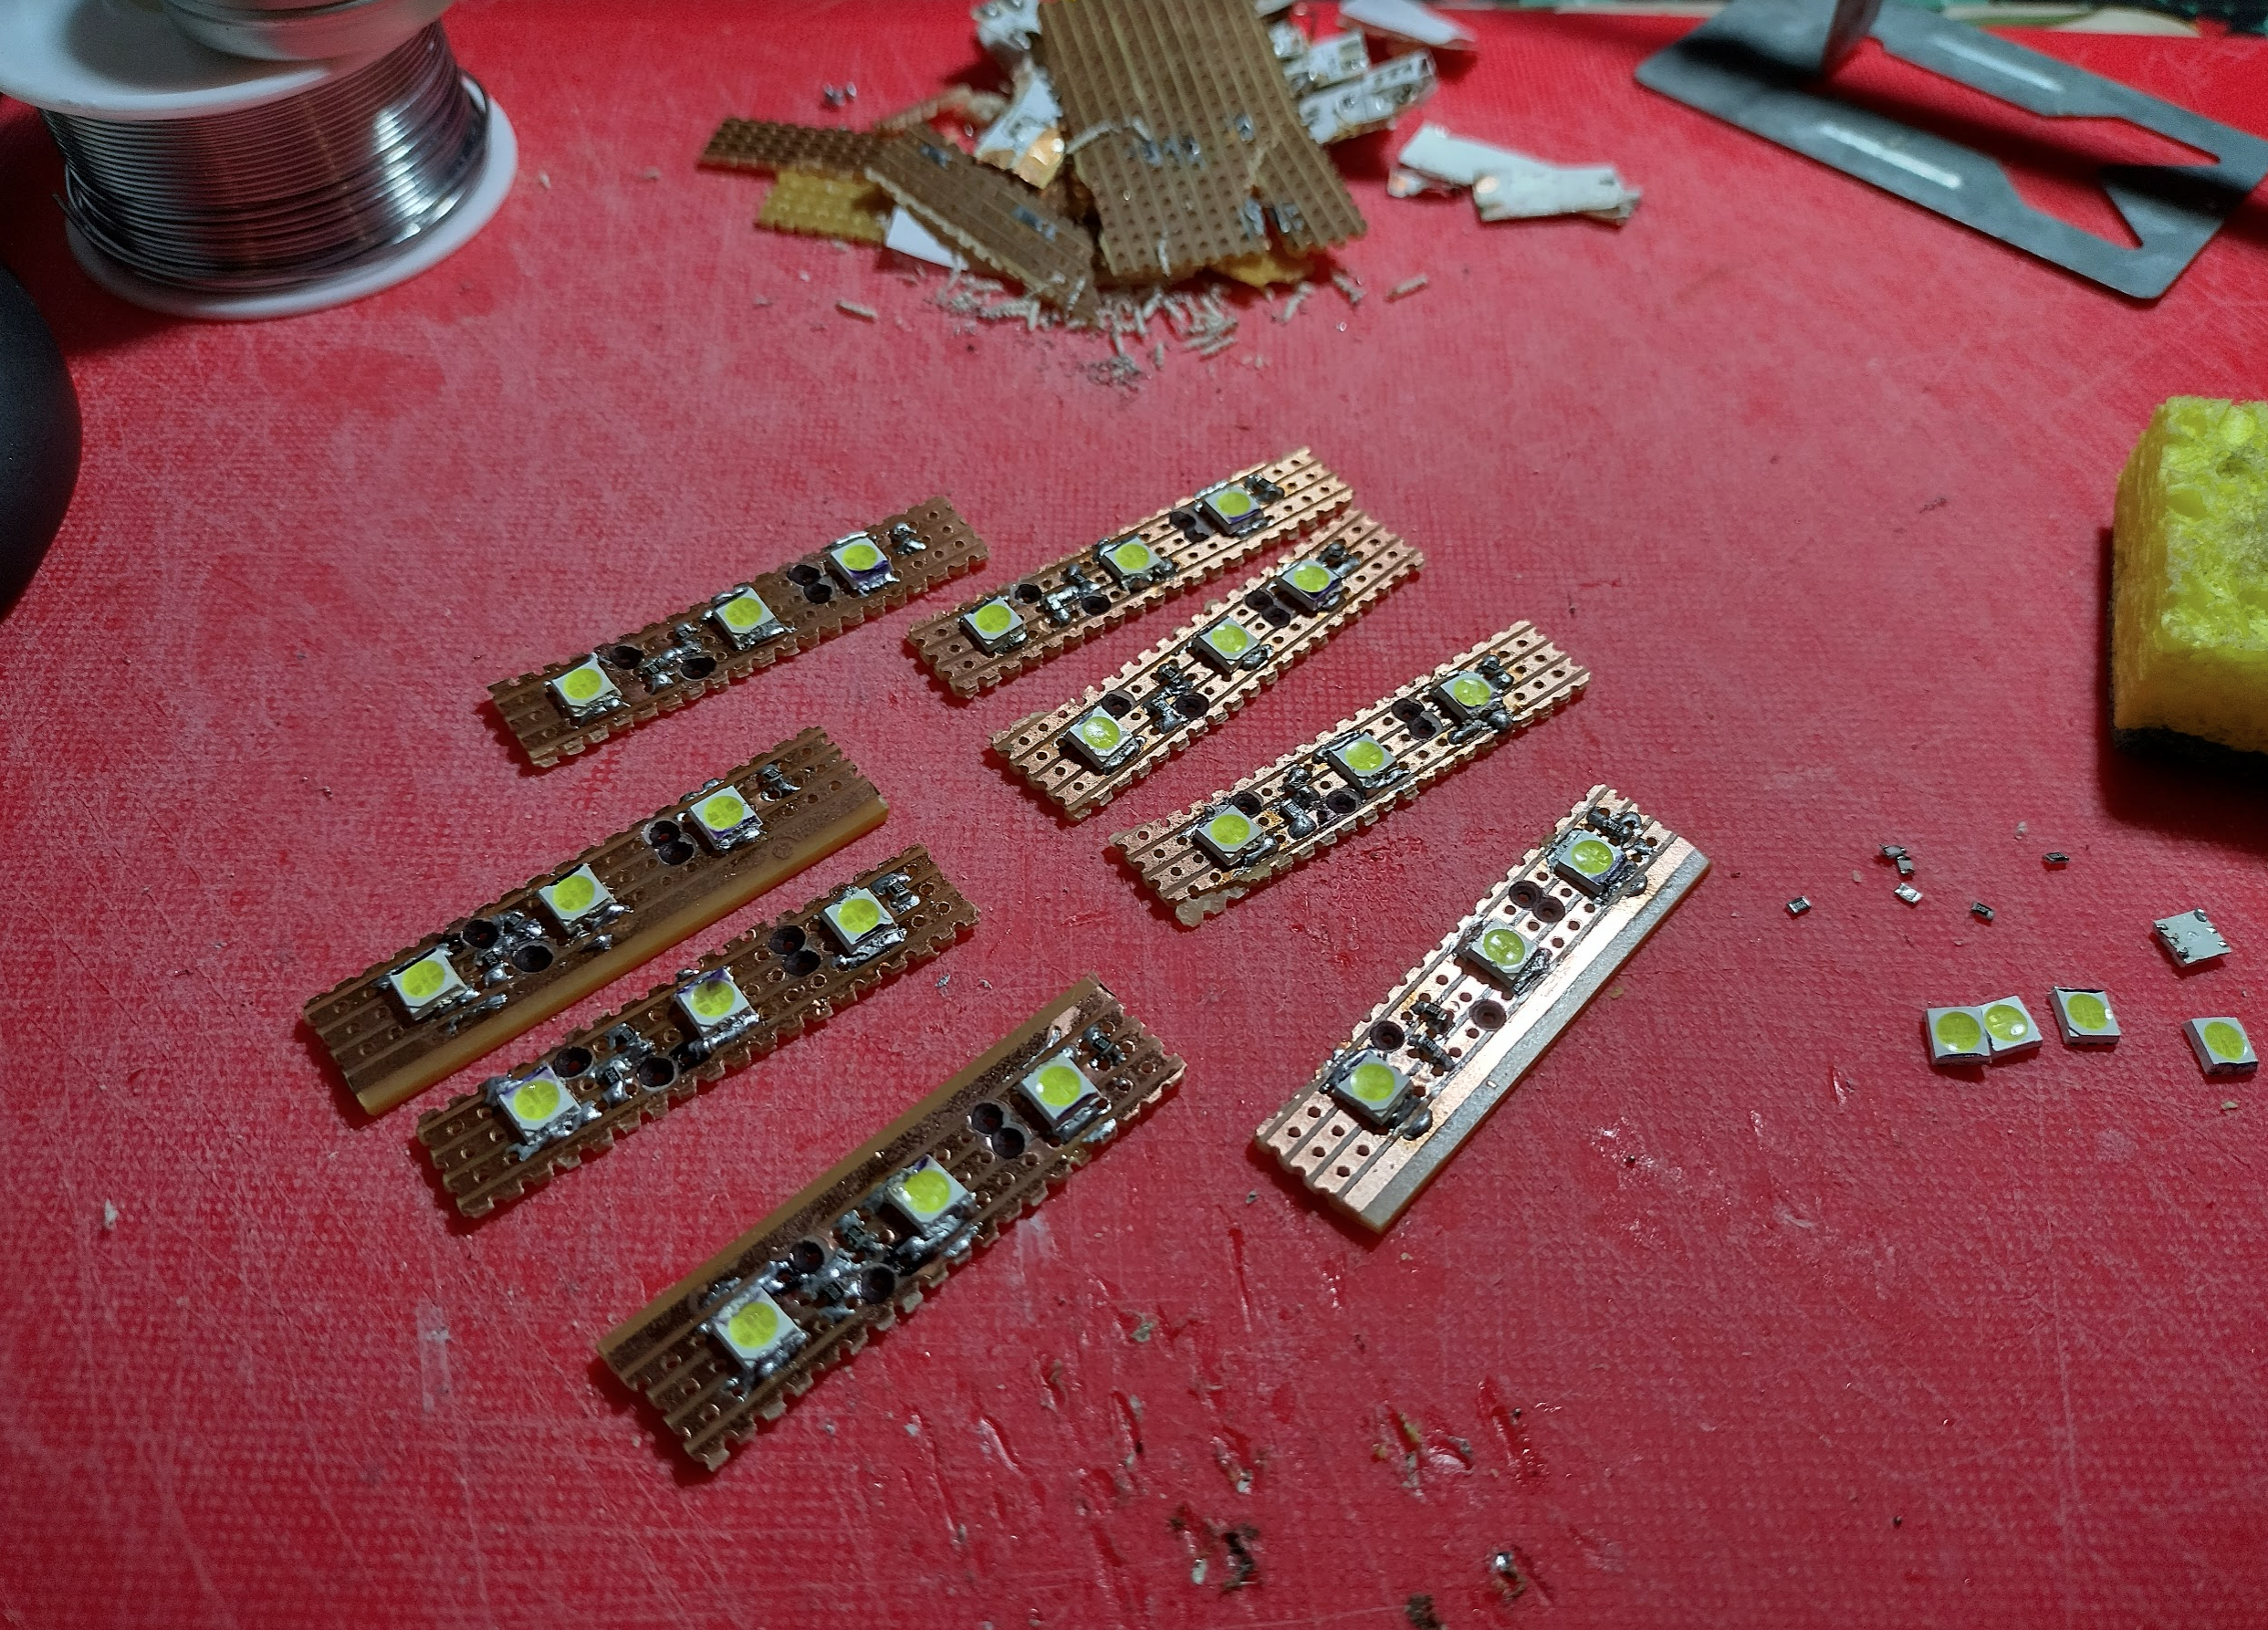
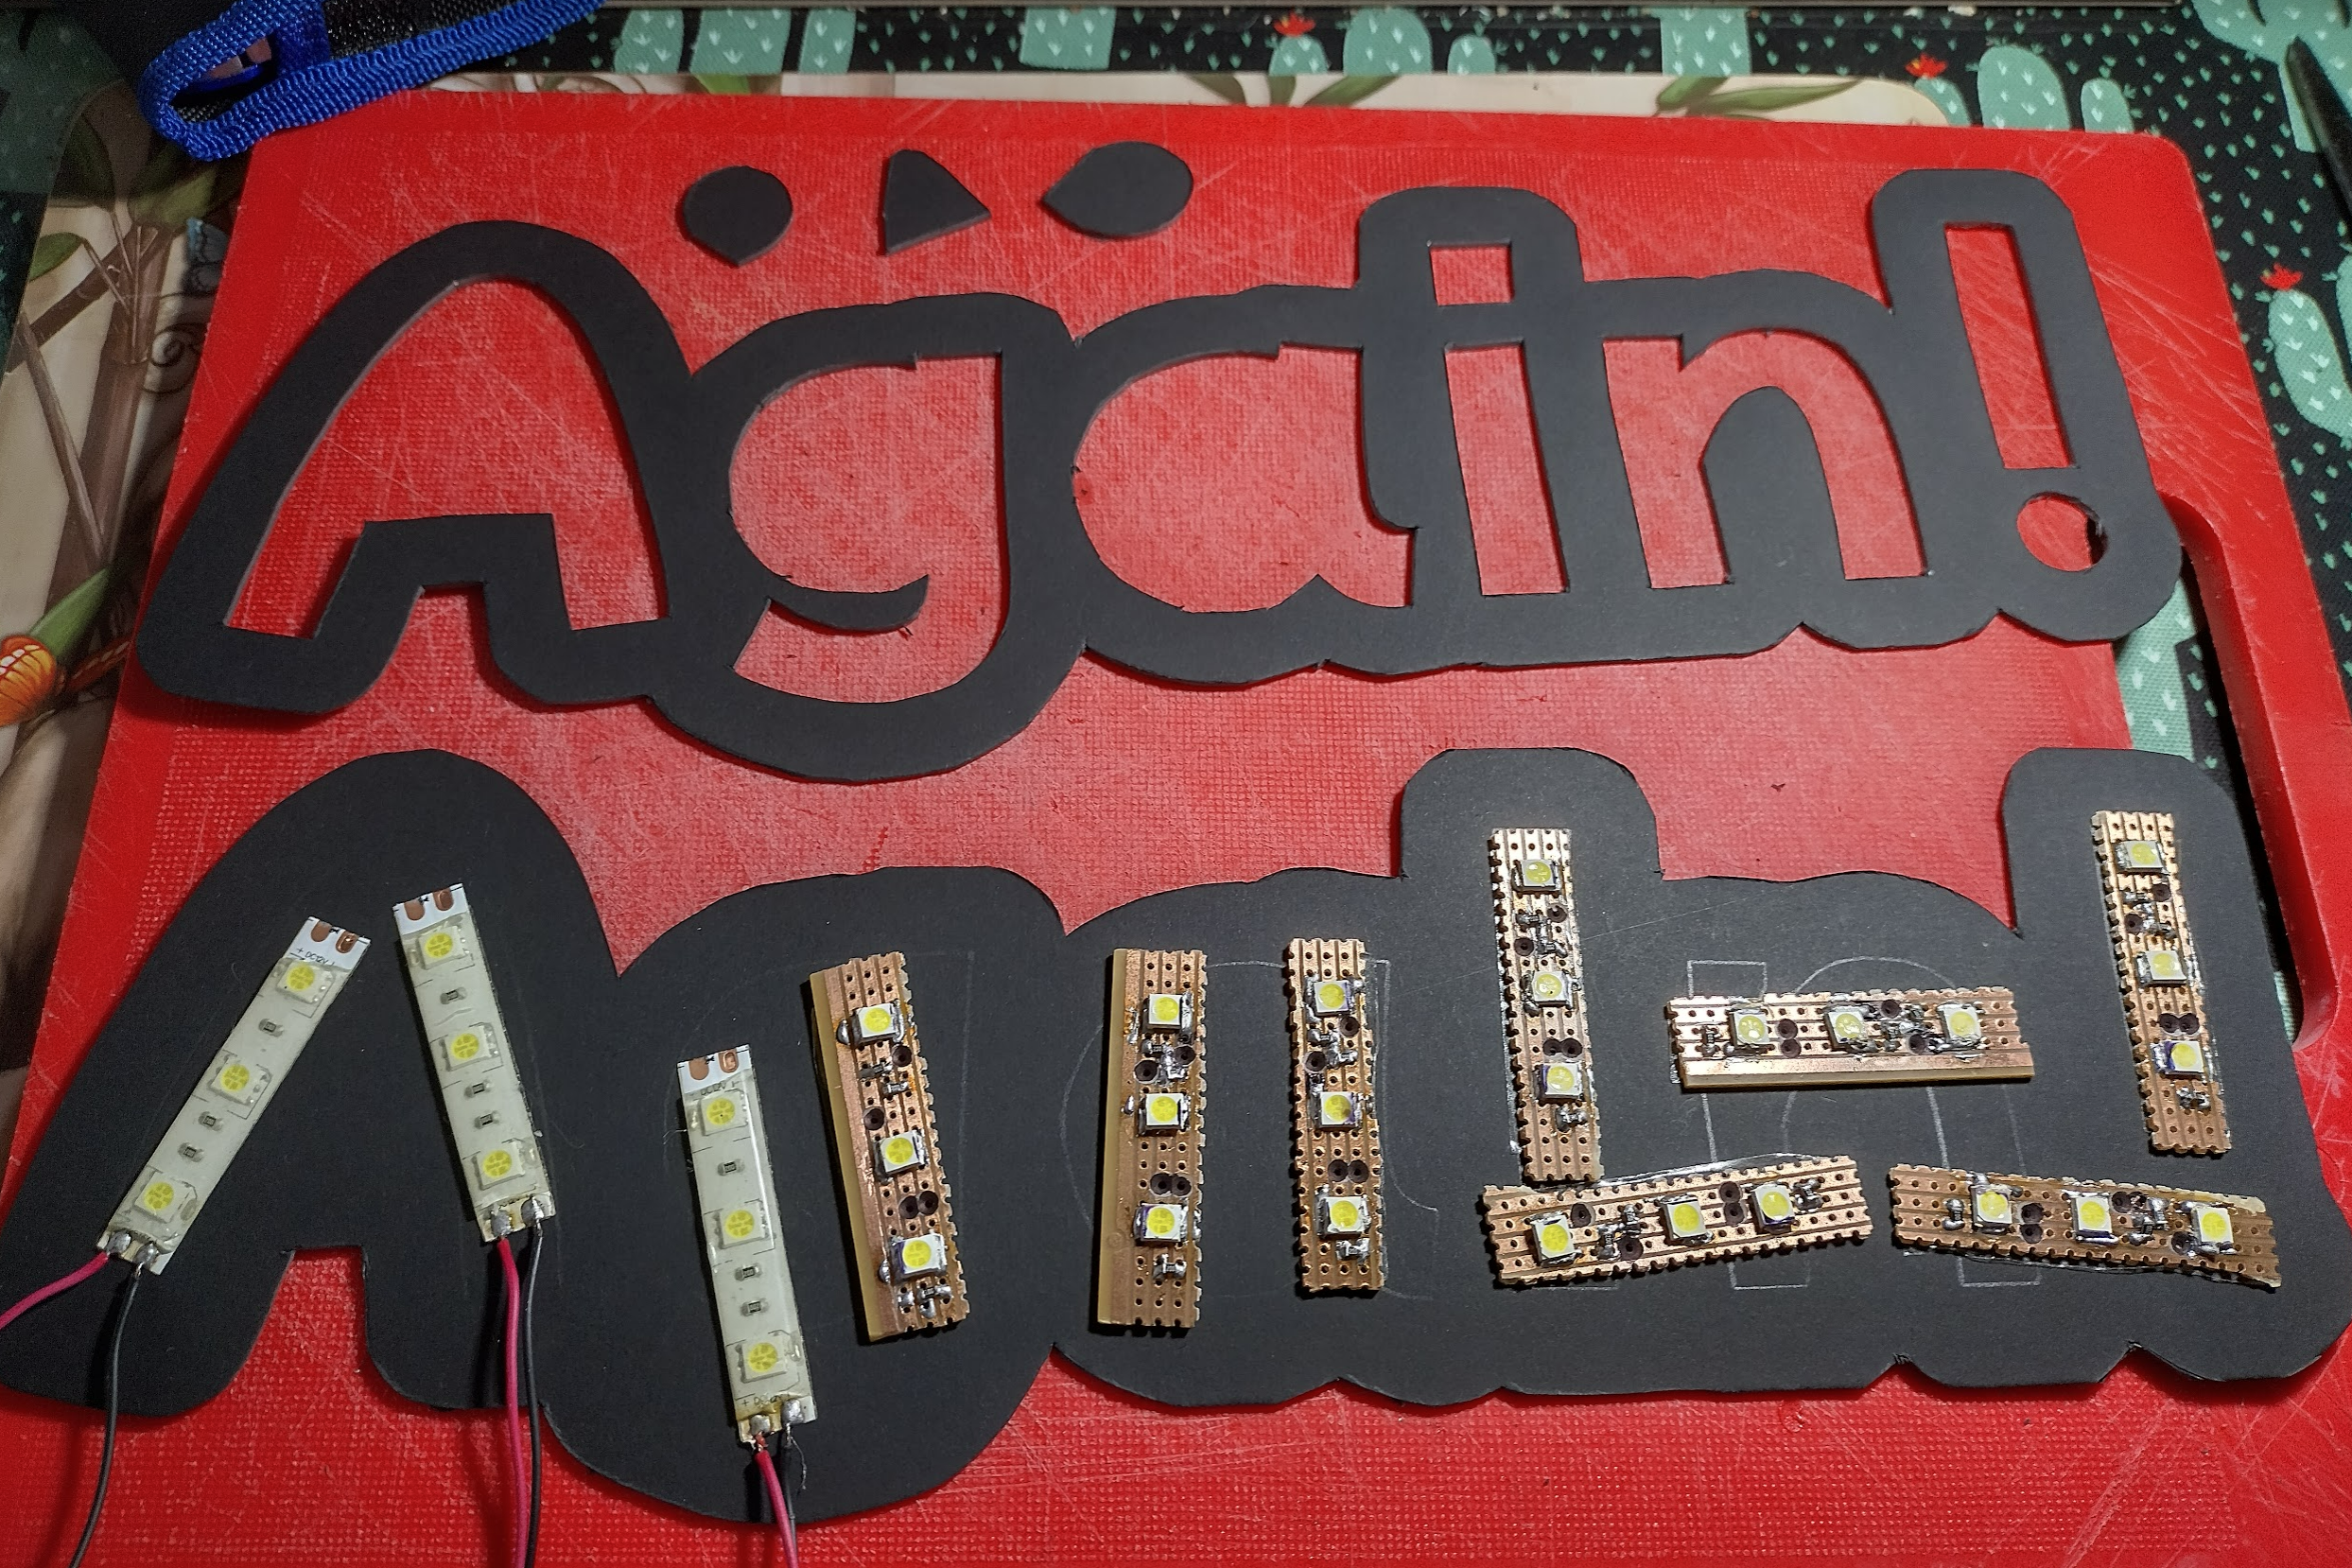
I now have enough LED strip segments rescued from the grave, with some unfortunate veroboard accidents in the background. So this project might actually work. On to the wording. This was done the same way as the original wording, scaled, printed, cut from black card stock.

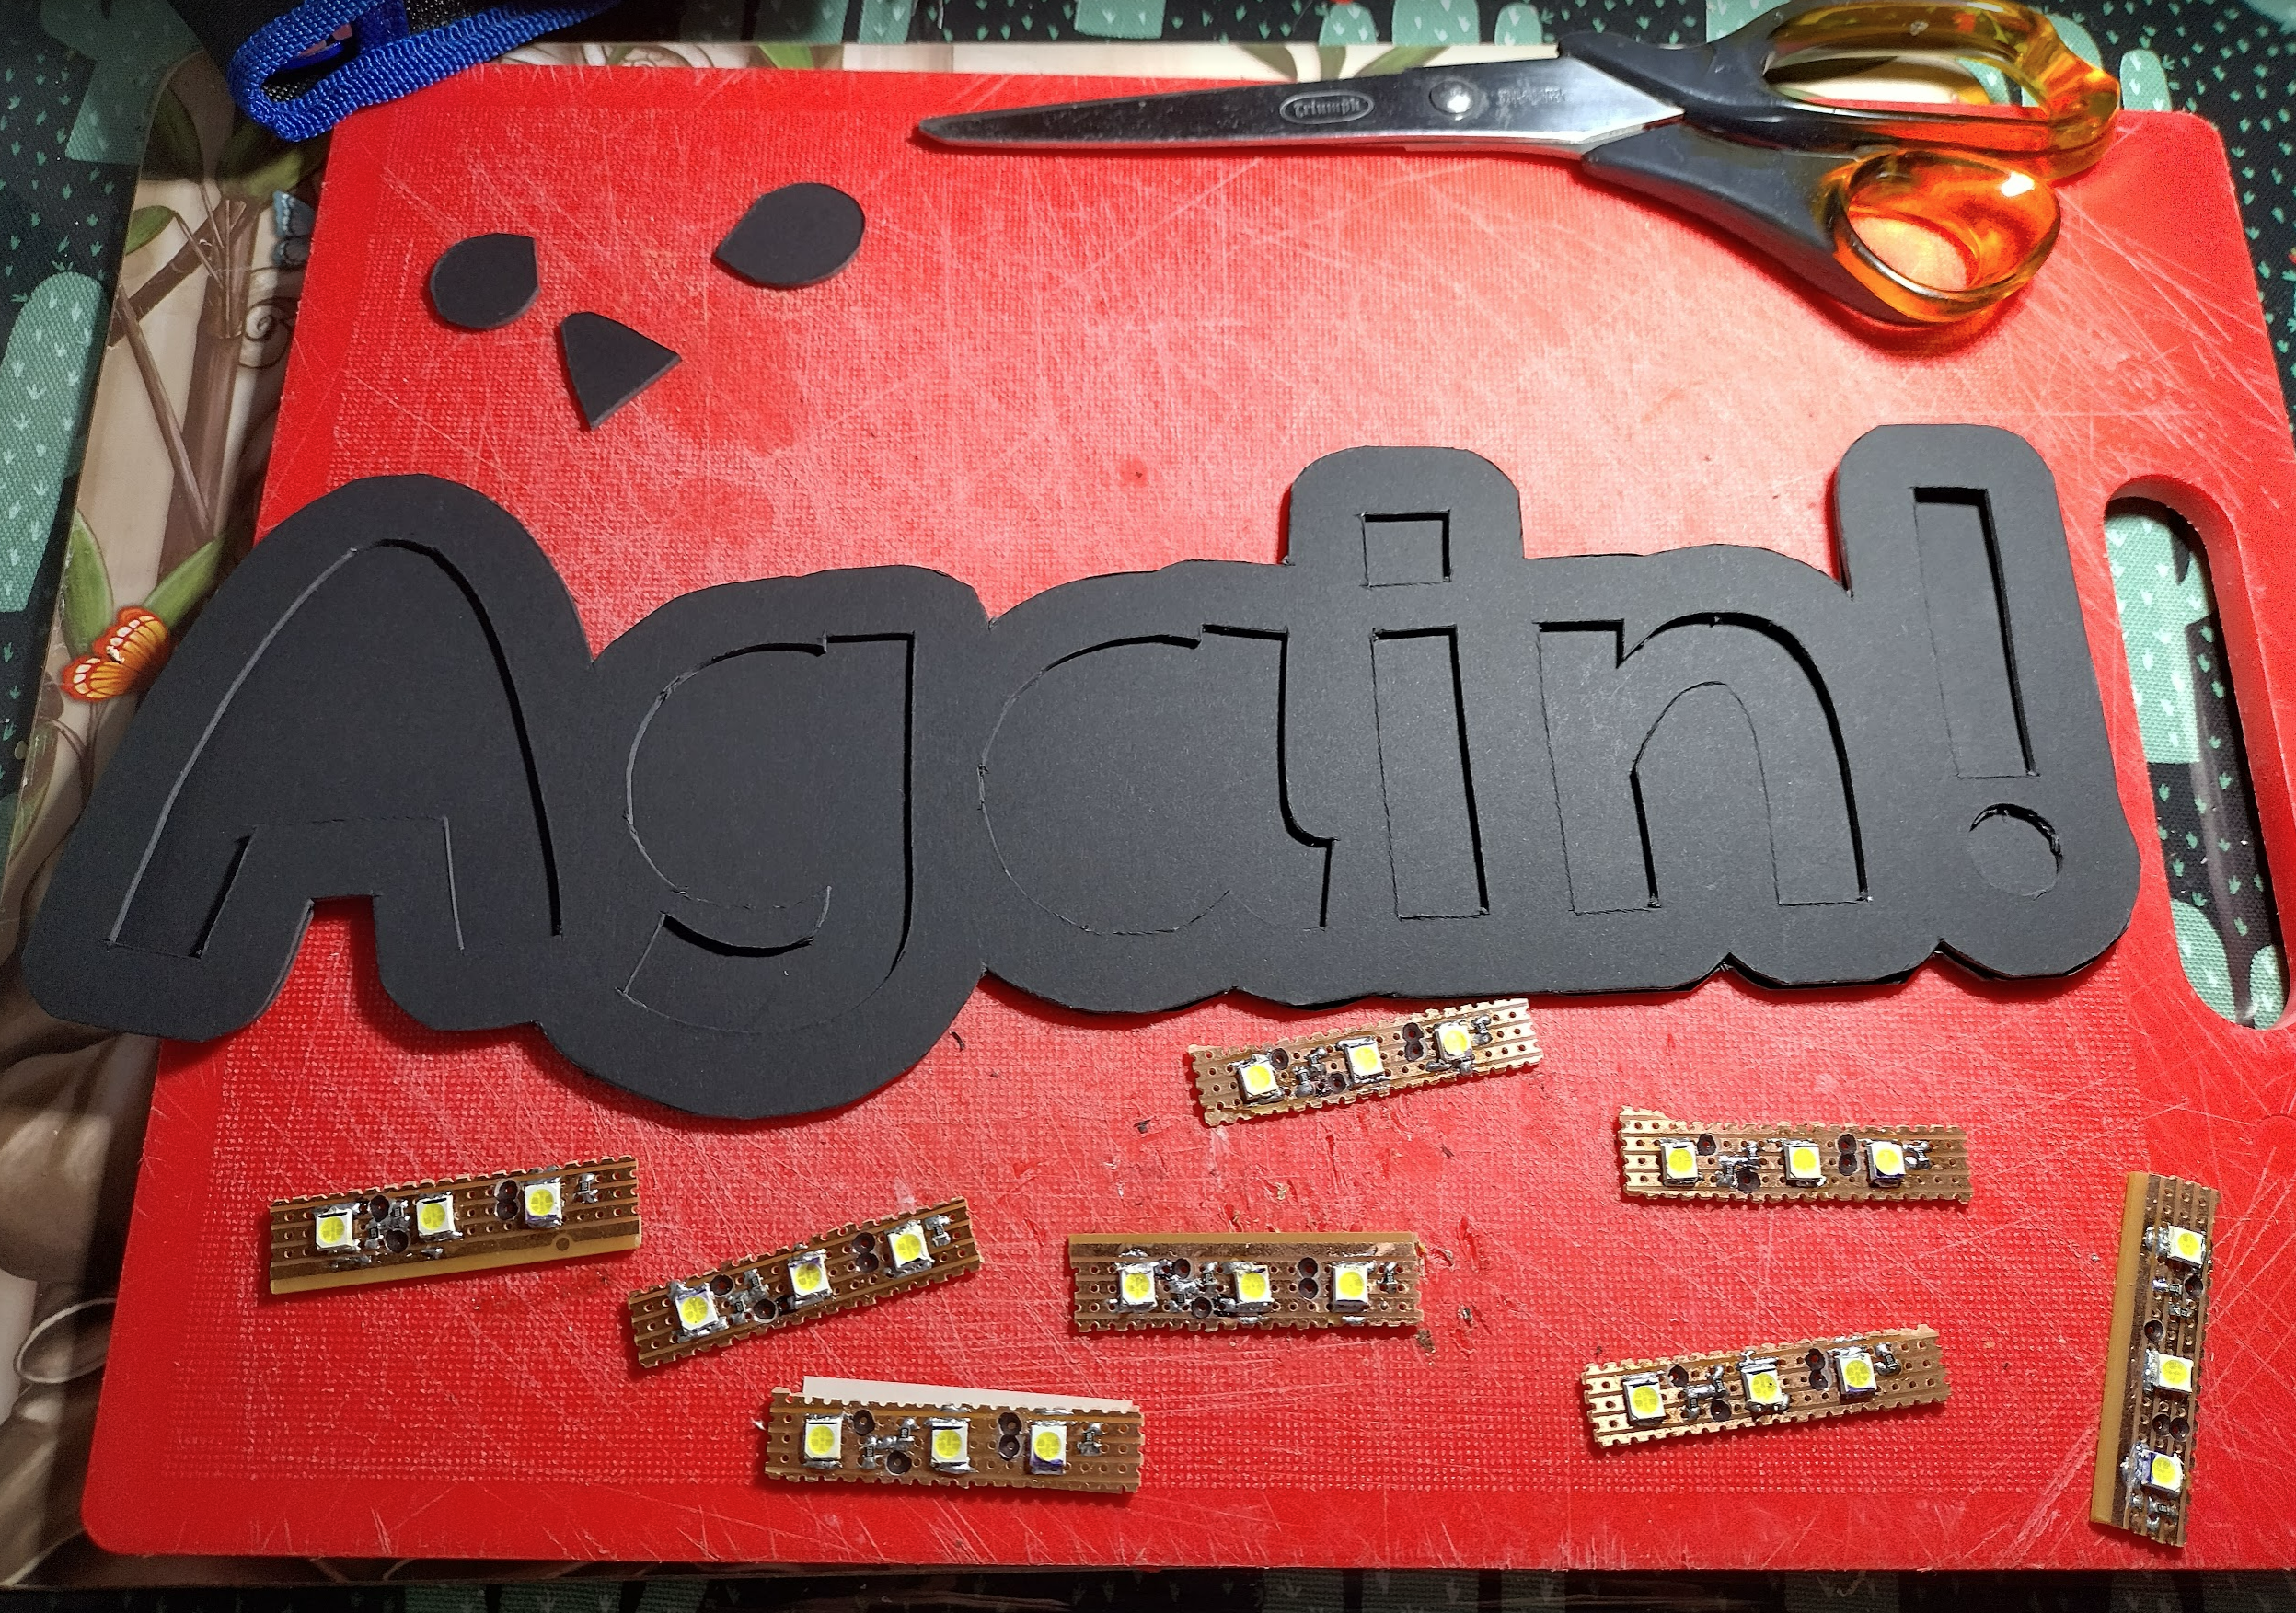
The “Again!” is a little different to the original in that it will sit above the board, like a sticker stuck on top of the original sign. So it needed its own back card whereas the original words were stuck directly to the board. TIme to arrange these segments.

Still on track for a success. So now to choose a colour for this. I had already used teal, pink, and yellow. The only other colour different enough was green. I ended up going towards a lime green by mixing two greens and a yellow.

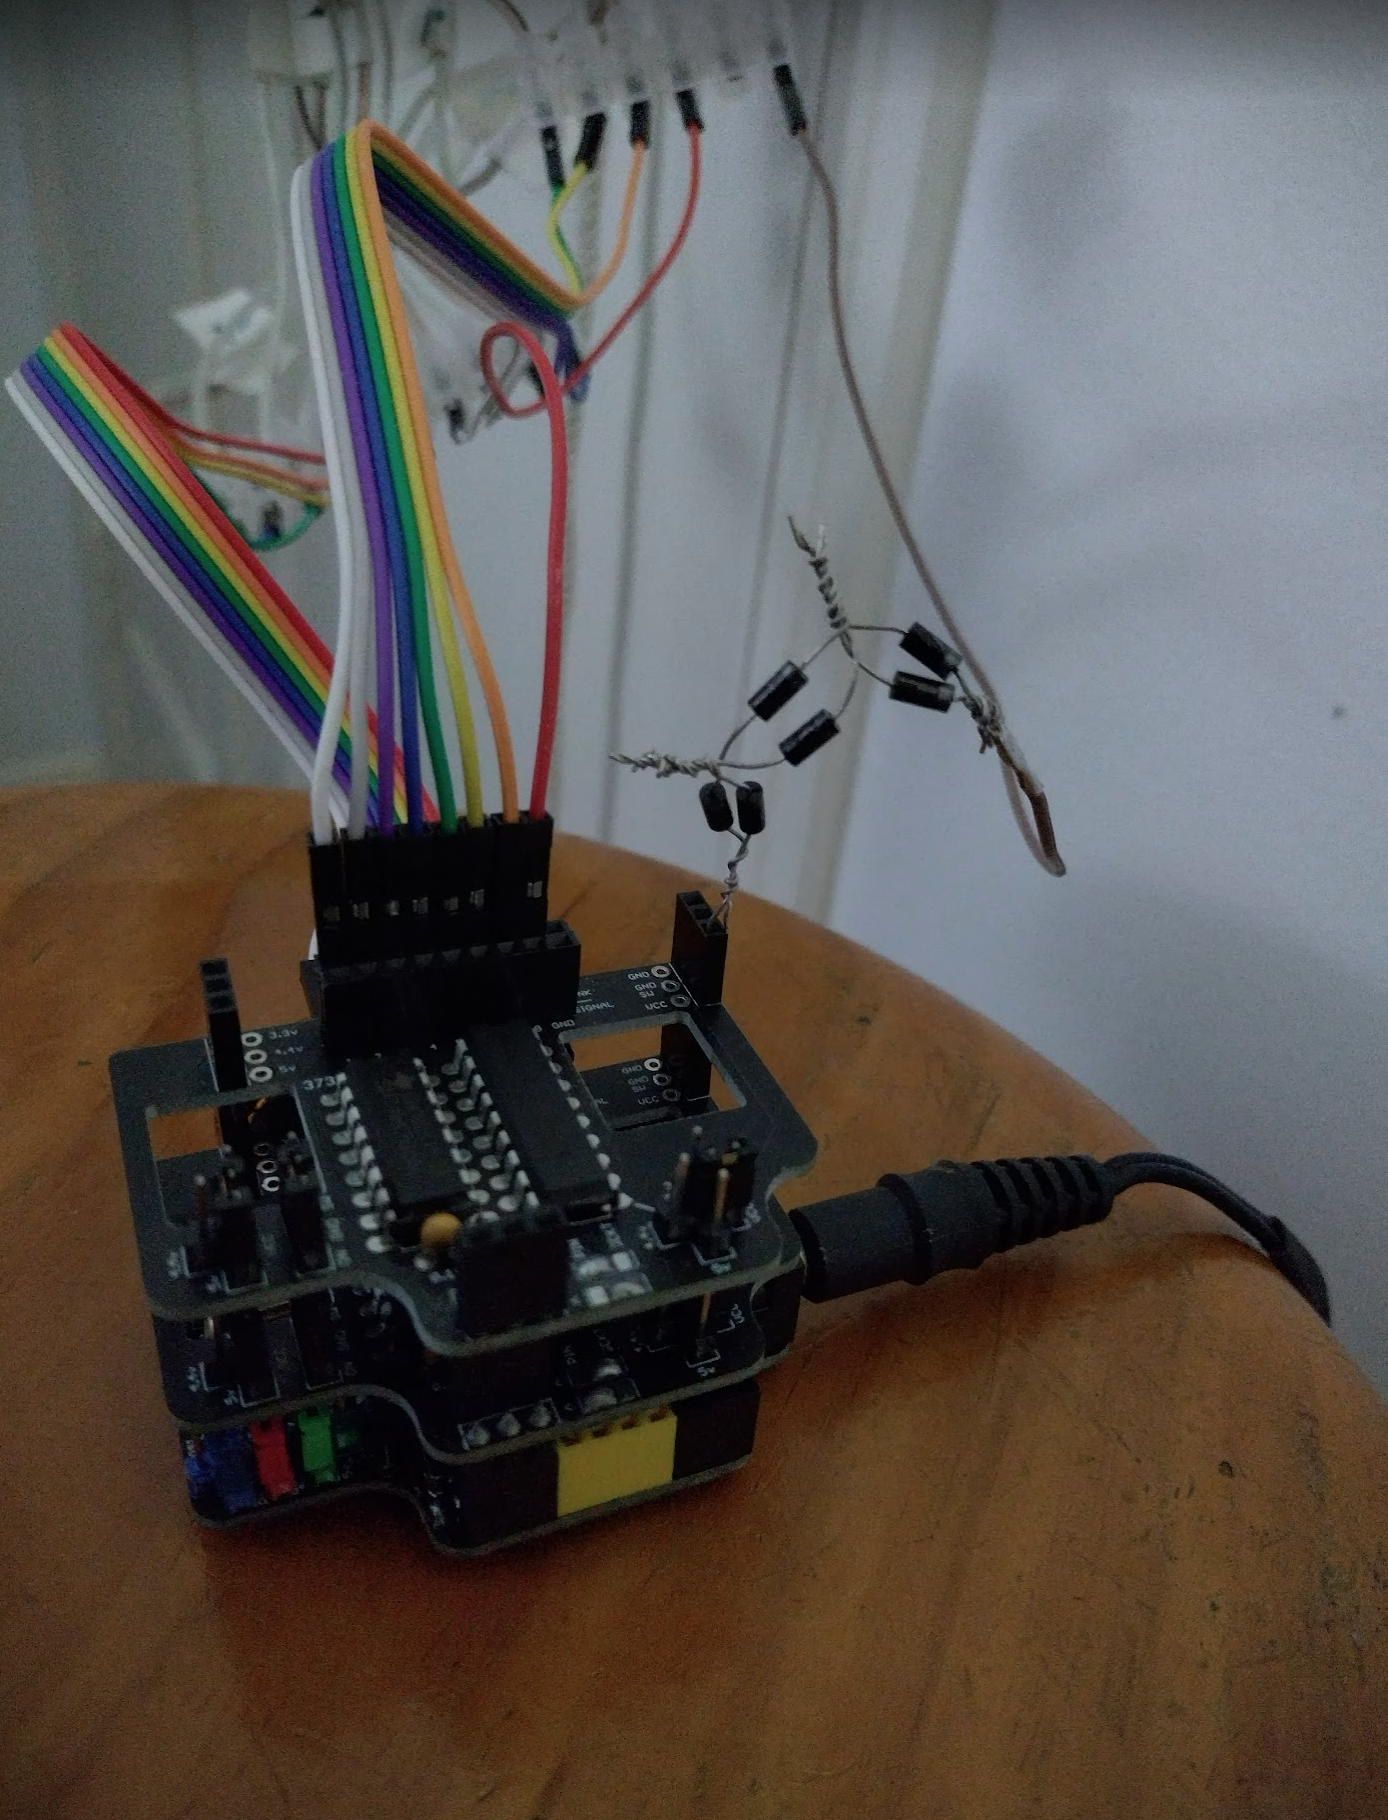
Then it was over to see if the original sign still worked, as I now have the new ResourciBoard and I can power it all without using MOSFETs in theory. This will make all the electronics MUCH cleaner than last year.
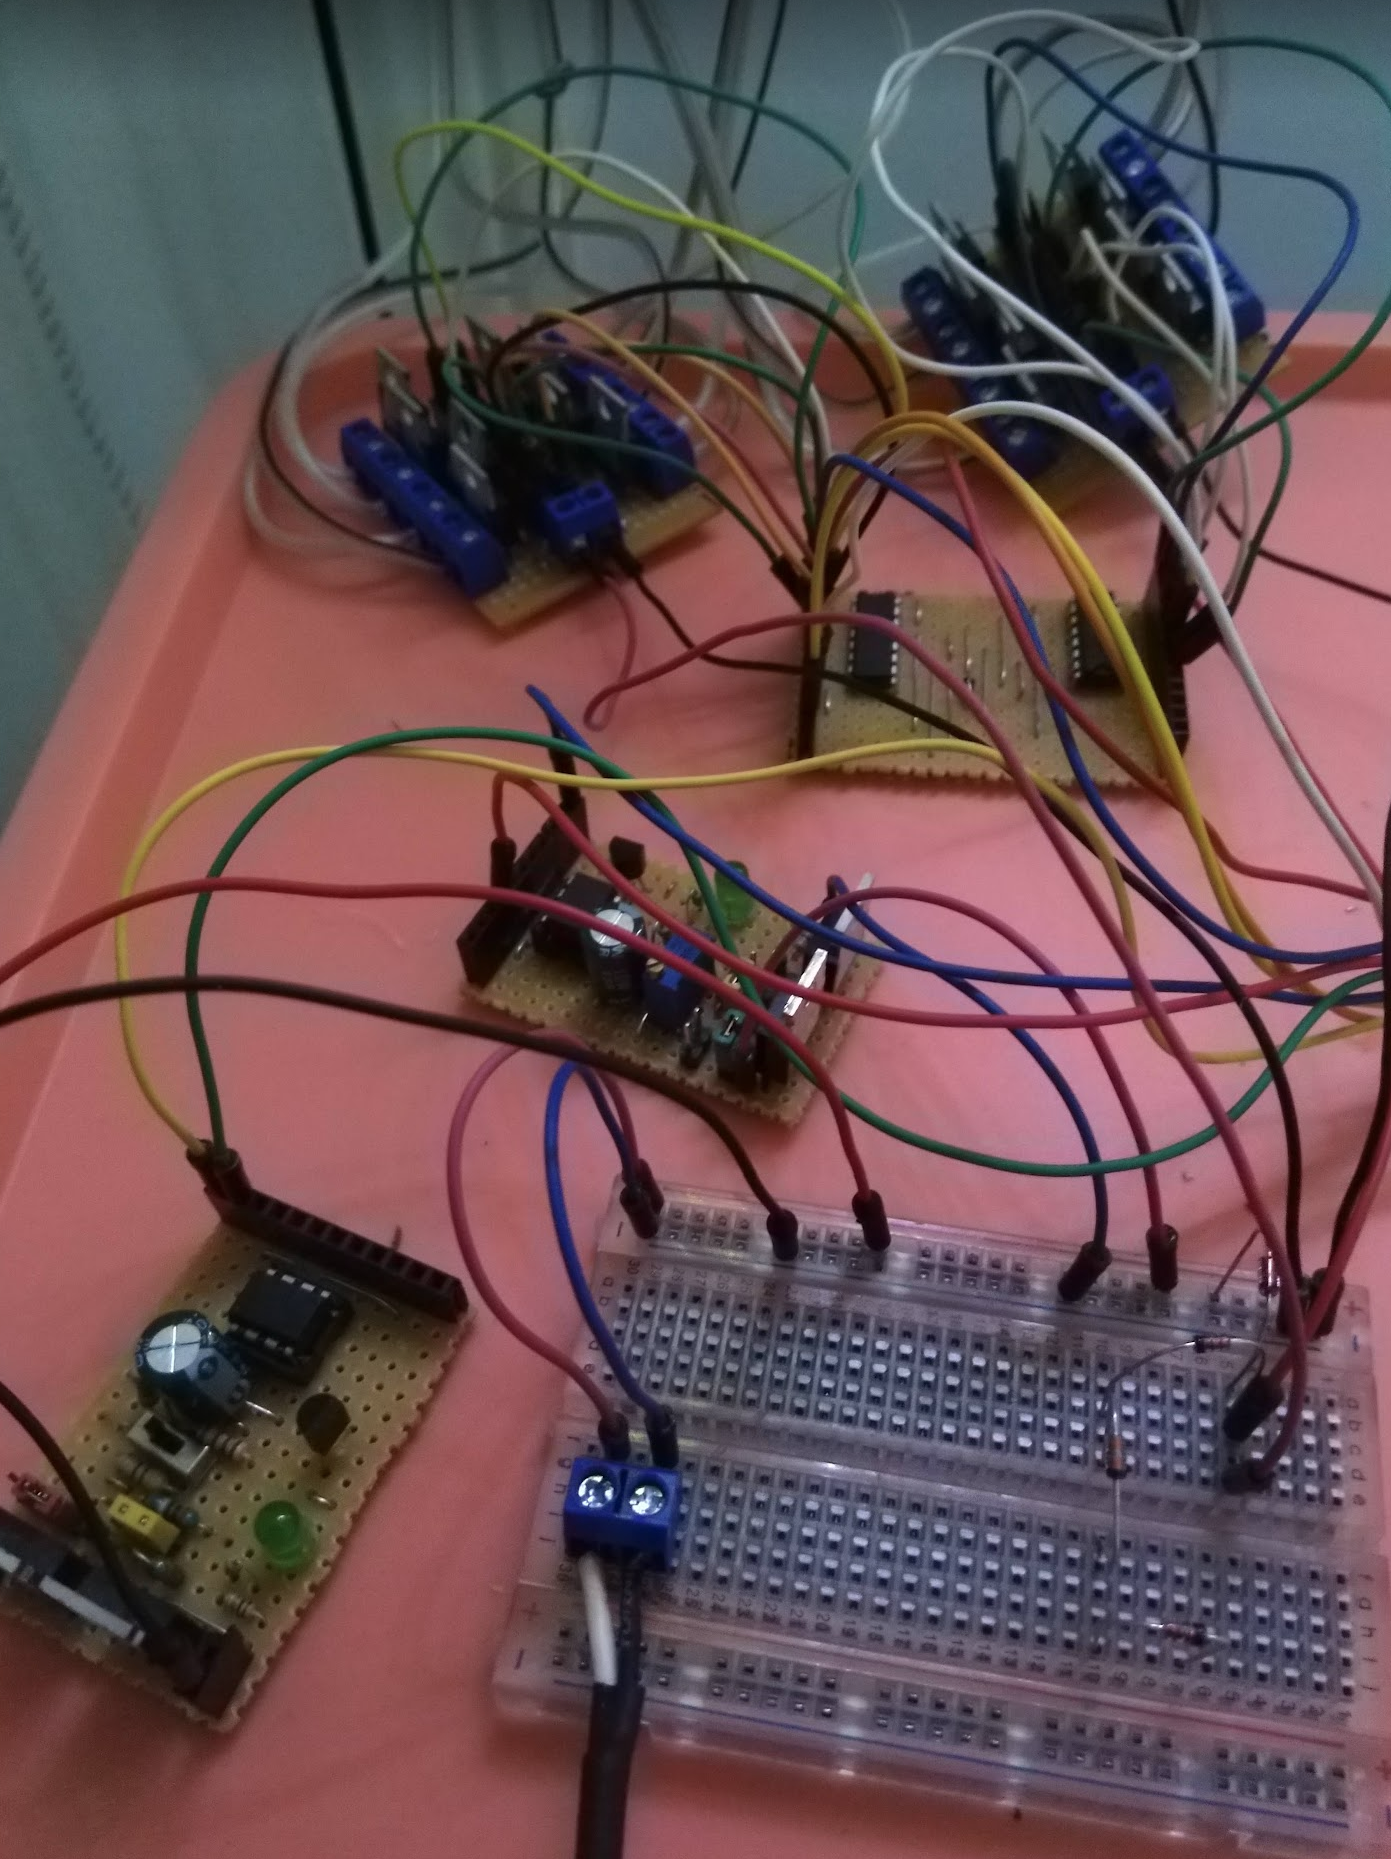
After that it was a matter of running an extra wire for the 16th channel that was unused last year, doing a lot of code fixes as now we’re using a separate BIOS chip rather than all within the single ATTiny85 like last time. Then gluing it all together.
Looking good! It was a bit glitchy at times but worked, and just had to come up with some new patterns. Here’s the resulting pattern code which is far more detailed and impressive than last year:
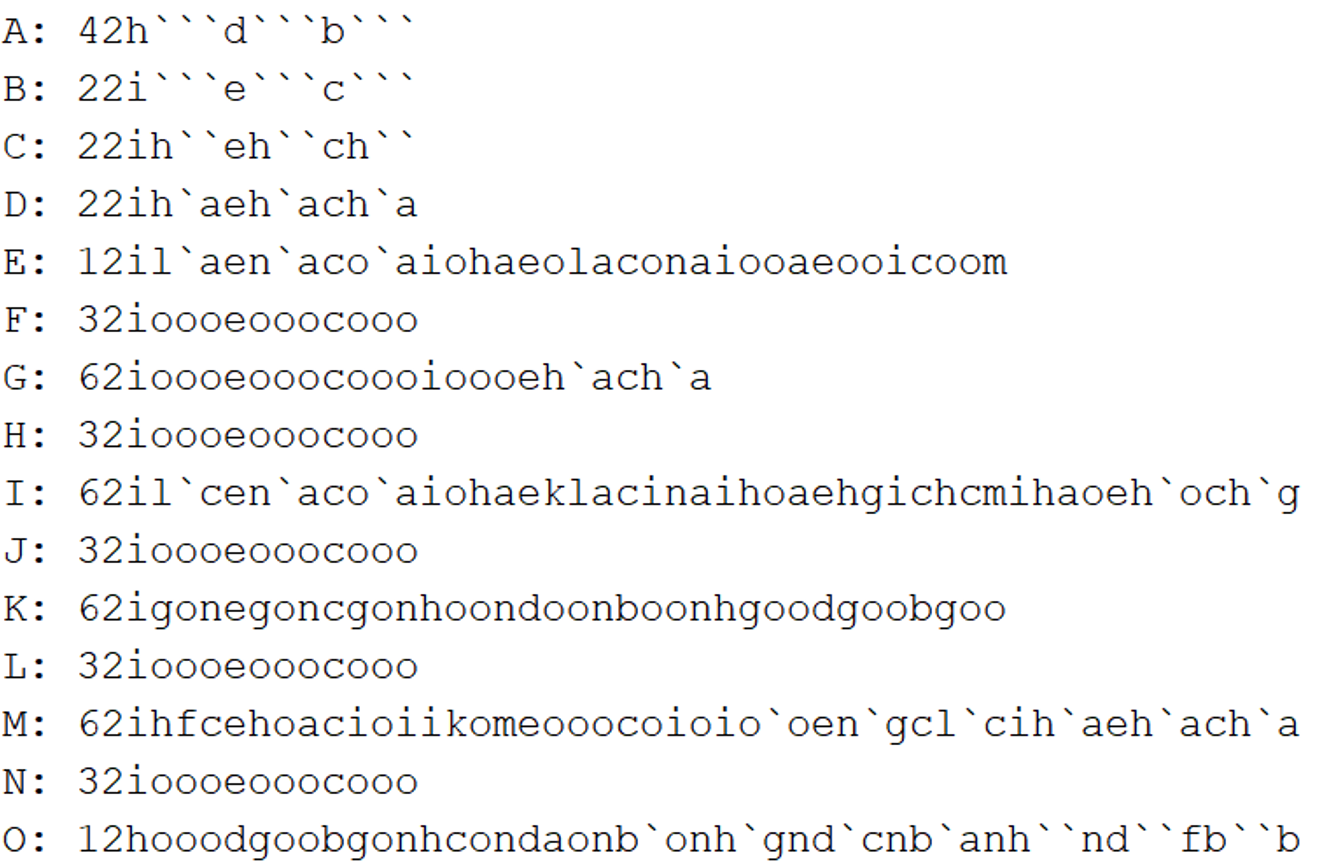
This was as much as I could fit in to the BIOS as there’s only 512 bytes, including a memory map. It gave me a few decent sequences. Then with a few cleanups and a bit more testing it was ready.
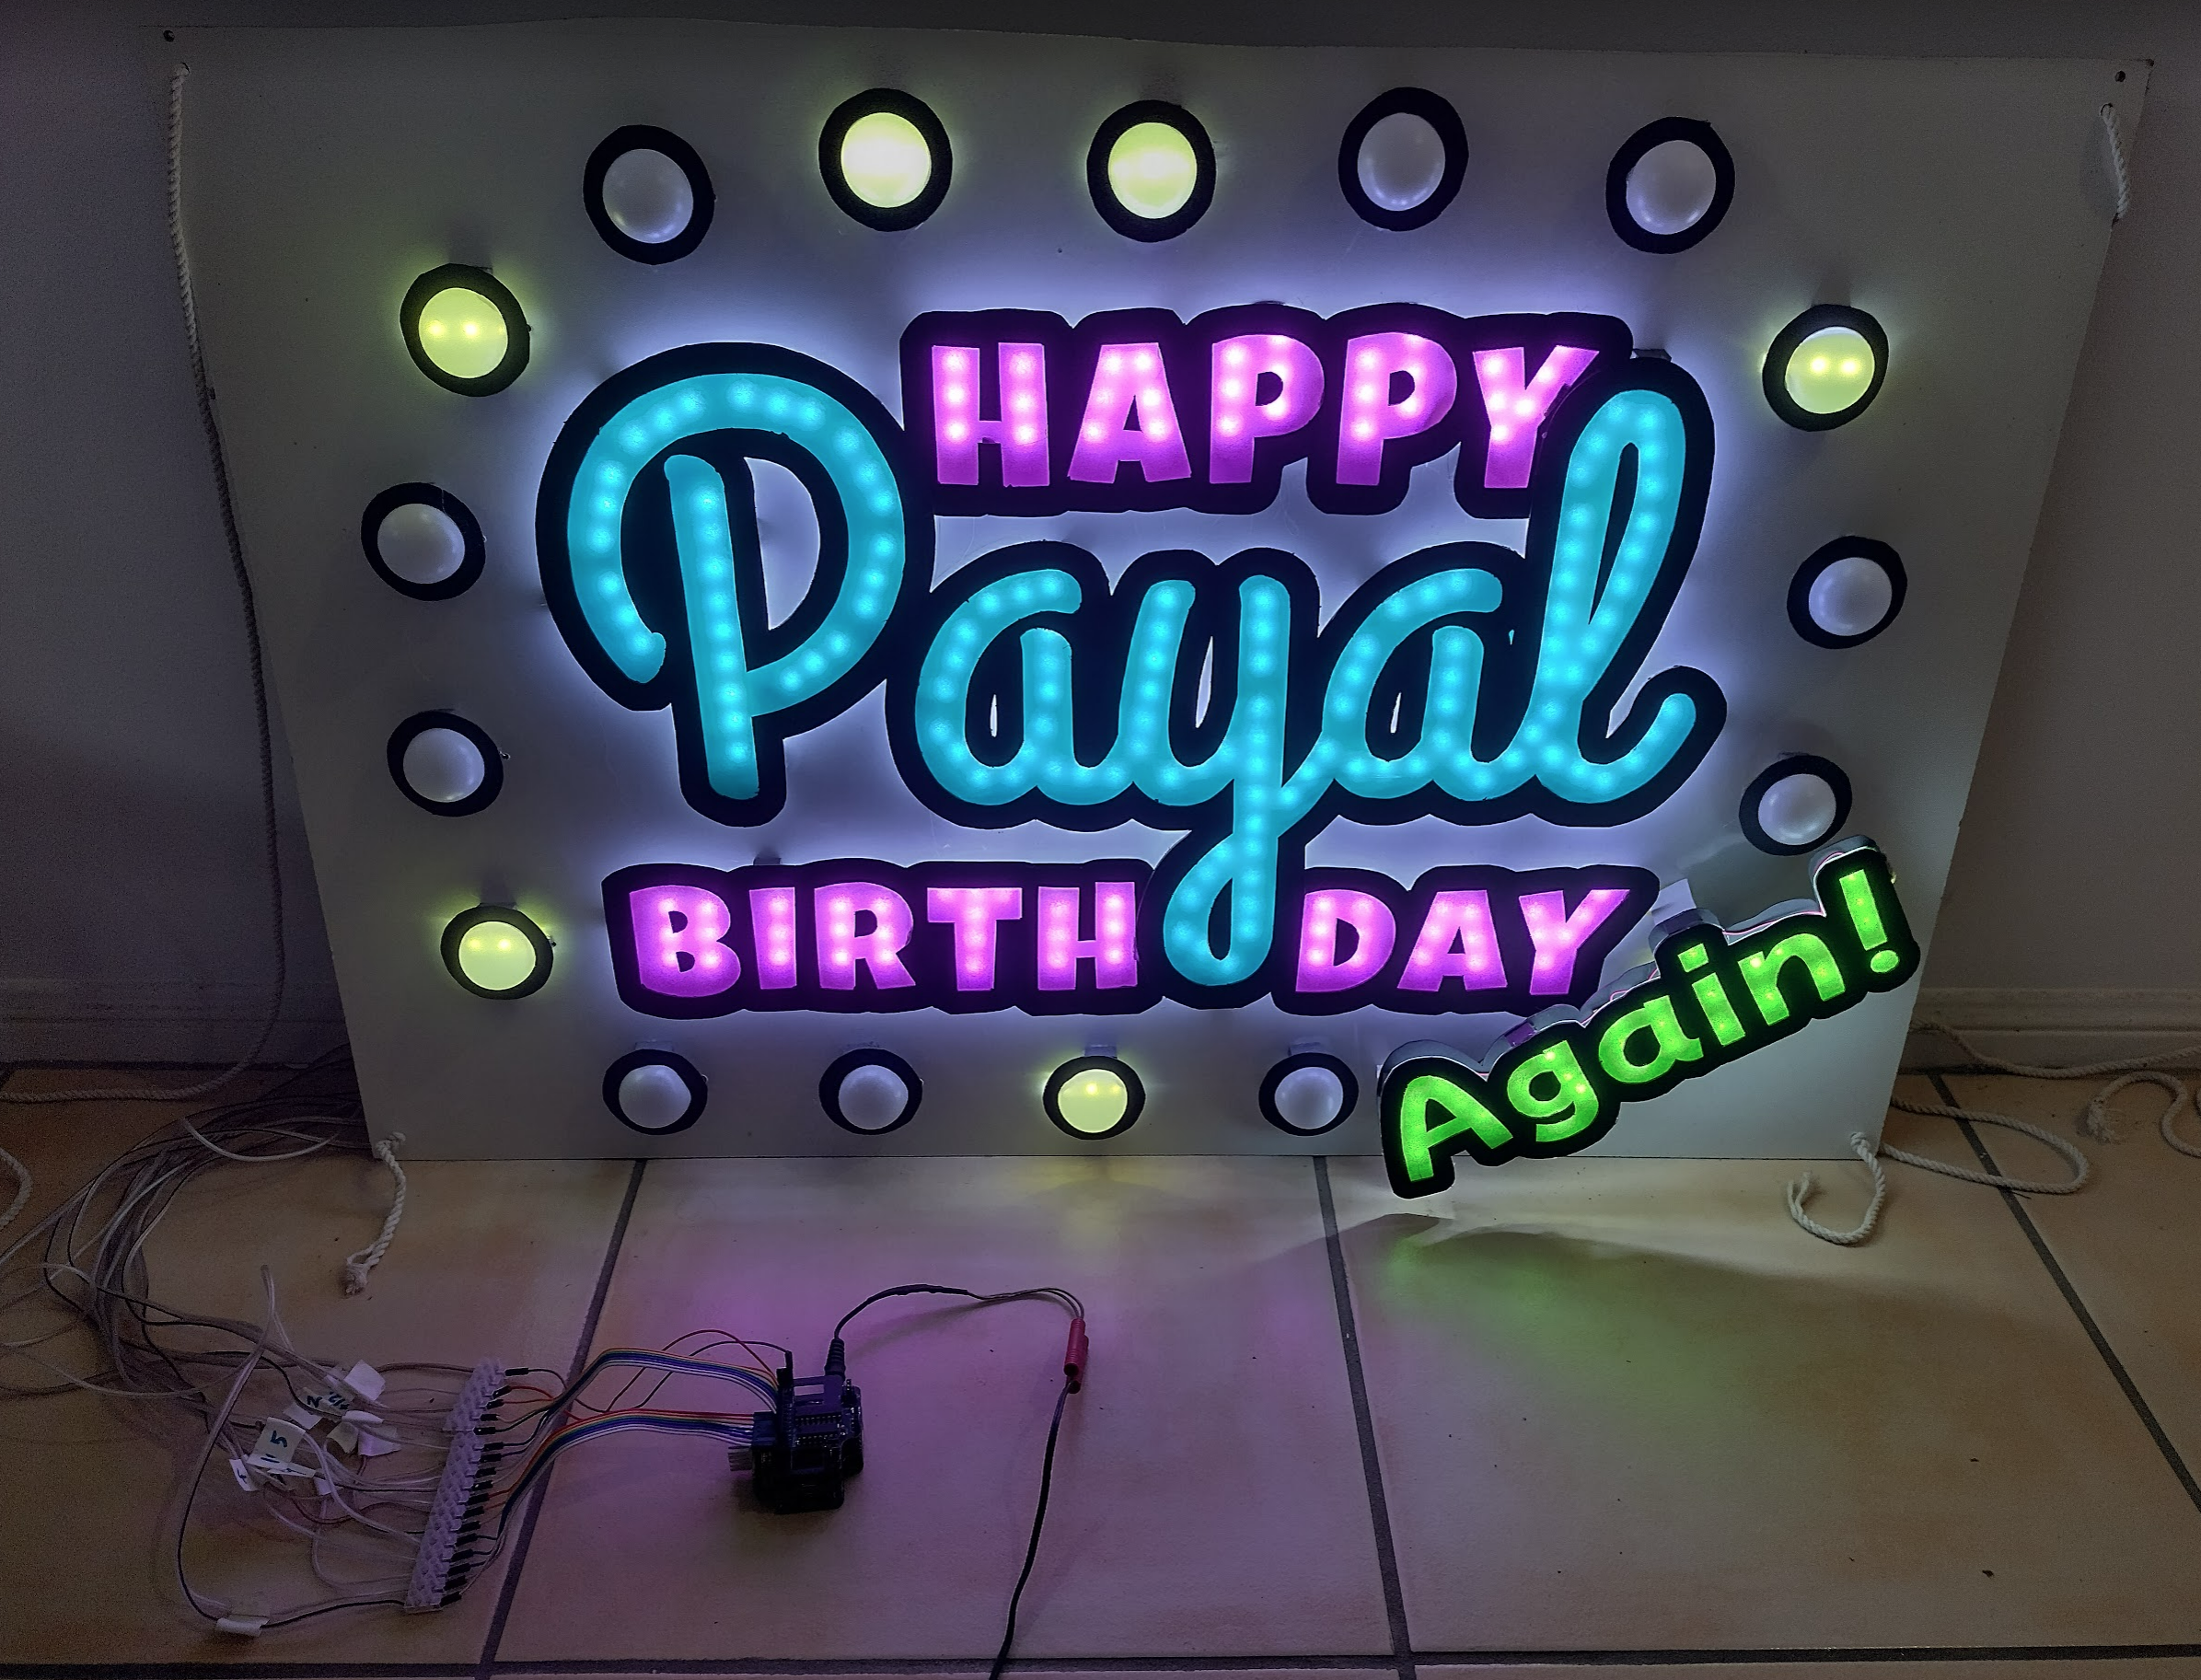
It sat there for a few weeks, then finally put in to place for the reveal.
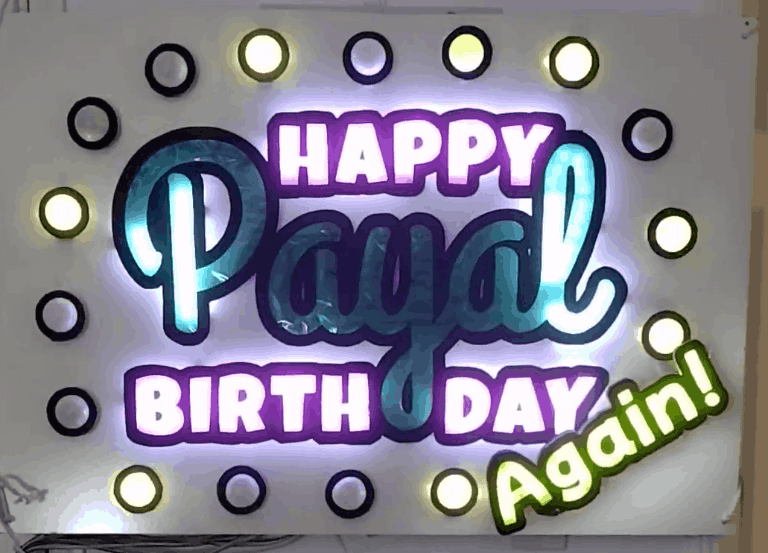
Overall the additional word wouldn’t have been too difficult if I didn’t have to resurrect broken LED strip. The bugs in the code took a little while as did the pattern. But the goal of reusing the sign but making it more impressive was a success!
Just what to do next year now. A CNC milled sign? A far bigger one? Will see.