This content is incomplete and may be inaccurate, feel free to look around & please check back later for updates.
I’ve held back a fair while (7+ years?) with my stock headunit, but I think it’s now time as most of my trips are different enough to require GPS. So it would be nice to have it integrated into the dashboard somehow, and might go a reverse cam and a dash cam if it makes sense and can fit in the budget. And I don’t have time to go a super highly customised route like I did 20+ years ago before the days of carplay/android auto & extremely low cost and low power SOC’s – so this will be a more standard radio install albeit running Android.
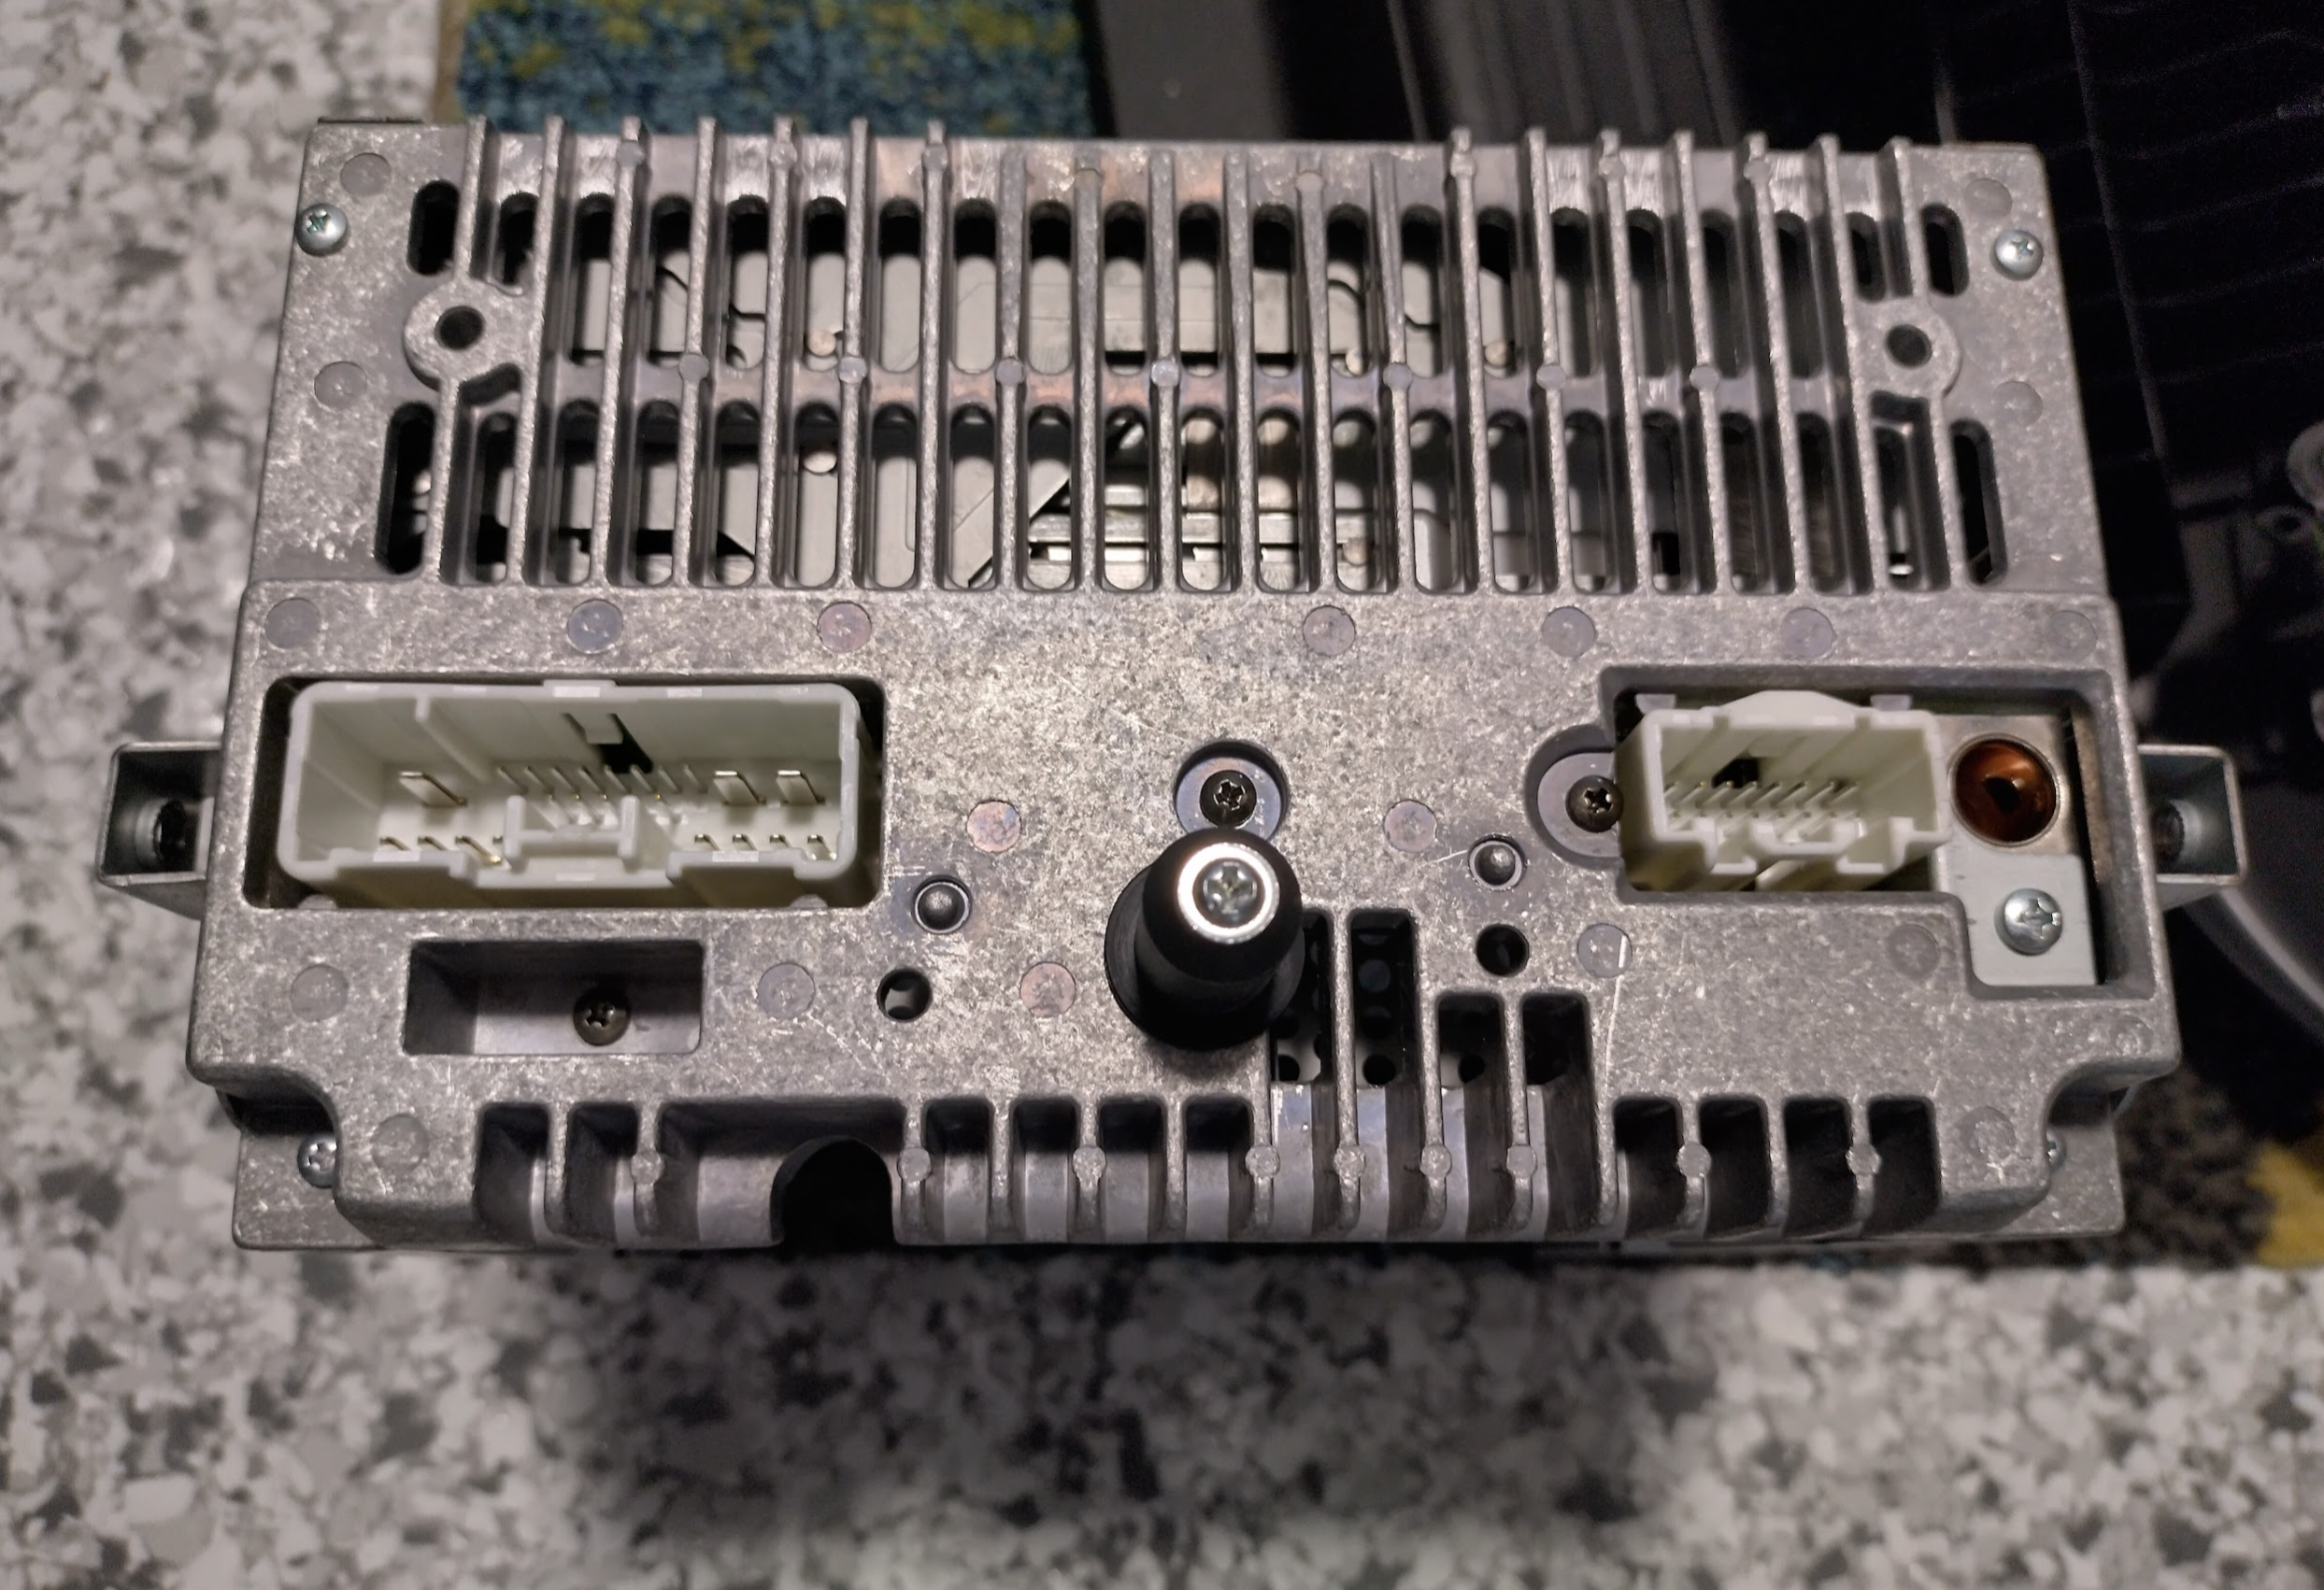
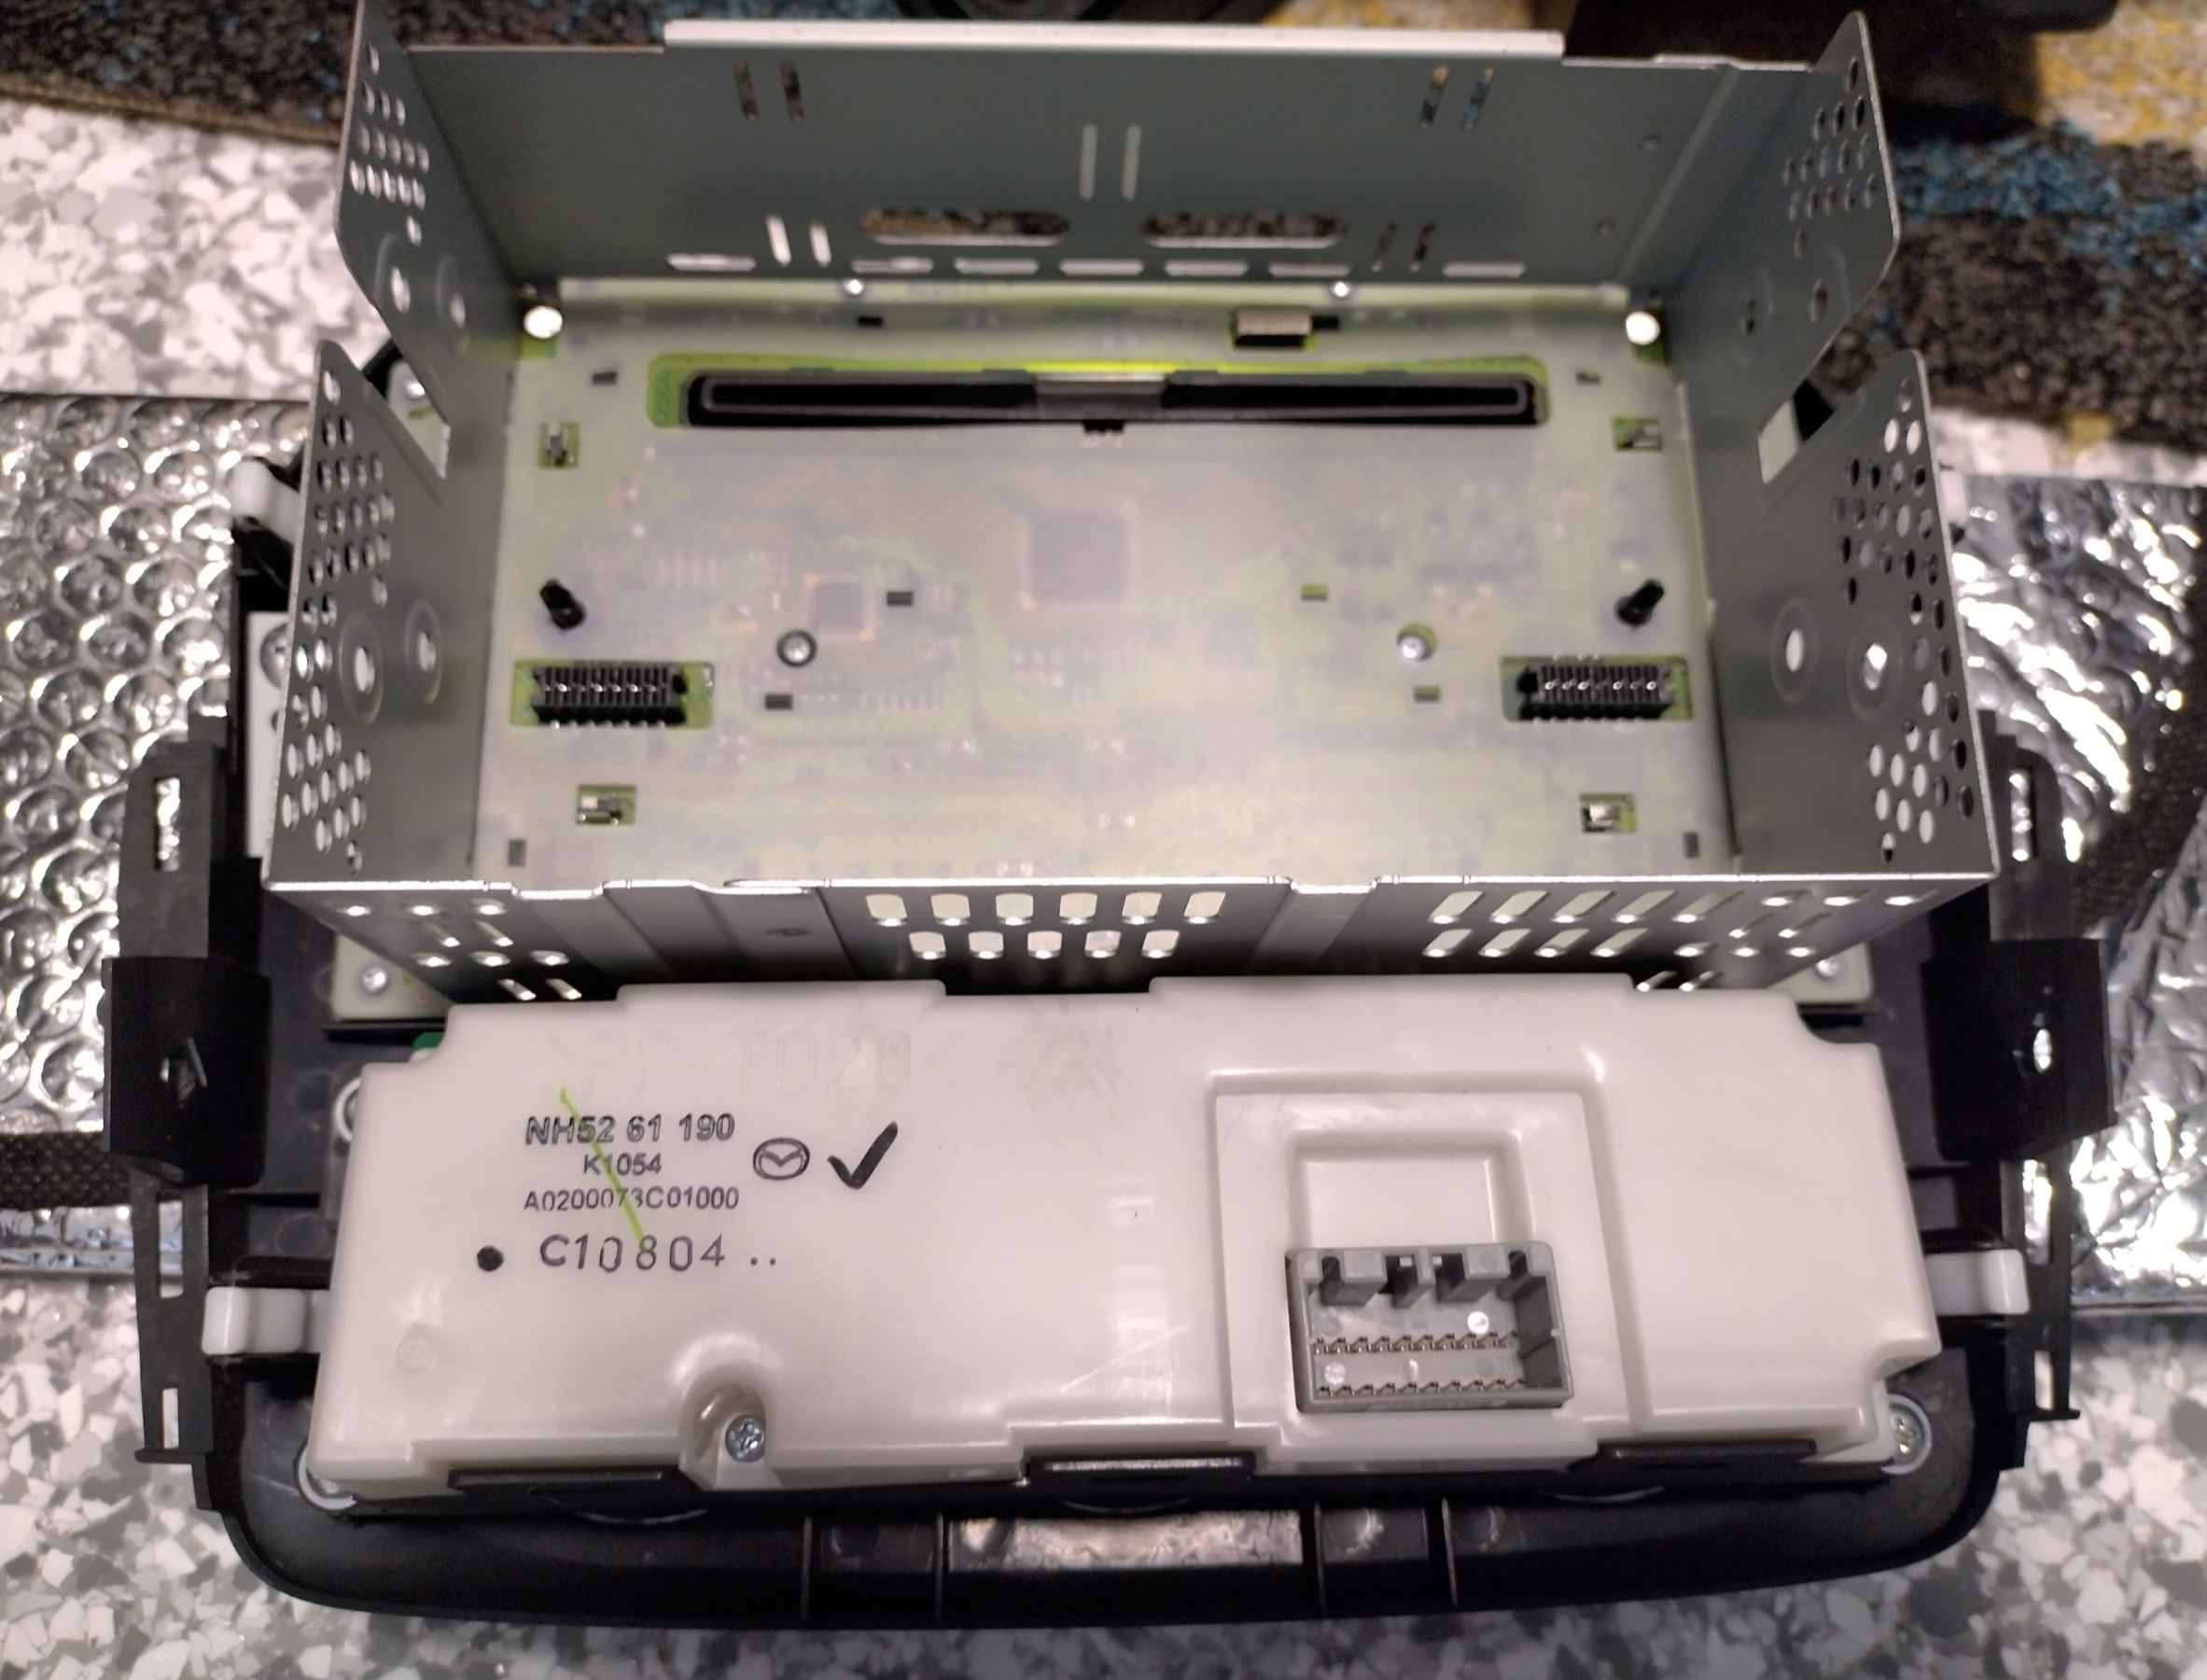
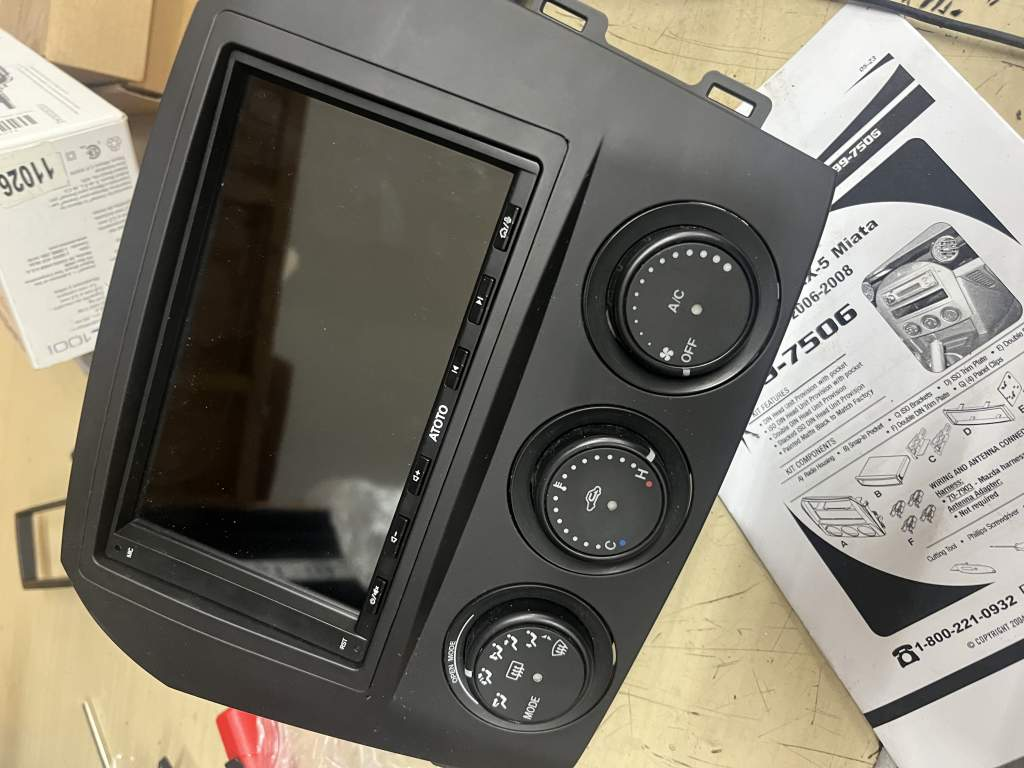
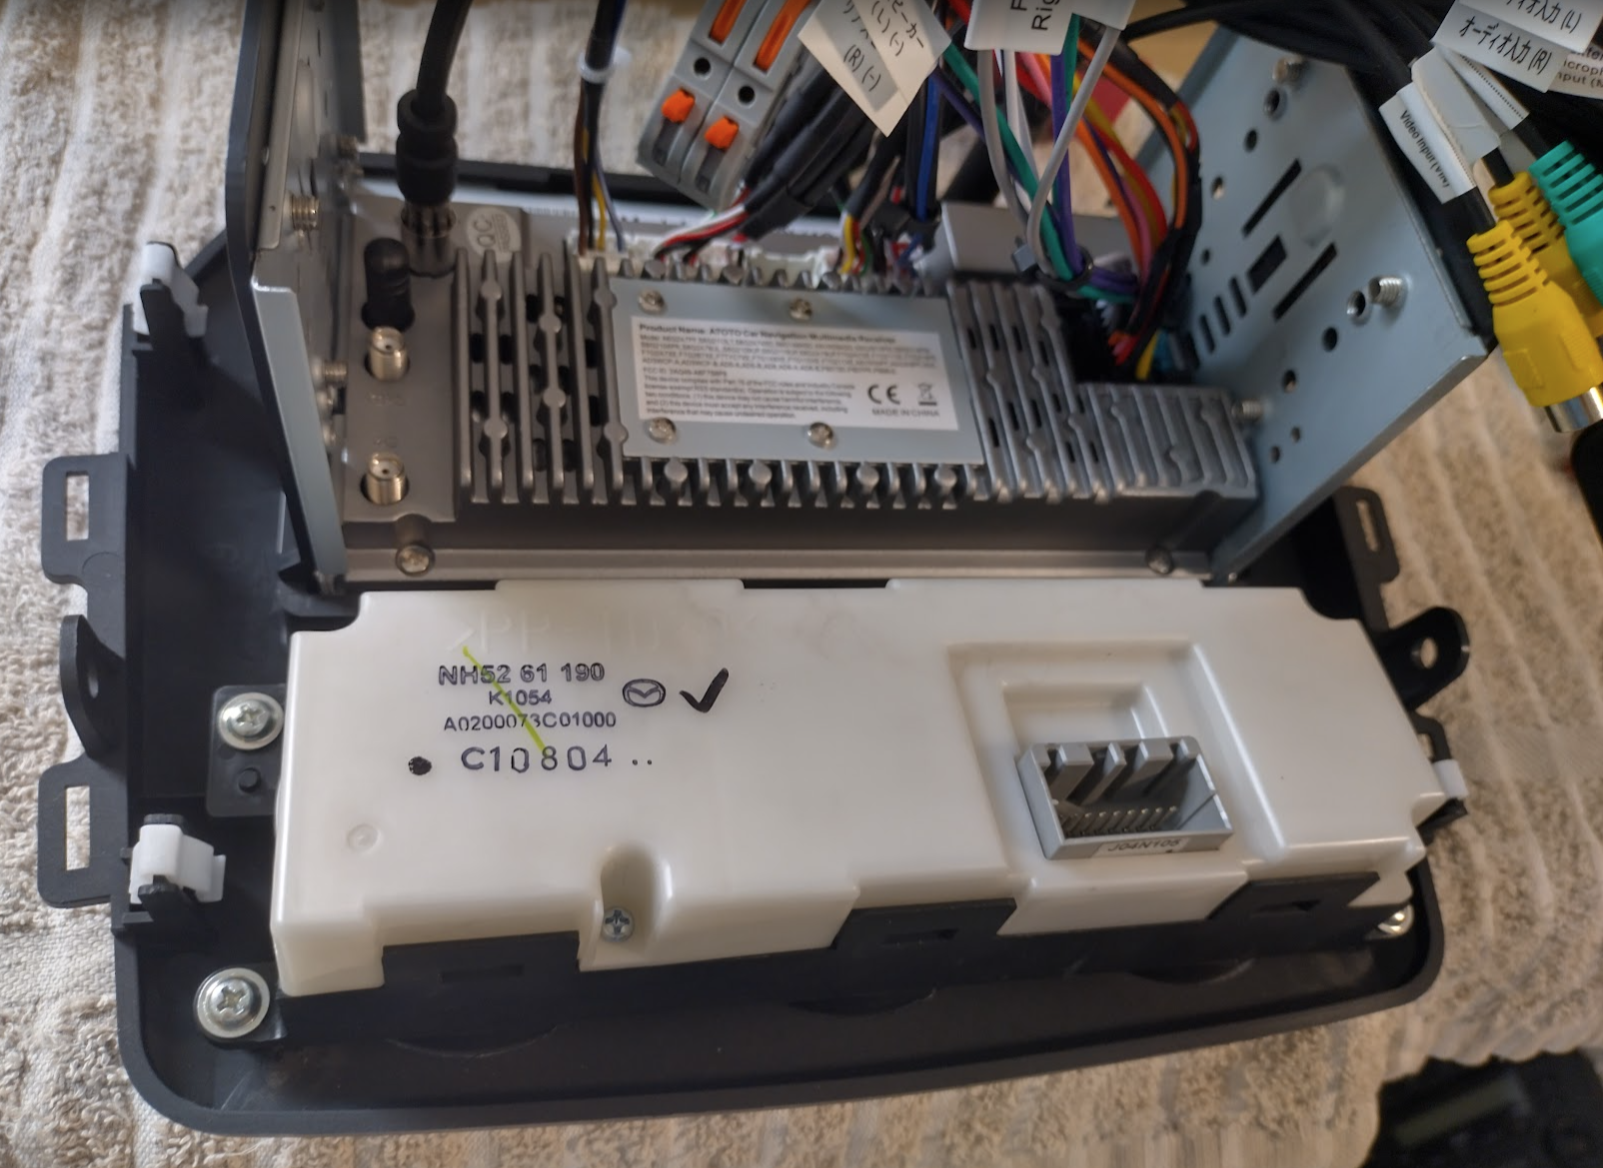
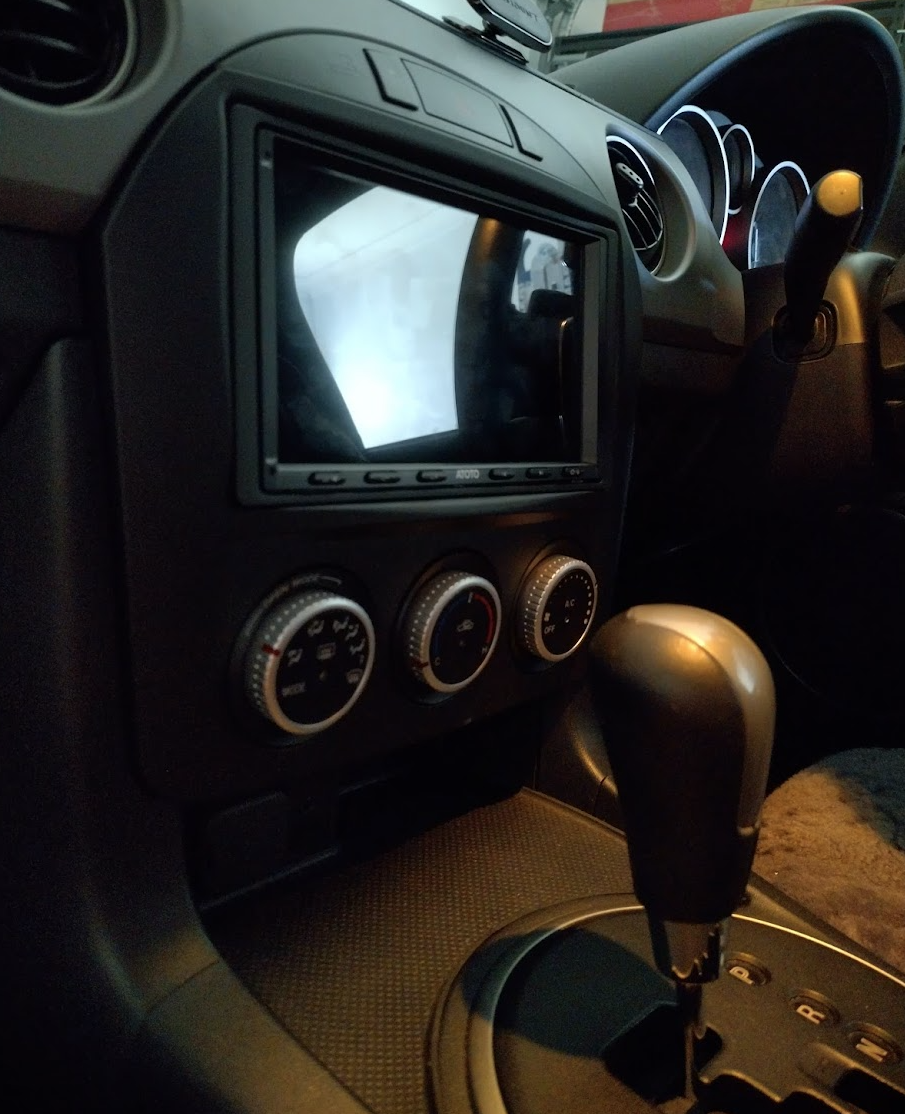
My model is the Australian 2009/2010 NC2, PRHT, Automatic with Bose. The factory headunit looks like this in photos from my article on how to swap the evaporator in the Air Conditioner:

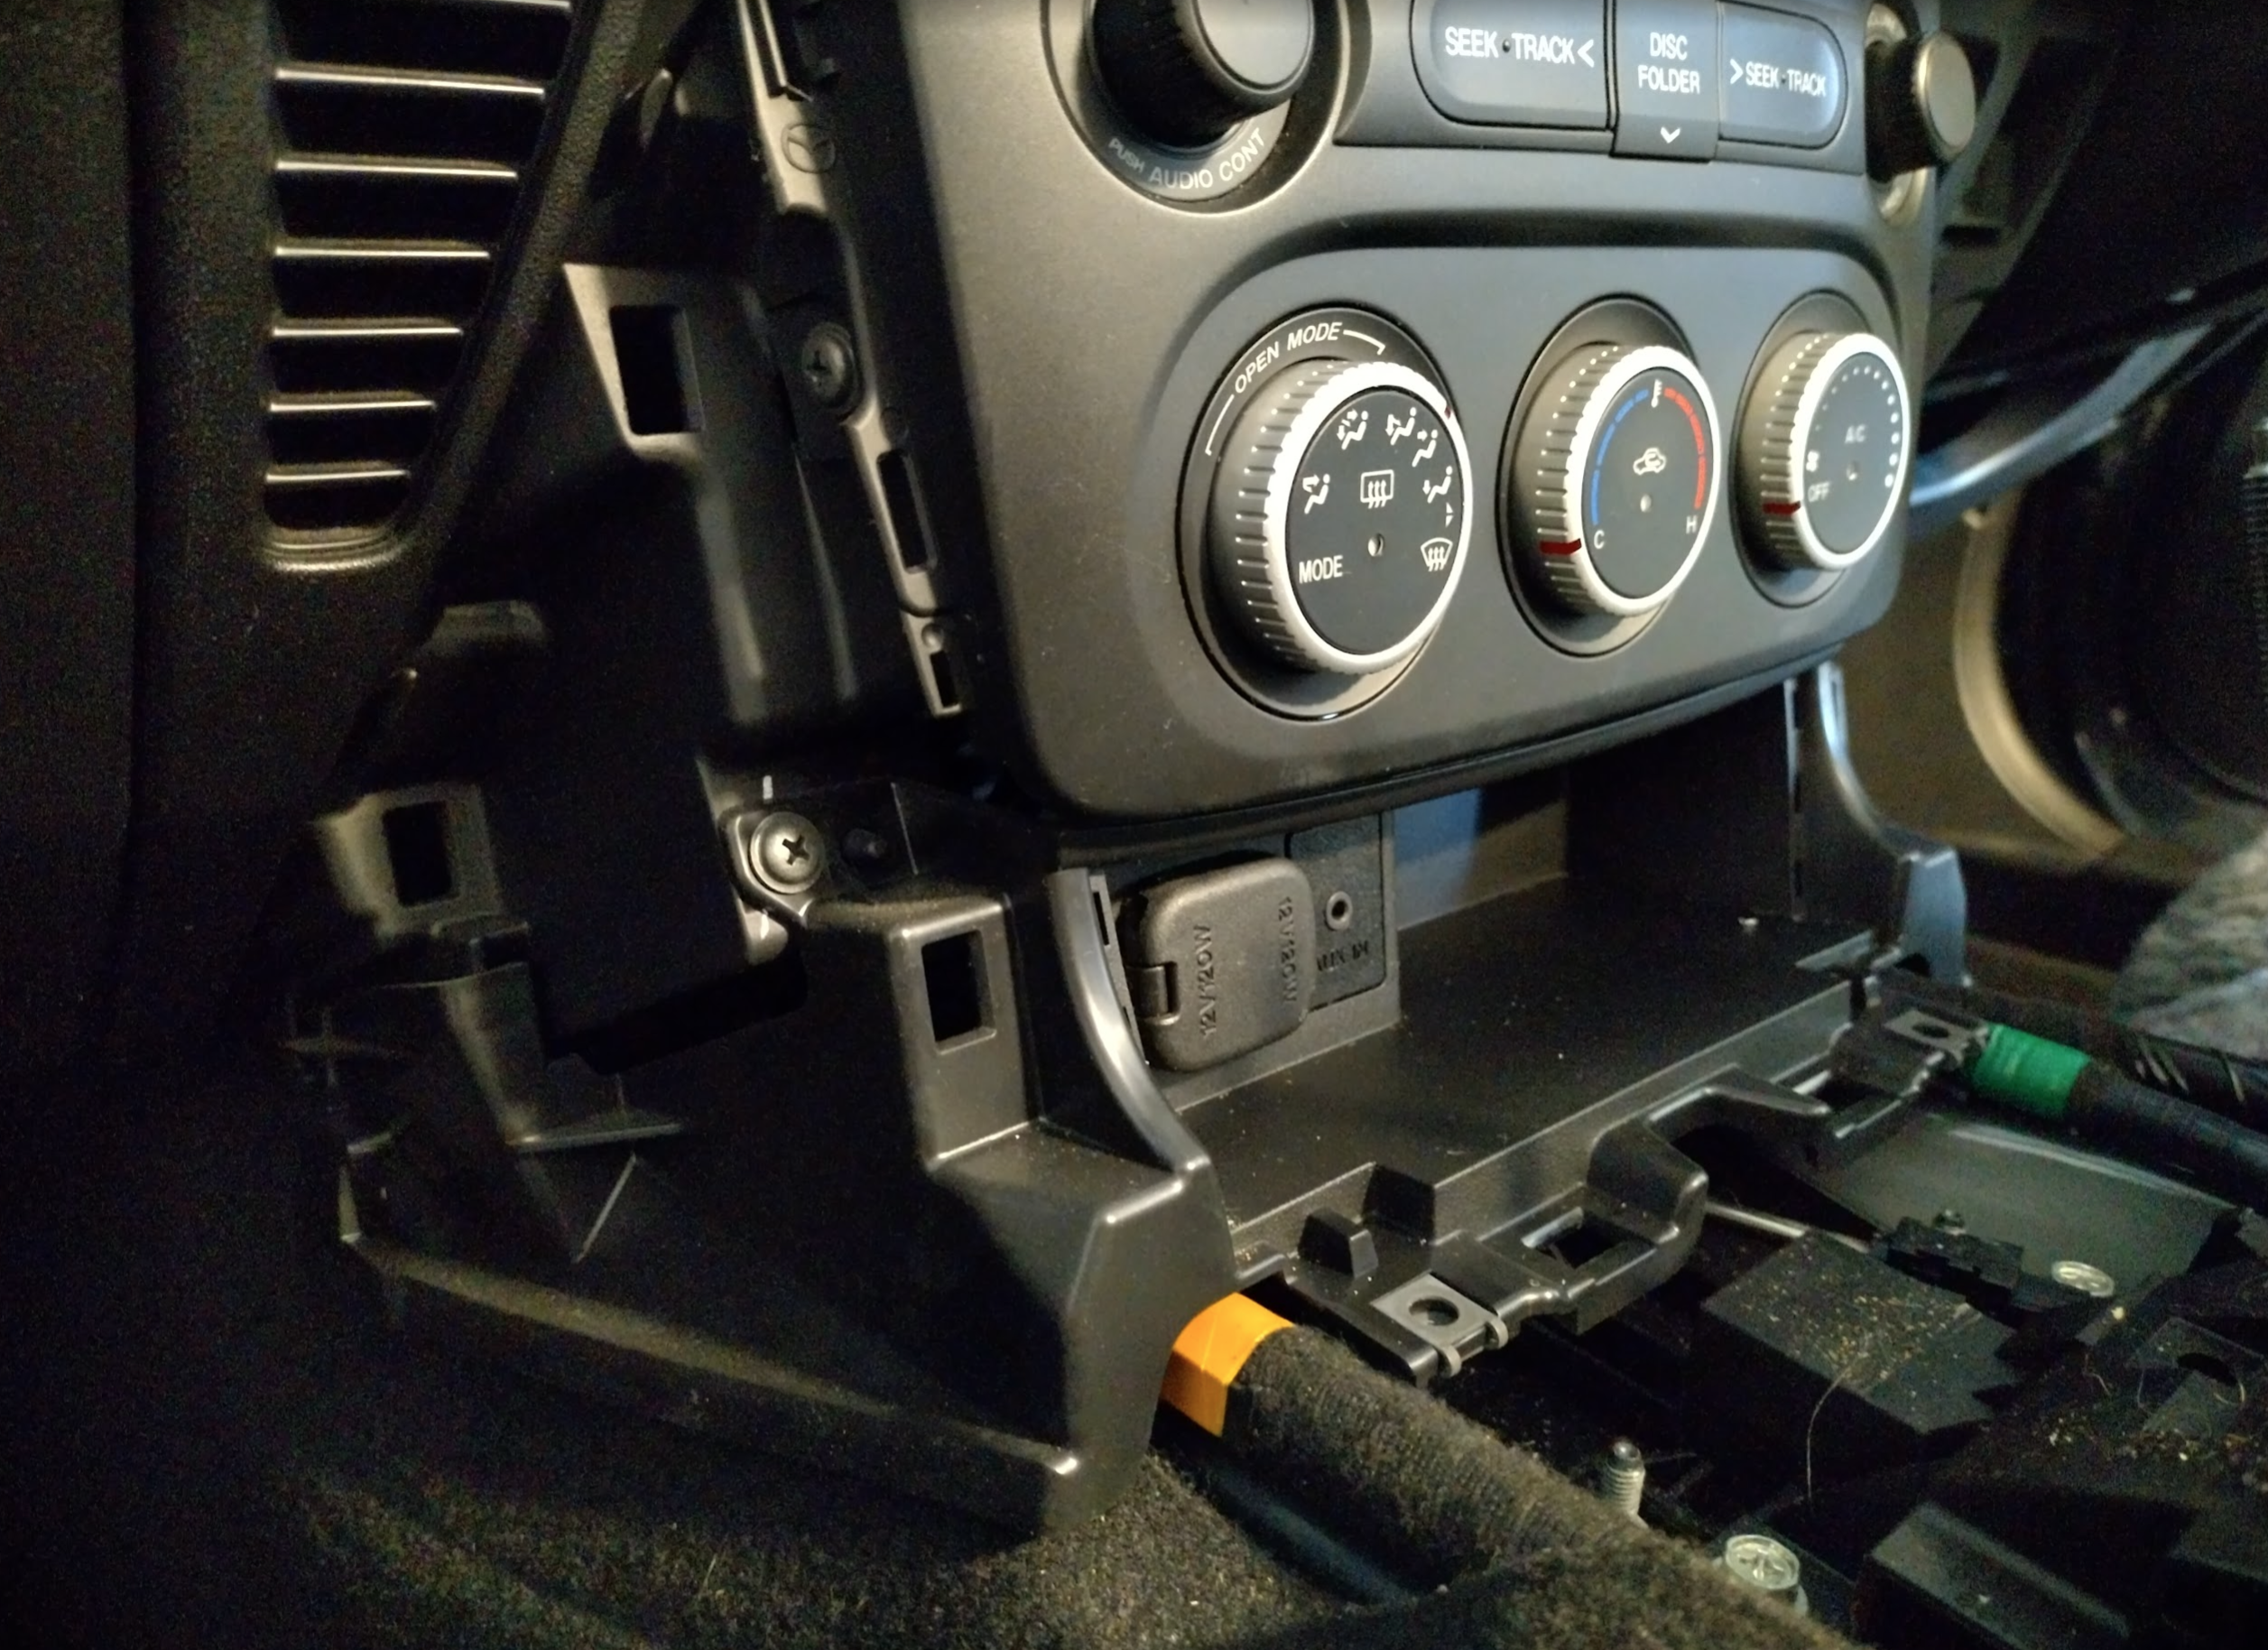
As you can see it comes with a state of the art 6 CD stacker that also reads MP3’s, to hold literally thousands of your favourite songs – playable within minutes.
Removing the entire fascia
I’ve already removed this once during the air conditioner repair & took photos as I knew this upgrade would happen sometime. However to get it removed is fairly straightforward, you can follow the first couple of steps in the AC article which is basically this:
- Unscrew the gear knob & pull off the handbrake cover
- Unclip (carefully!) the small panel between the seats
- Unscrew the centre console plastic section, unclip two plugs, and lift it out
- Remove the two plastic shrouds on either side of the radio
- Remove the lower section of the fascia (containing the 12v socket)
- Unscrew both sides of the combined aircon/radio fascia
- This is probably the hardest bit – there’s a tiny bolt hidden on the side of the radio – mine was on the drivers side in AUS. This needs to be removed before the whole section can be pulled out. This was easier to get to for me as I had the entire steering column unbolted and out of the way. Good luck!
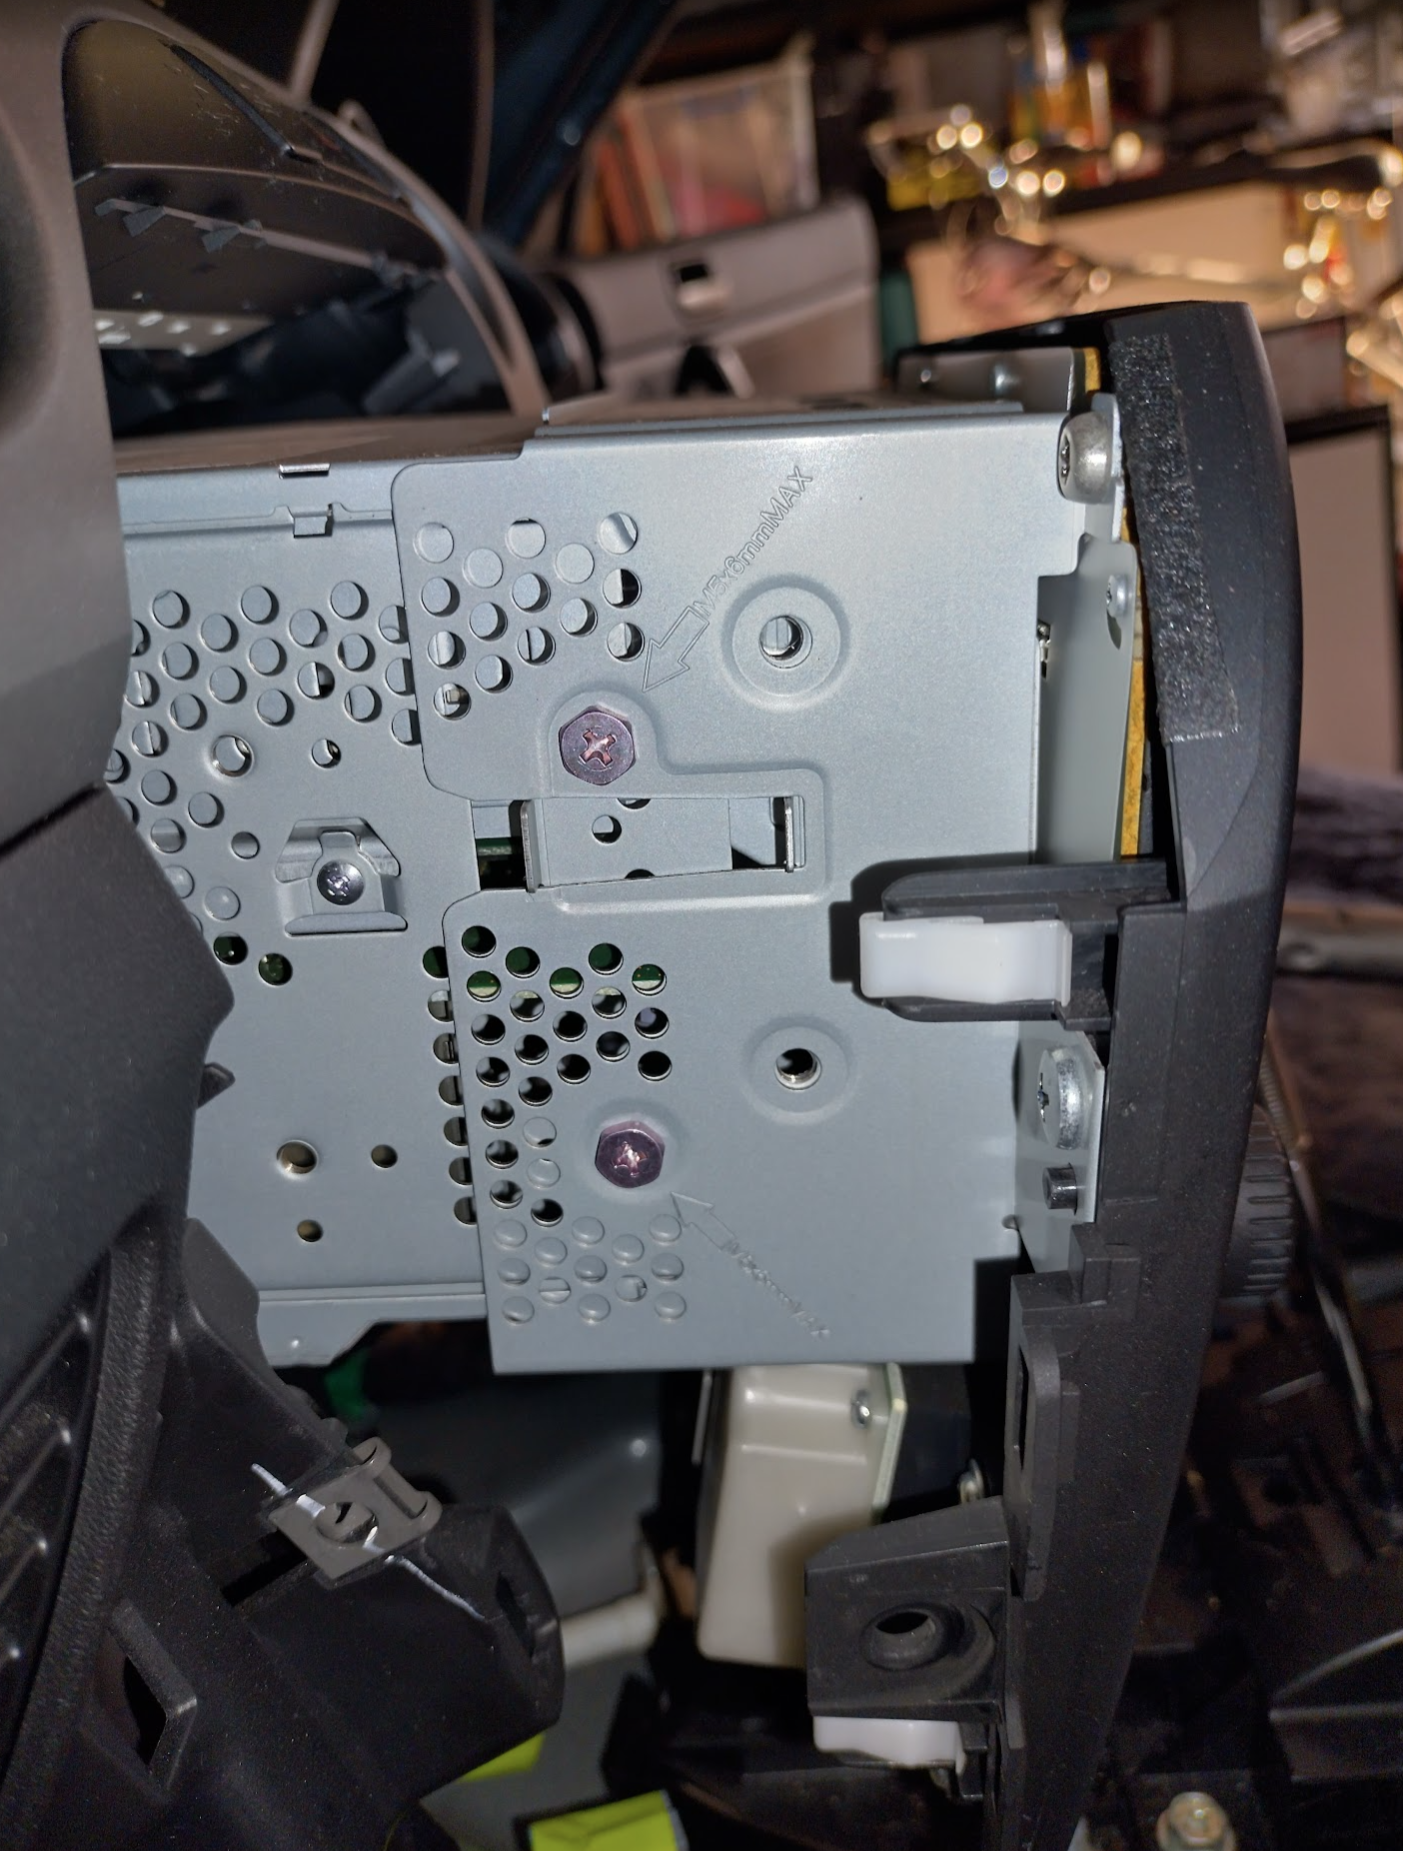

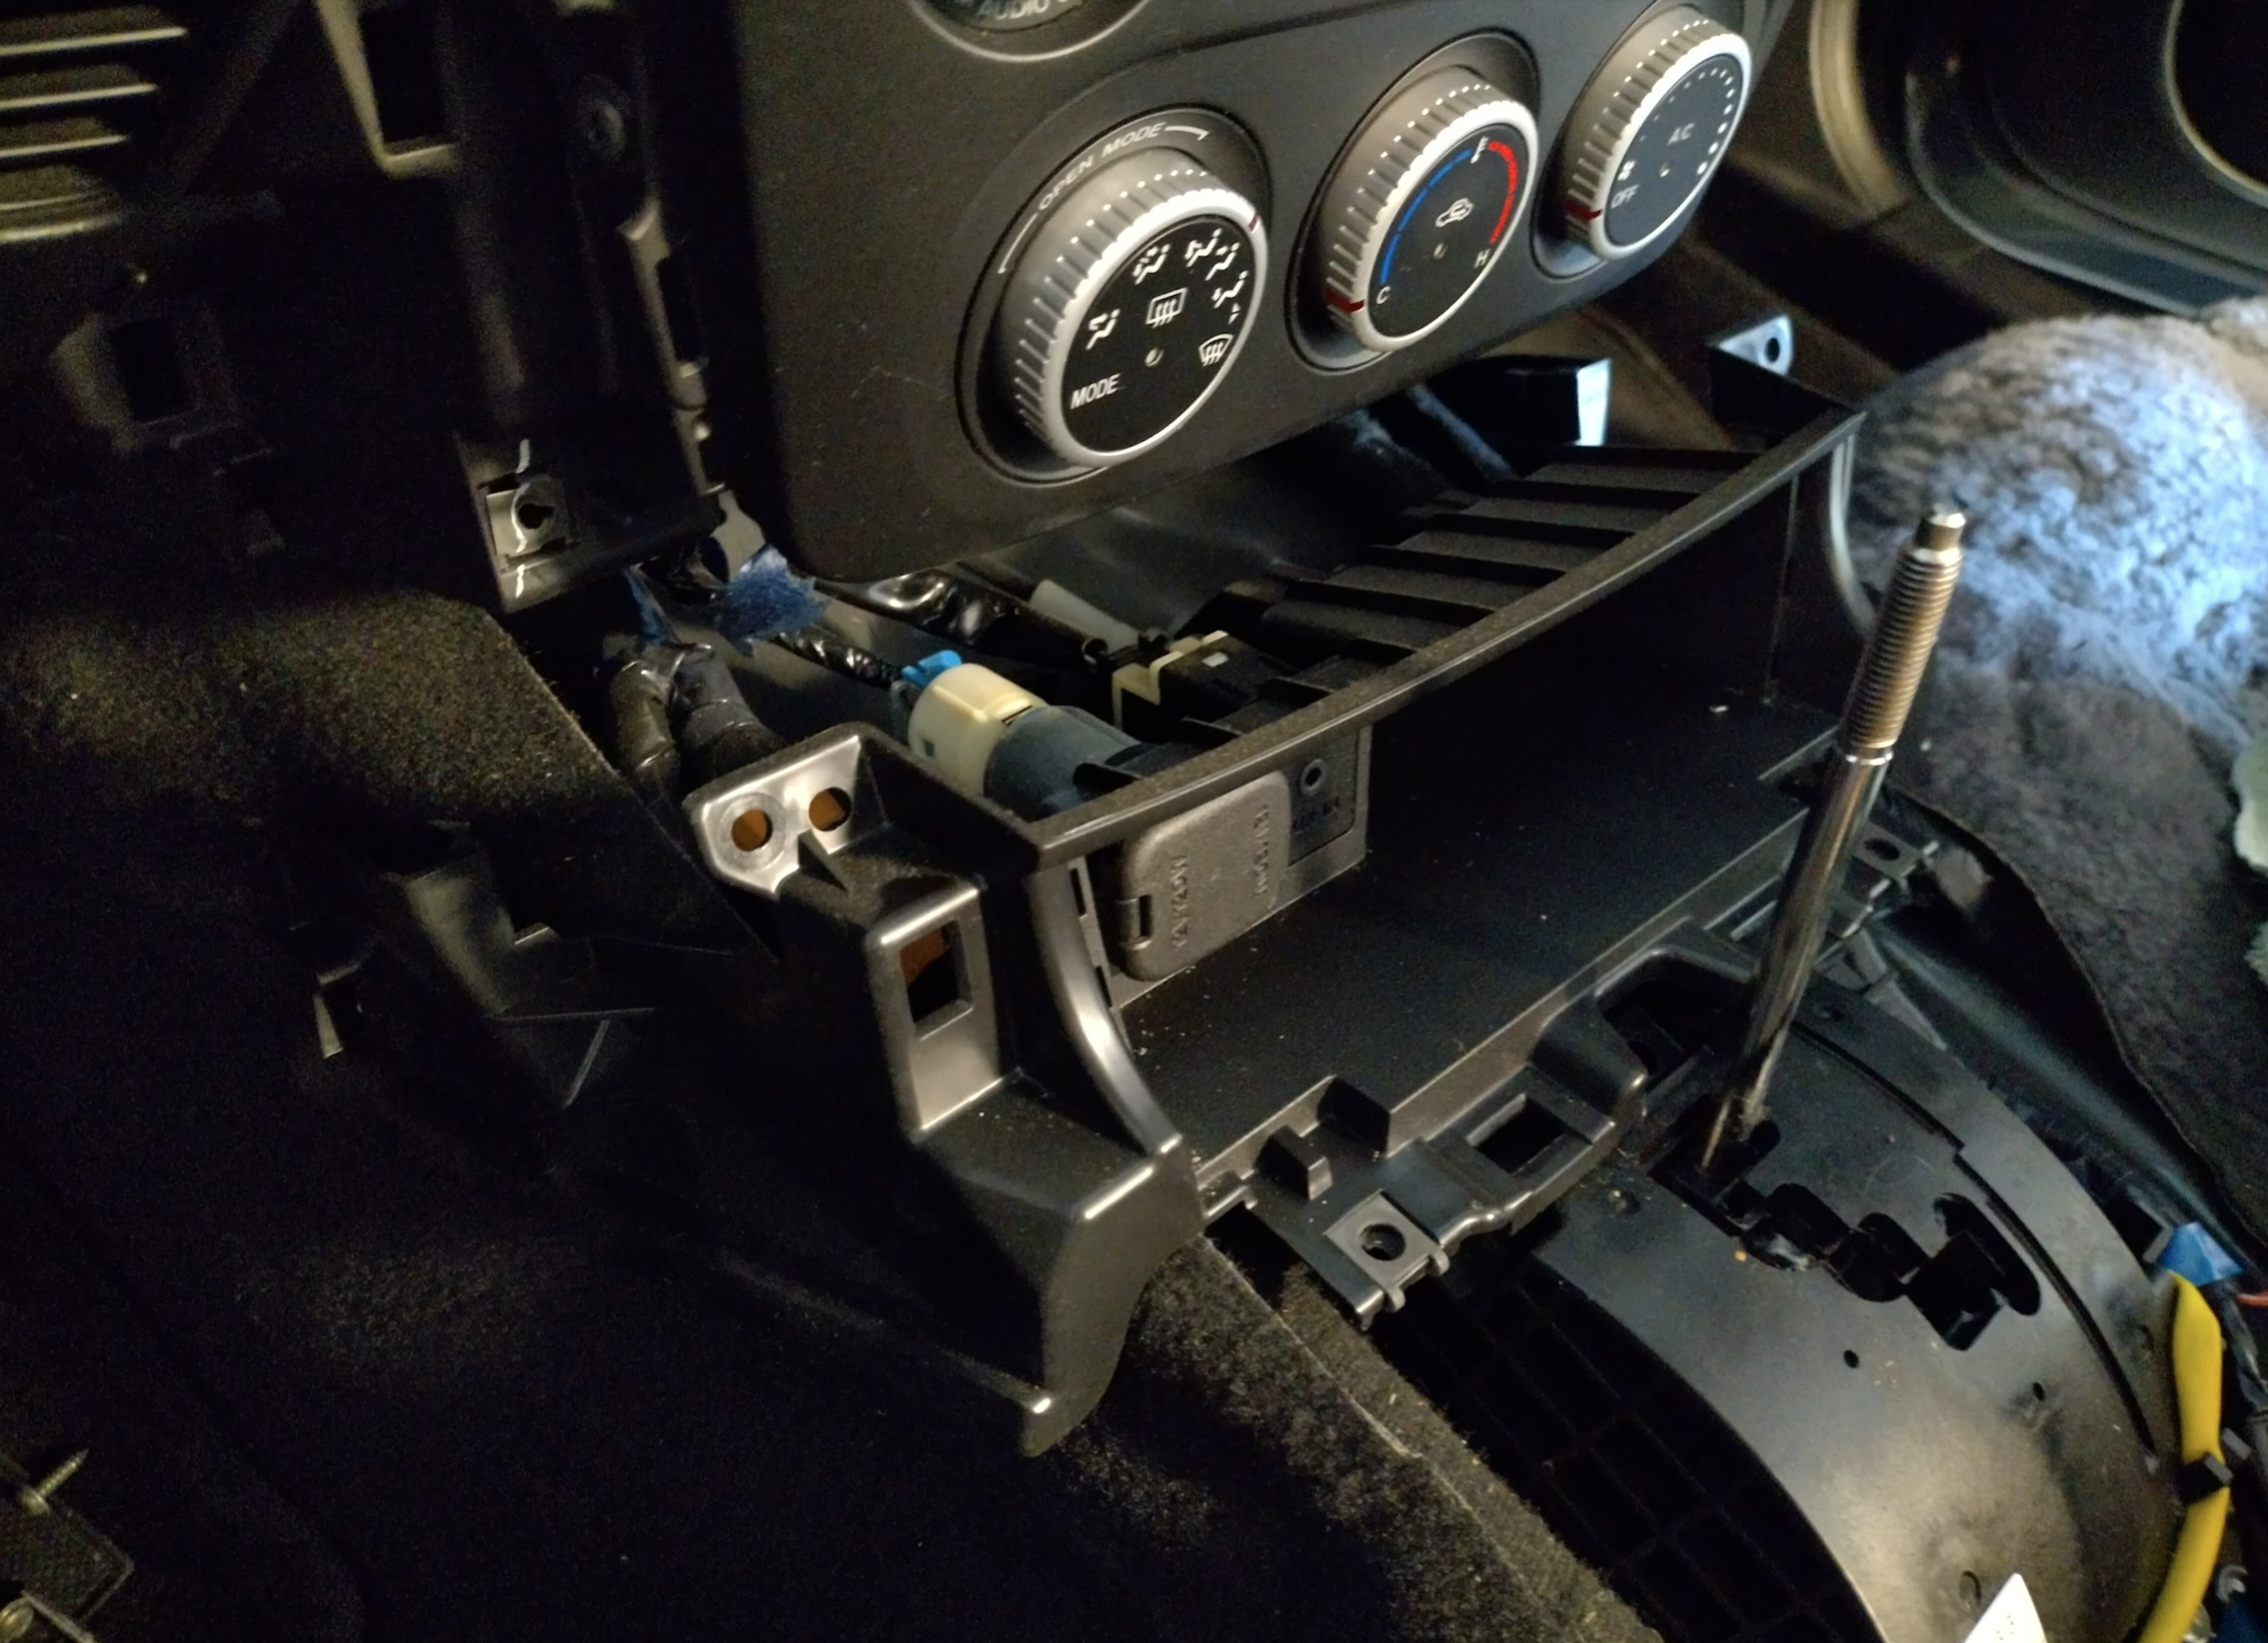
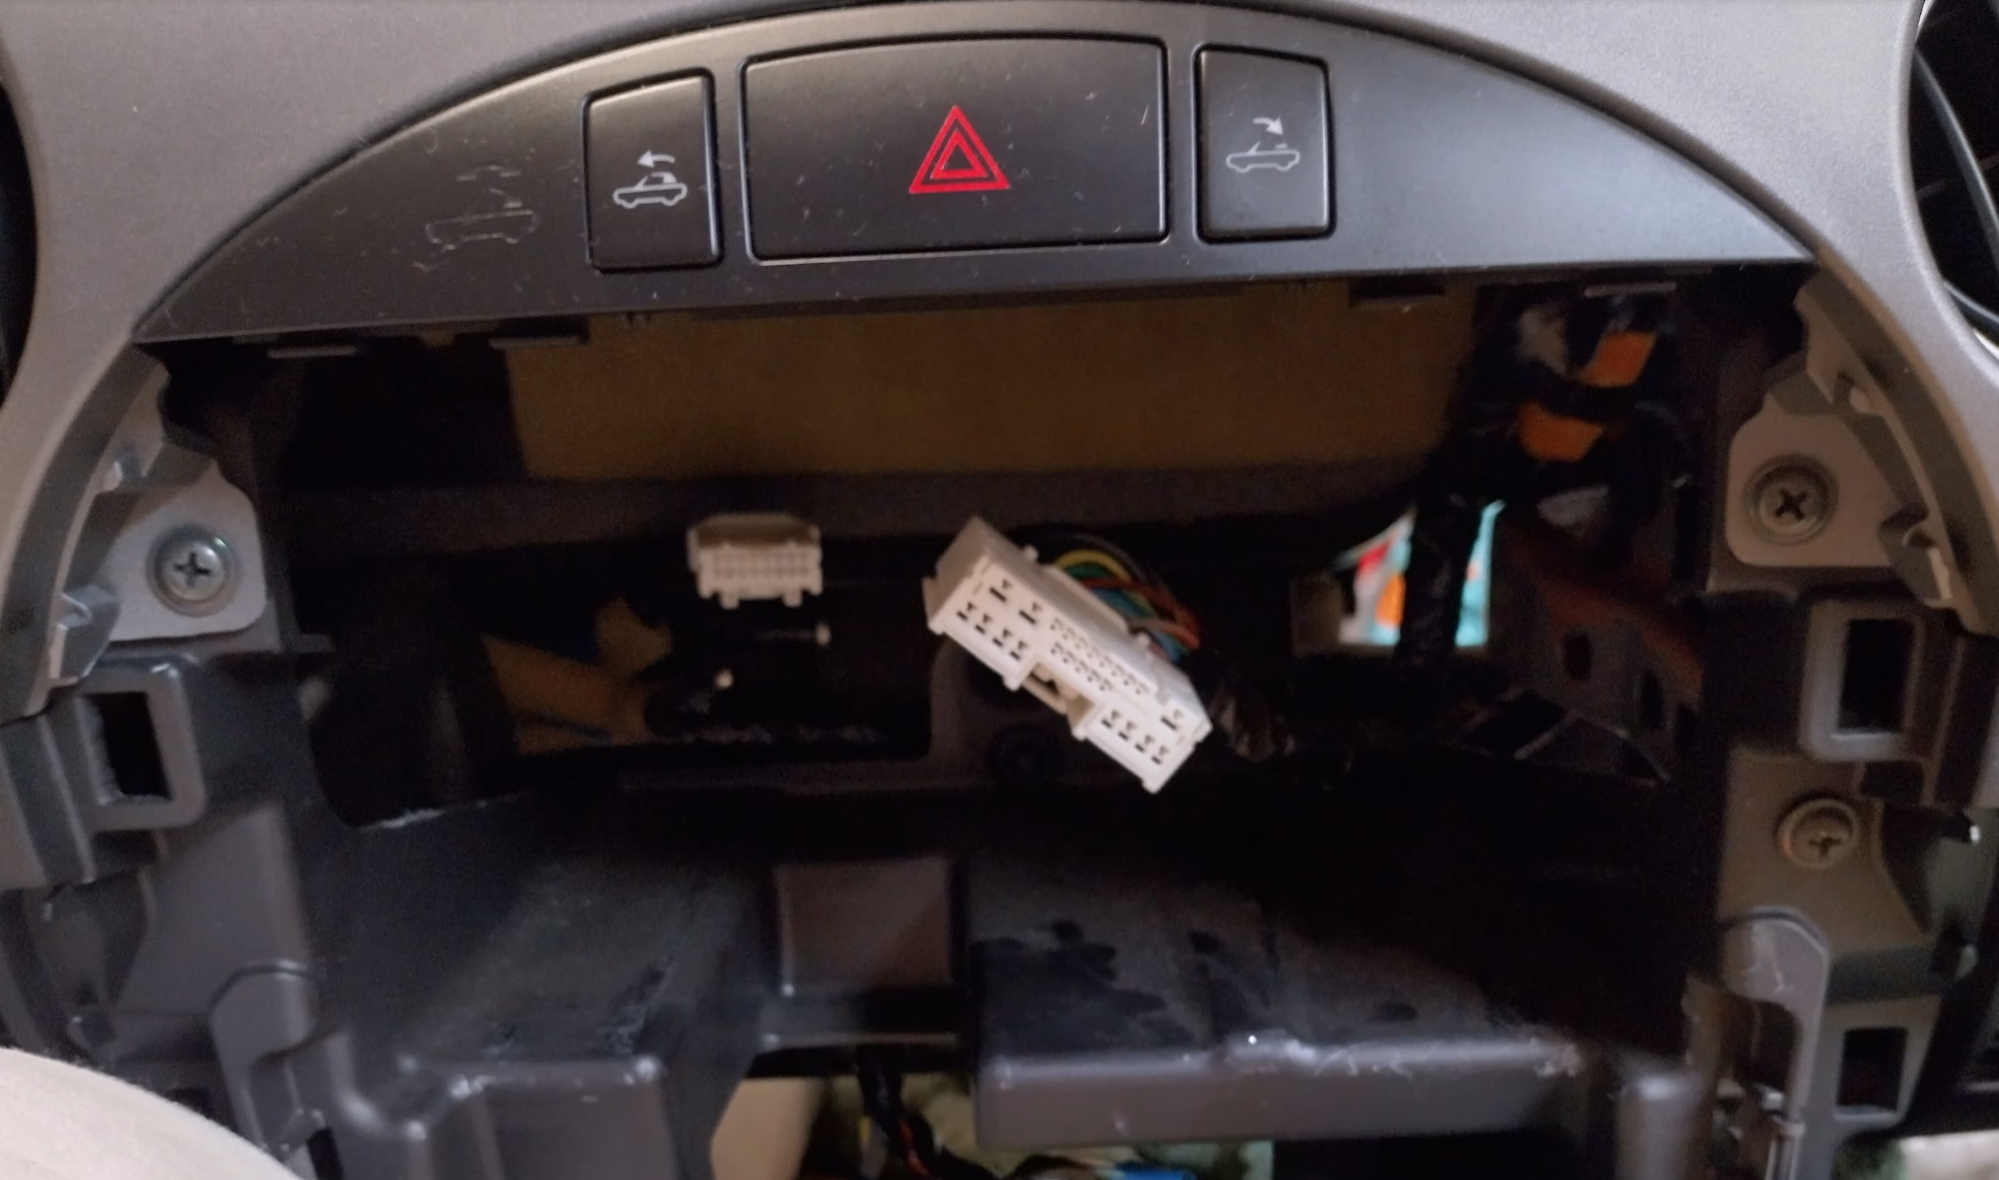
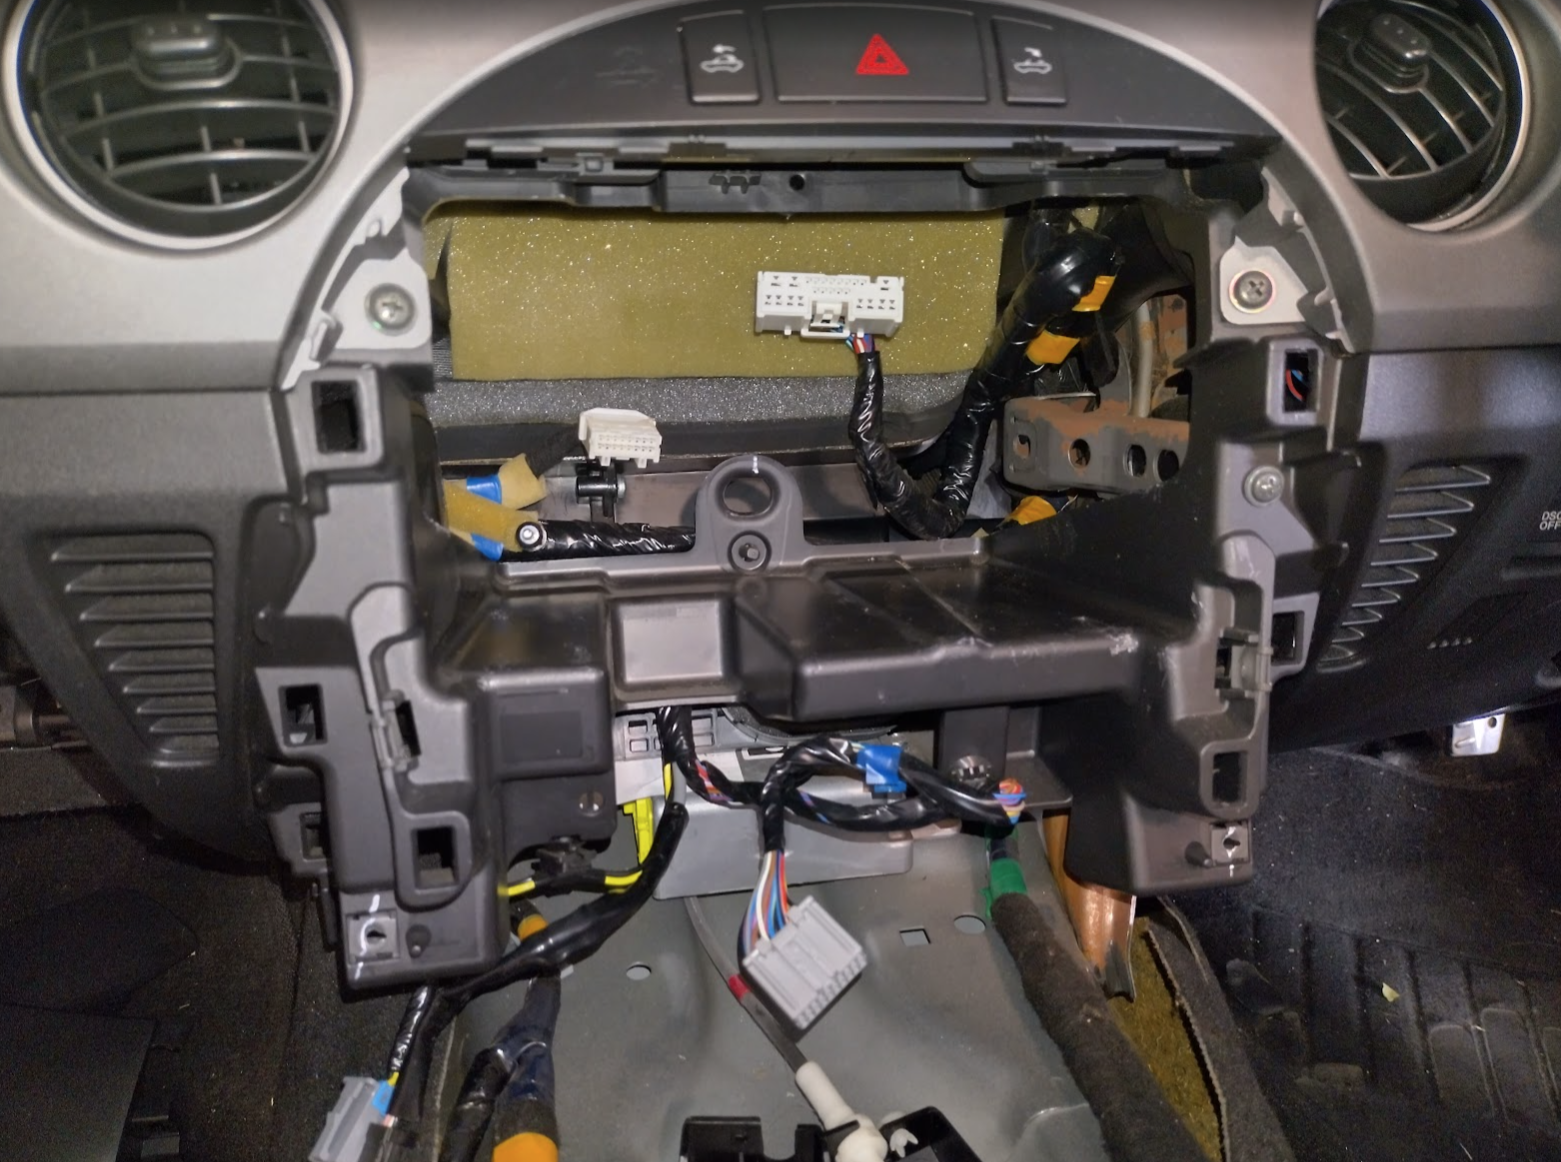
Here’s how it looks from the back once removed, so we know what we need to find regarding wiring harnesses.
It’s already been done
Here’s a few videos from people who have gone through this process already, which we’re going to be getting some hints from regarding wiring trickery.
Now that I’ve found these videos, I’m getting suggested videos all for MX5 NC radio installs so there’s plenty of information out there to go astray!
There’s also a great writeup with a lot of tips (some I have discovered, others I wasn’t aware of) here: https://forum.miata.net/vb/showthread.php?t=769695
Shopping List
Now that we can see what’s there and how people have done it, we can figure out what bits we need to achieve this.
Fascia/Bezel/Frame
There are maybe 3 options for the Fascia I have discovered, someone bought three different ones and gave an overview here: https://forum.miata.net/vb/showthread.php?t=759111 , what I have discovered online is below.
Generic Aliexpress – seems to be missing the side guides. There is also an option that allows for two single din slots but can be cut to allow double. This model also looks like it’s for the NC1 (the bottom corners aren’t round), and apparently causes slight gaps at the top when used in an NC2.
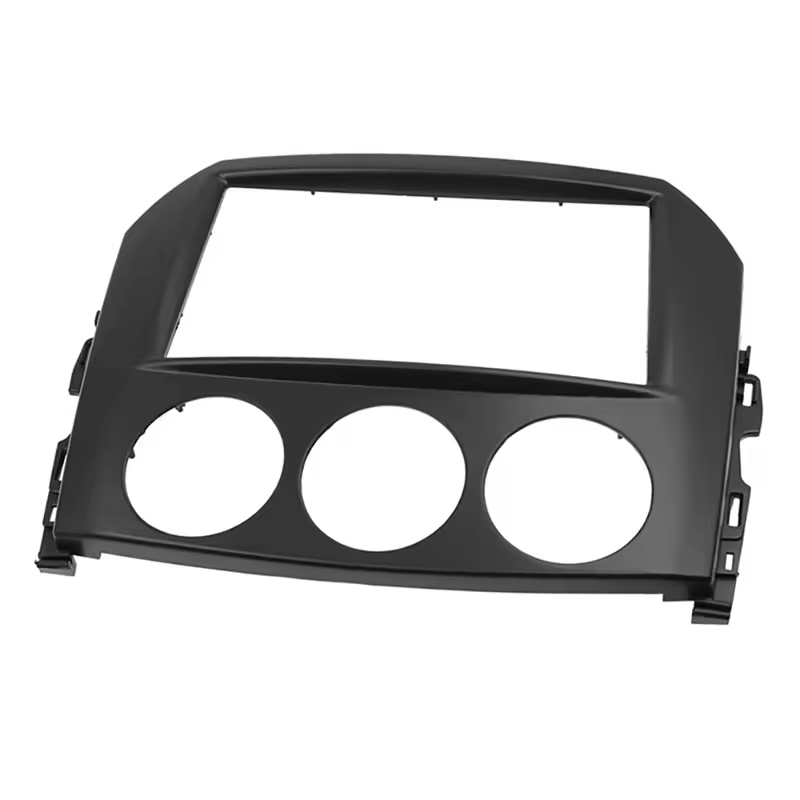
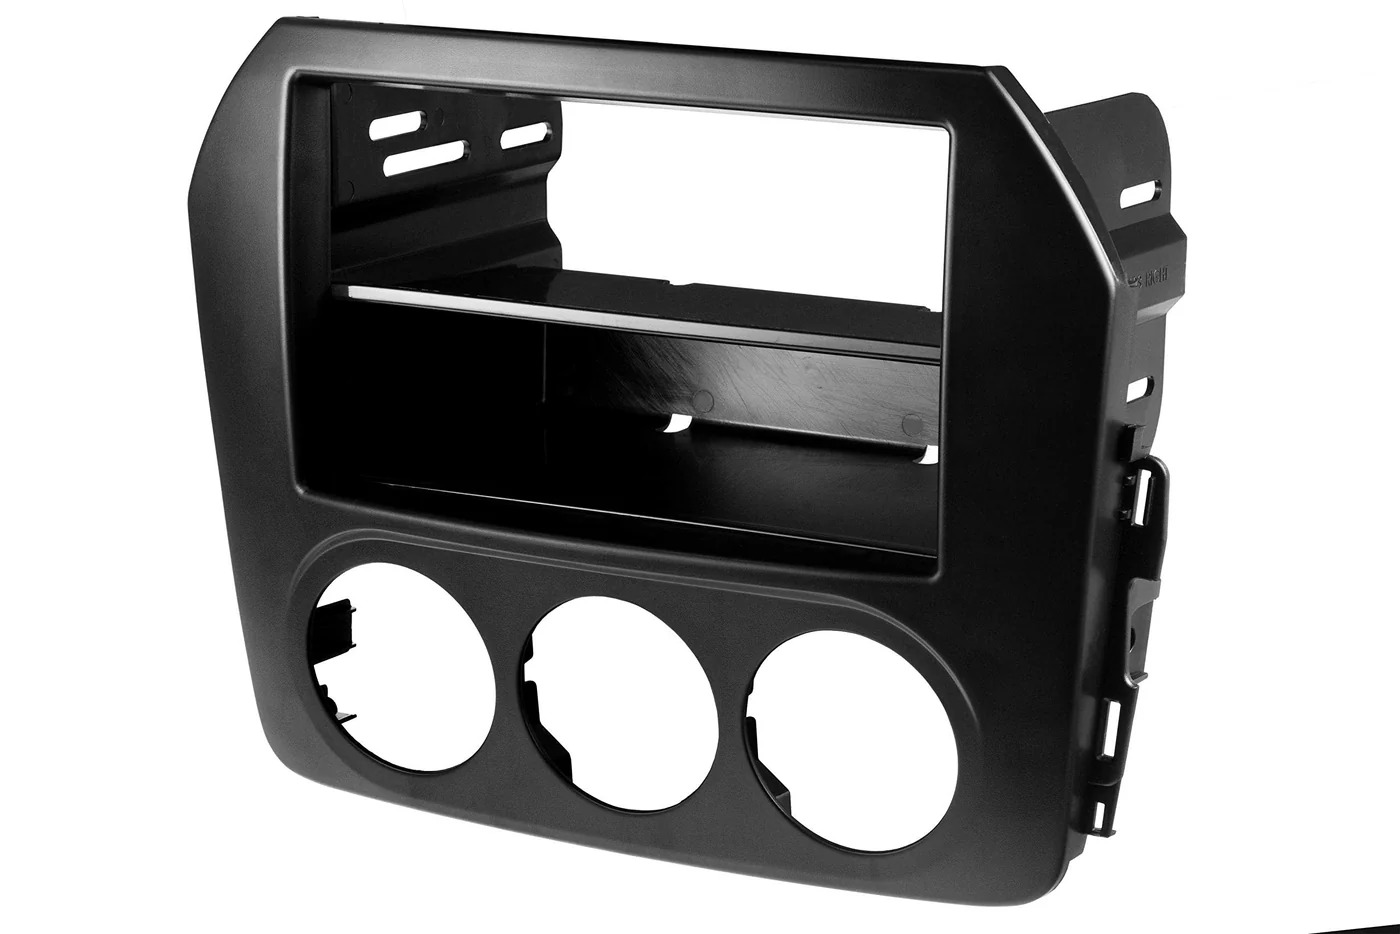
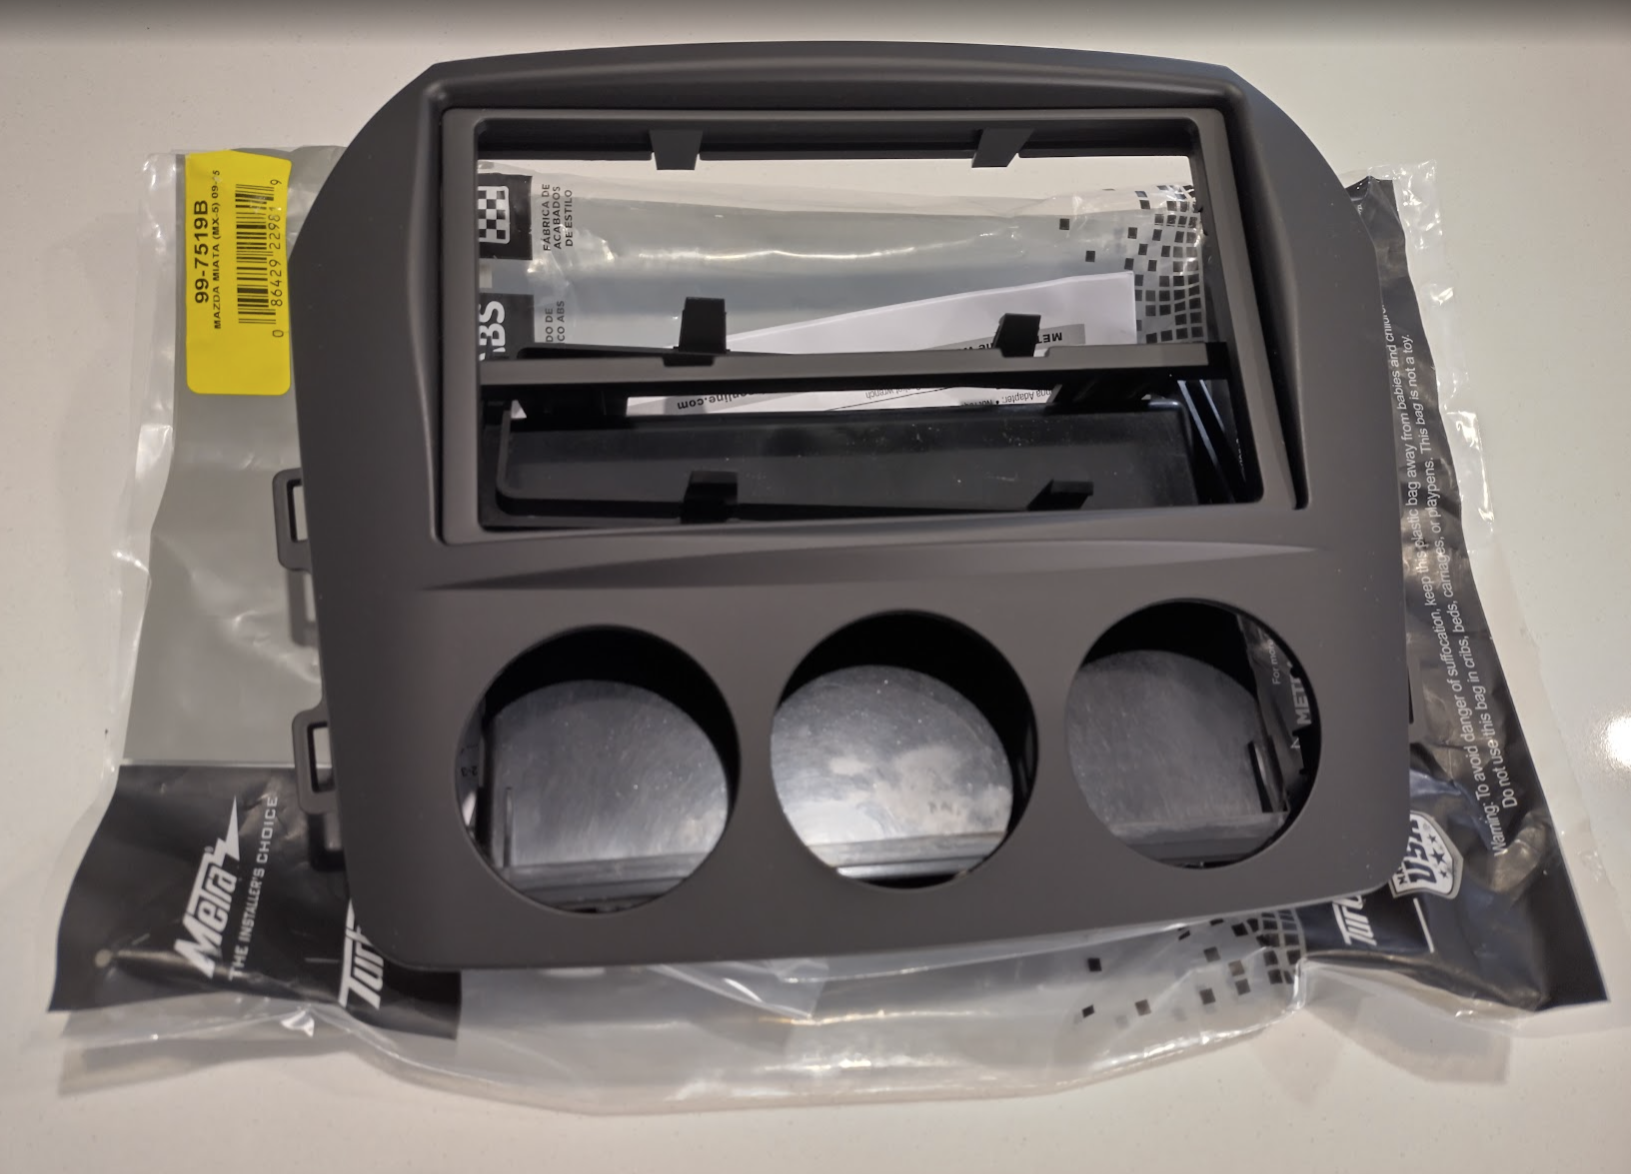
Metra 99-7519B (or Aerpro FP8268)- This is similar to the aliexpress options in terms of style (the DIN area has a protruding lip) but contains the side guides. The one pictured specifically is for the NC2 and up due to the lower rounded corners, for the NC1 there’s a different variant with the square corners. This (or a variant of it) is what the majority of guides/videos/forums use, and seems to fit the nicest regarding gaps when installed, but may need slight modification depending on the exact size of the radio you get (Atotos especially)
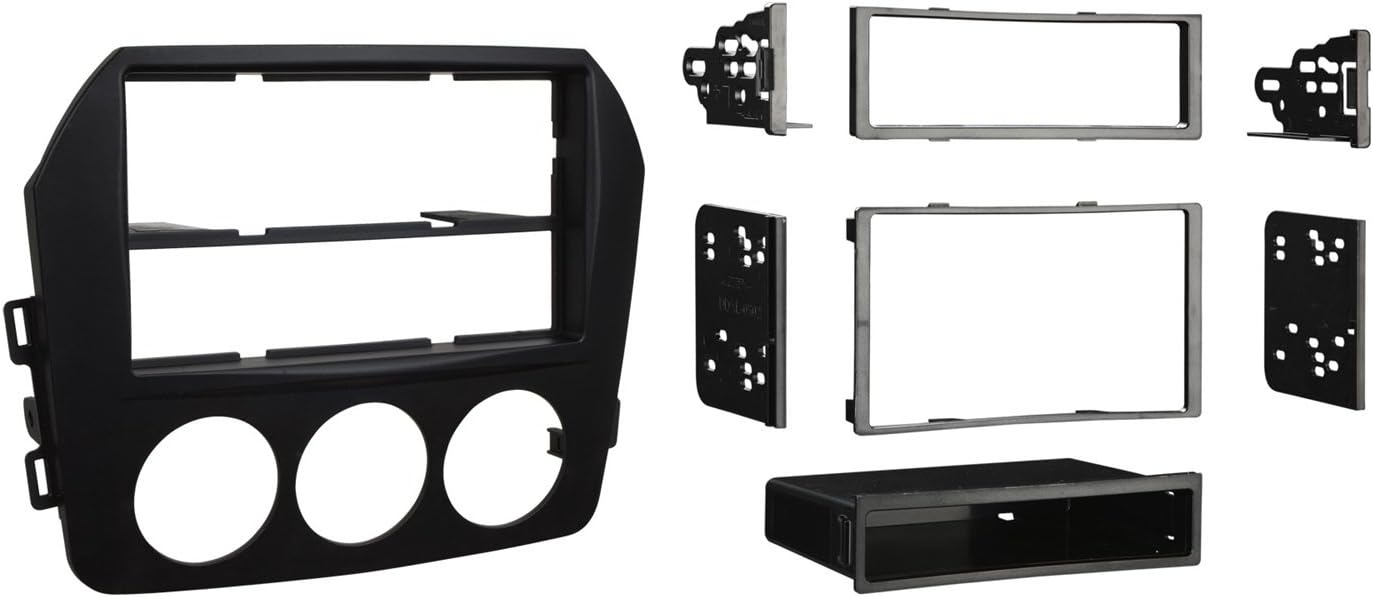
Scosche MA1550B – this appears the closest to the factory fascia regarding shape (rounded lower corners, inset aircon controls) and the most expensive, and extremely difficult to source as they might be out of production (2025). It’s mentioned in regards to the Atoto radios as the opening is very slightly taller. The plastic finish is a little shinier and apparently isn’t as closer match to factory as the Metra, and it may have a bigger gap at the top once installed but I’m unsure if that’s referring to a slightly different model number.
OEM (N17355210B)? – extremely difficult to source and expensive, but of course the best fit and finish of them all. As far as I have found in the UK there were GPS models of the NC that had a double din unit. I’m unaware of any in Australia. It’s the official version of the Metra Fascia.
My aim is to try to source the Scosche MA1550B for the slightly more OEM look especially around the aircon controls, and also it seems to have a slightly larger (taller?) opening to allow for the cheaper radios that I’m looking to get. I’m reading a lot of people are having to modify other options by filing or grinding to get radios to fit.
Update: I found a site within the country that listed the Schosche as in stock (and expensive!). I have ordered it and if it’s the right one when it arrives I’ll update this with their name.
Update2: They sent me the Metra 99-7519B without saying anything. Kind of expected that, and they have refunded me. I actually think the Scosche MA1550B probably isn’t being made anymore or extremely hard to source (2025). So the Metra might be the only real option anymore, and since it’s free I’ll see if I can make it work nicely.
Radio
For the radio the goal is to keep the price on the low side ($200AUDish), not the absolute cheapest but not at the name-brand level (sony/kenwood/pioneer – $400AUDish). Here’s what I’ve found so far.
- Atoto / Revcarx
- These seem to be about half the price of more popular brands while still doing all the typical google functions (like maps) and android auto which is what I’m after.
- The models that keep getting mentioned are:
- A6PF (2022, 2gb), A6PL (2024 refresh? 4gb? QLED), A6PP (2025? 2gb/4gb/IPS/QLED??) <– the A6 range seems to be the common one people go for.
- A5L (2025, 2gb, absolute cheapest models)
- A7 (Linux based, not android but does android auto, has odd gremlins?)
- S8 (mid-range, costly, 4gb)
- 10X (top range, expensive)
- The differences being the design of the front (buttons or touch-buttons, exposed usb), the display technology (IPS vs QLED), Android version, & ram/cores.
- Popular opinion is if you can afford it and it makes sense for the car, go for at least 4gb ram and QLED.
- They seem to have packages with cameras.
- Extreme sales on Aliexpress during big holidays.
- Eonon
- Only just eyeballing these as another budget option. Don’t seem as prominent as Atoto
- They get a decent review, and have more recent android versions?
Currently leaning towards the Atoto A6PL (A6G2B7PL), or the S8 if it’s cheap enough.
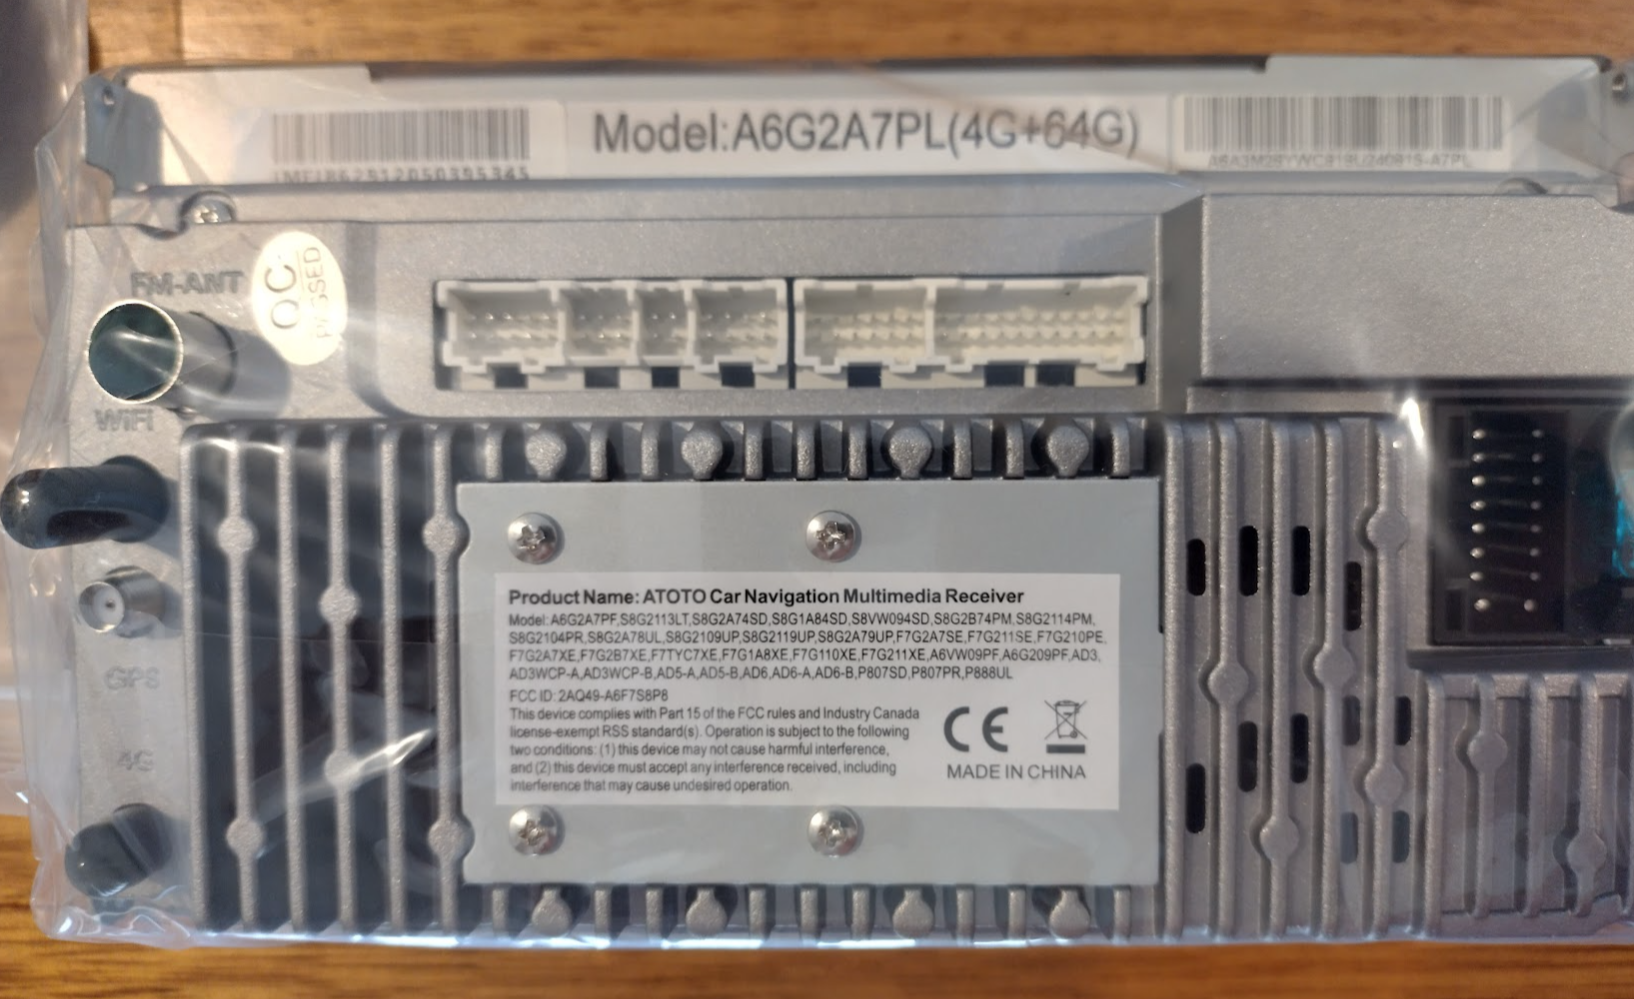
Update: I found an A6EG2A7PLB + front cam bundle for 20% off + 20% off ebay black friday bonus. So the radio + front + rear camera + postage is a total of ~$240. To go the capacitive buttons or S8 was $100+ more which goes a bit above the old budget for this car. Not a lot of information about the “PL” variant but everything indicated it’s like an A6PF just with 4g ram, 64gb storage, and 4G. This makes it apparently as good as the S8 with it’s features. Will update this to verify whether the correct radio model arrives (with QLED) as it sounds too good to be true. Even at that price if it’s a standard A6PF or so it’ll be a good buy.
Further Update: It has just arrived and all barcodes and stickers indicate it’s the correct model number and features, except it’s missing from the FCC list. I suspect it’s Atoto’s way of extending the life of the common A6PF model.
Update2: Atoto seems to have been huge around 2020, 2022, that sort of year, with a bit of a little bump in 2024. In late 2025 it’s still there but not as raved about, as the big brands all seem to have Linux/Android options in similar price brackets now. The general “forum” idea is that if you’re a sound purist, get a proper name brand. If you’re not bothered by that or just listen to the radio/free spotify mostly and want wireless carplay/android auto, then the chinese brands are a good option as they give other features for less.
Wiring looms & other
For the wiring we need to connect between the new radio and the mazda plugs inside, and also accommodate for the steering wheel controls and maybe the handbrake/park override. The mx5’s (I think up until very recent ND models) don’t have standard CANBUS, you can purchase converters but I’m going to skip this as I don’t think it’s necessary. Update: I don’t need the Atoto canbus, just bluetooth OBD2 so I’m going to give it a try.
The Atoto’s come with so many wires so you don’t need to buy much else, which is partly why the Atoto choice ends up so much cheaper. You don’t need to purchase a $100 steering wheel control box or line out converters or antennas – it’s all in the box.
The recent headunits actually contain additional RCA outputs (along with dedicated speaker outs), so the line-out converters aren’t supplied in those models as they’re no-longer required.
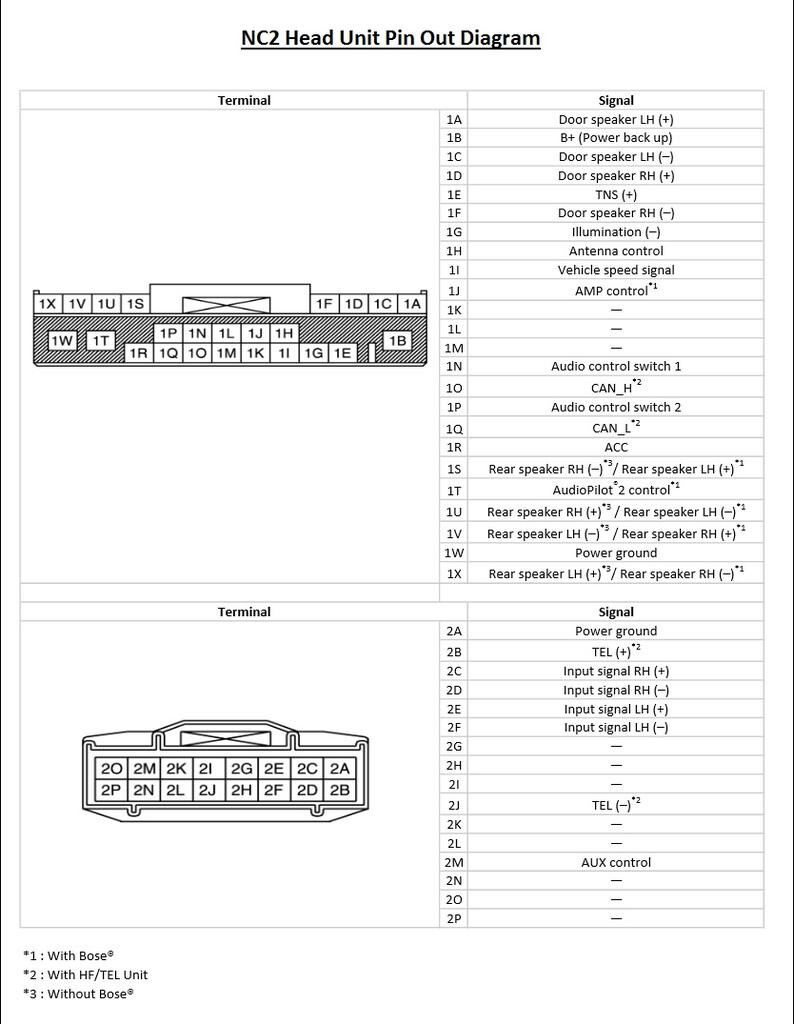
Note: The smaller white plug that goes in to the back of the stock MX5 radio seems to be ignored by everyone – mine has one and the only thing I’m aware of is the AUX port down in the tray area, so once I have the radio out again I’ll trace this to confirm what it does. I’m going to be very annoyed if I had bluetooth available for 7 years! Ok I have found photos I took while it was apart and a wiring diagram. The smaller plug seems to be more so the stock radio can react to the cars speed, lights, all of that – like a CANBUS. And also the AUX. So this is why people are ignoring it. I might see if I can wire up the AUX socket to the new radio anyway since I’ll be in there.
So this is what I have come up with from the videos.
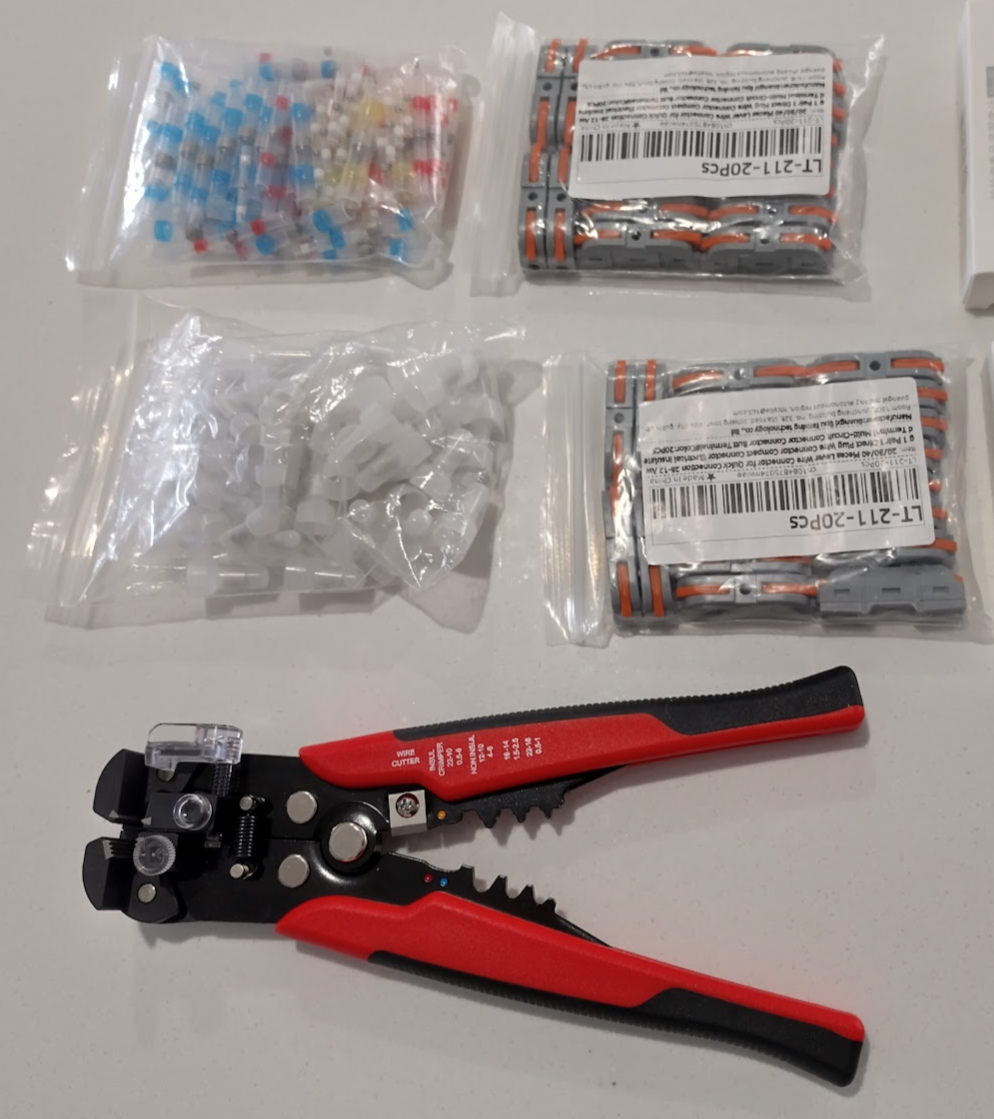
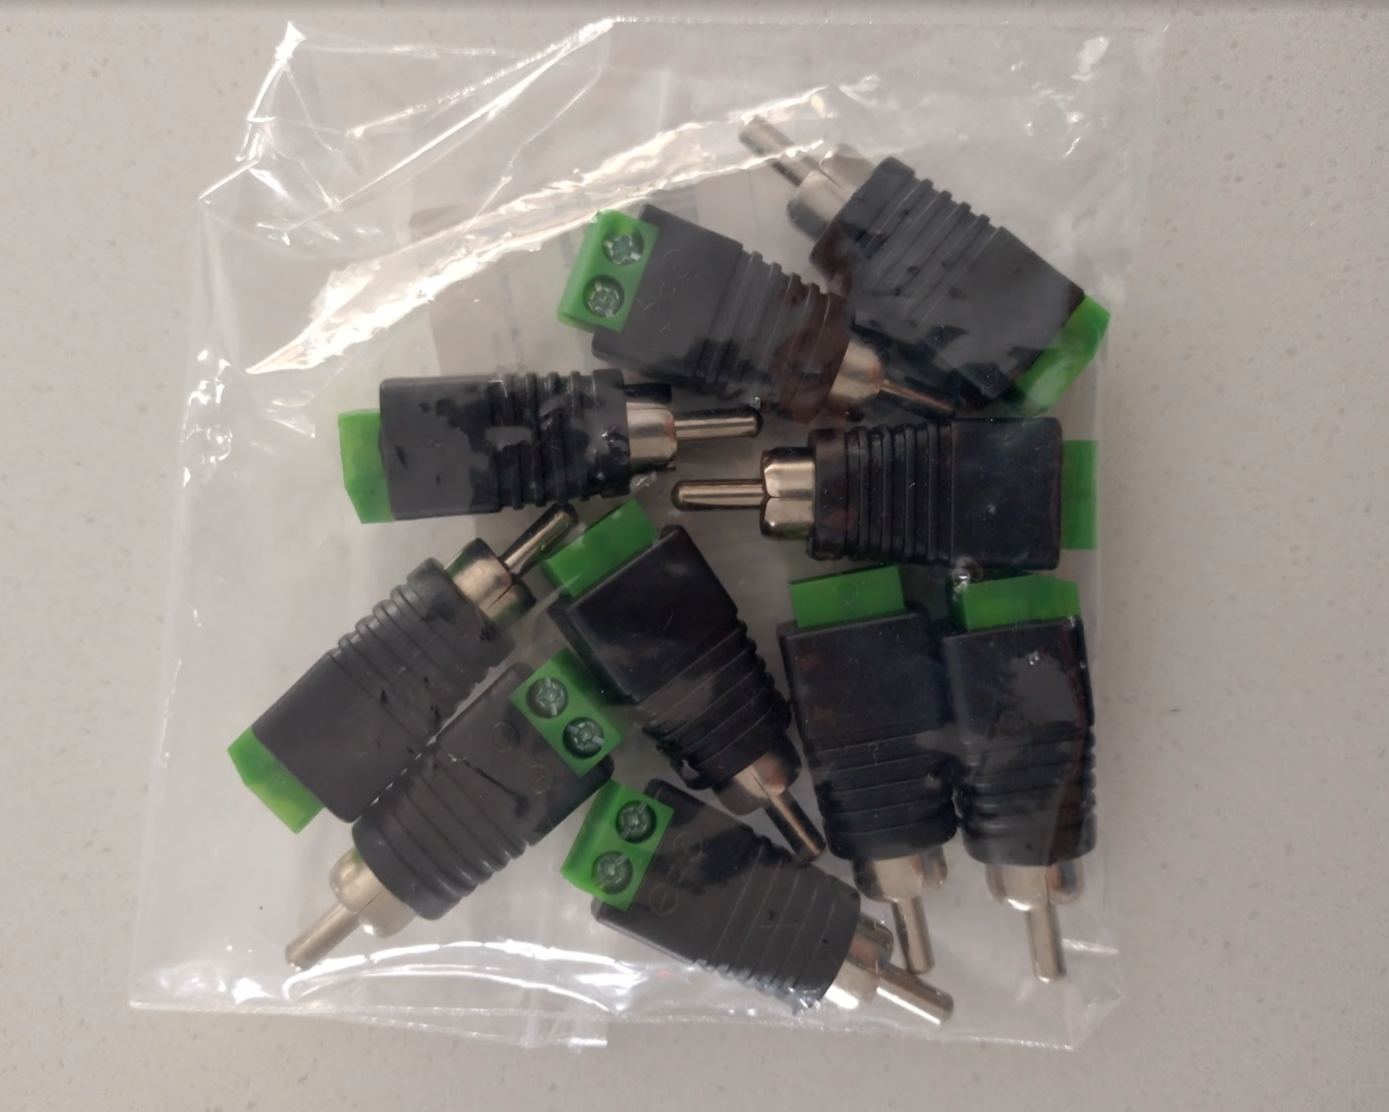
For all radios:
- 4 x solderless RCA plugs (for the Atoto line out converters) (maybe a few more to replace existing AUX
- Wire terminals/caps/crimps/joiners
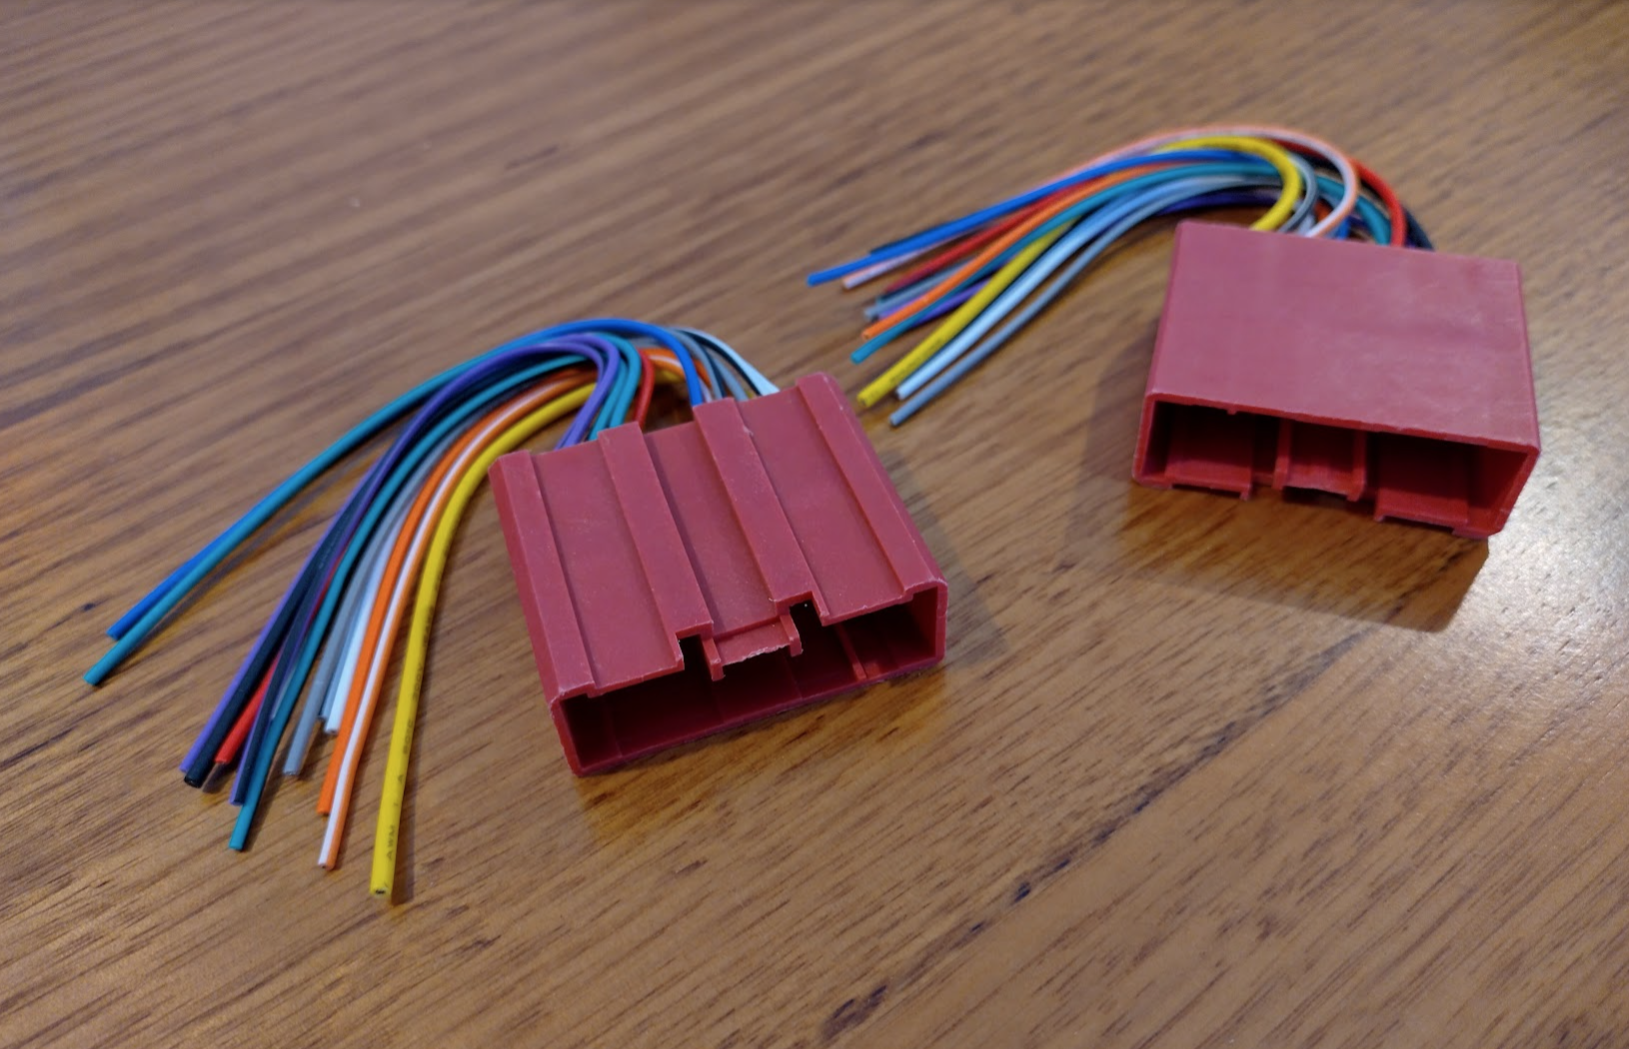
- 2 x Metra (or similar) 70-7903 Wiring Kits (the 2nd is purely to borrow two pins from to put in the first, for steering wheel controls)
If you’re going for a big name brand (sony/pioneer/kenwood/jvc/etc.) radio:
- Parking break bypass cable (this is radio-brand specific) – apparently only required for name brand radios, for Atoto we can ground or just leave disconnected the parking break wire as I’ve read there’s a software setting to override it anyway.
- Metra ASWC (for steering wheel control translation – the Atoto contains an app to do this without the hardware, I’m unsure of others)
- You may need 2xline-out converters if you have an amp already (BOSE for NC2) and your radio doesn’t have RCA outputs (These come with SOME Atoto’s, others have the RCA outs already)
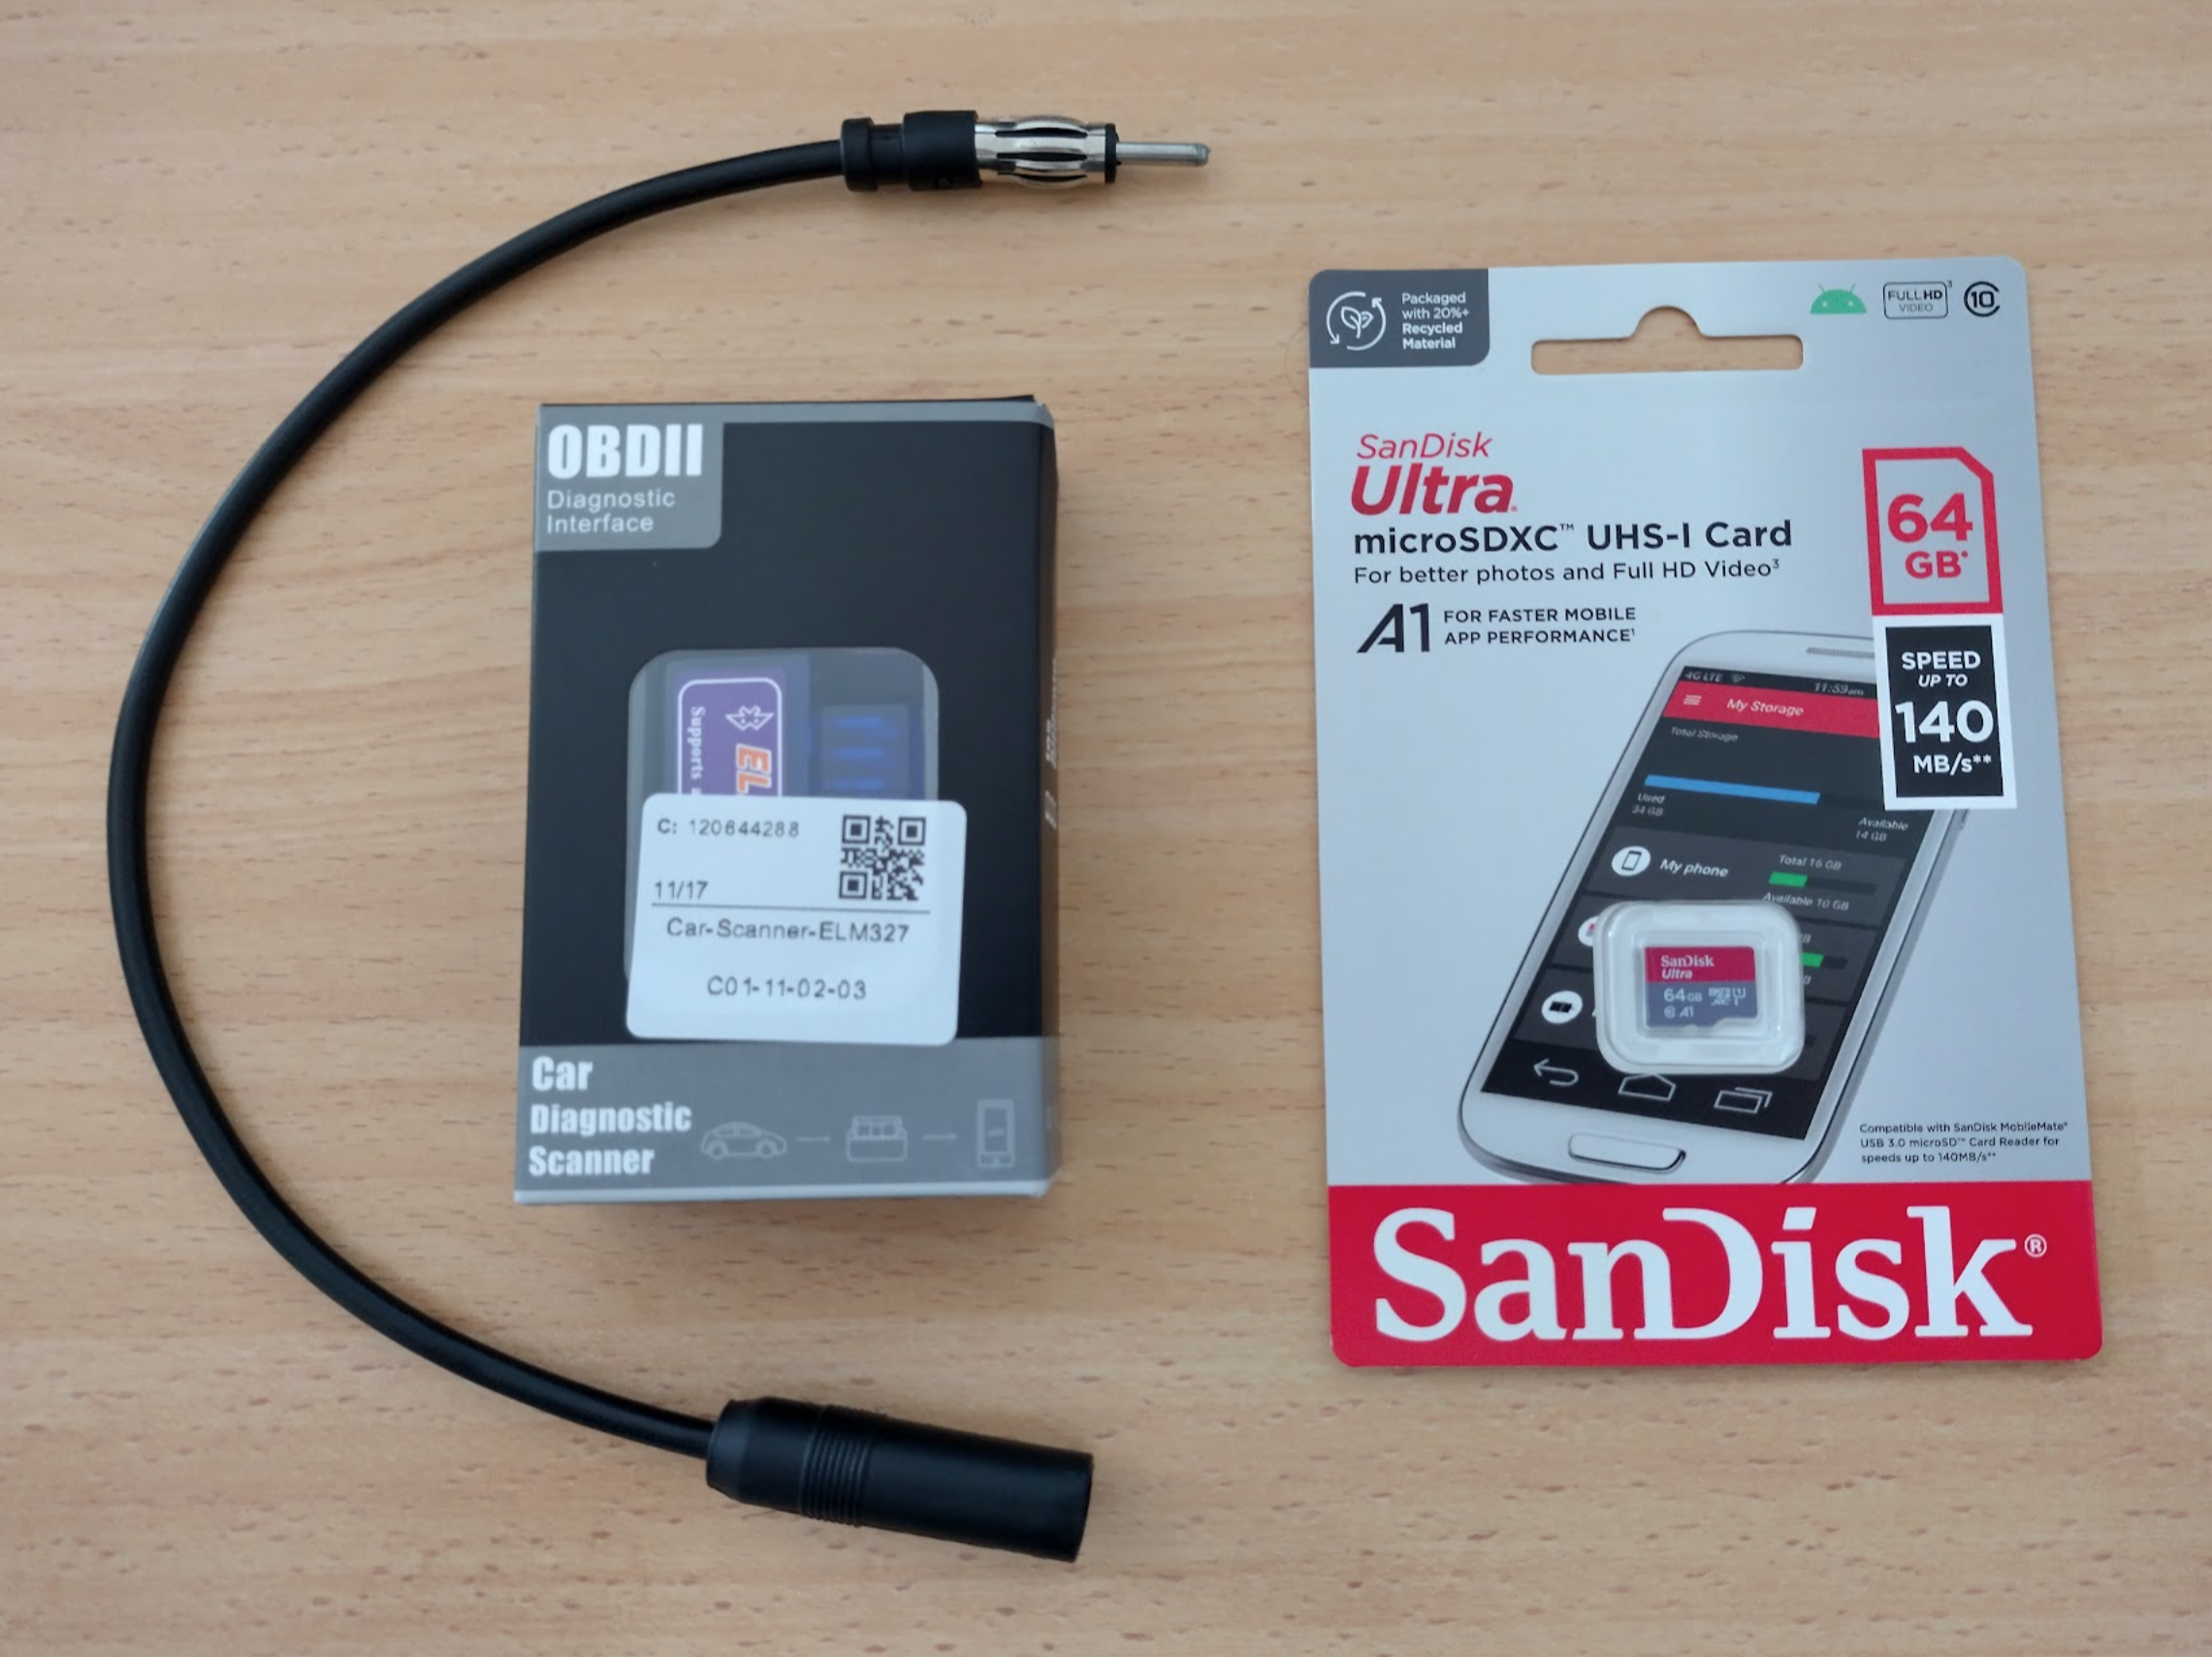
And a microsd card for the dashcam.
And a short radio antenna extension lead as these radios are shorter than the stock so it’s tight.
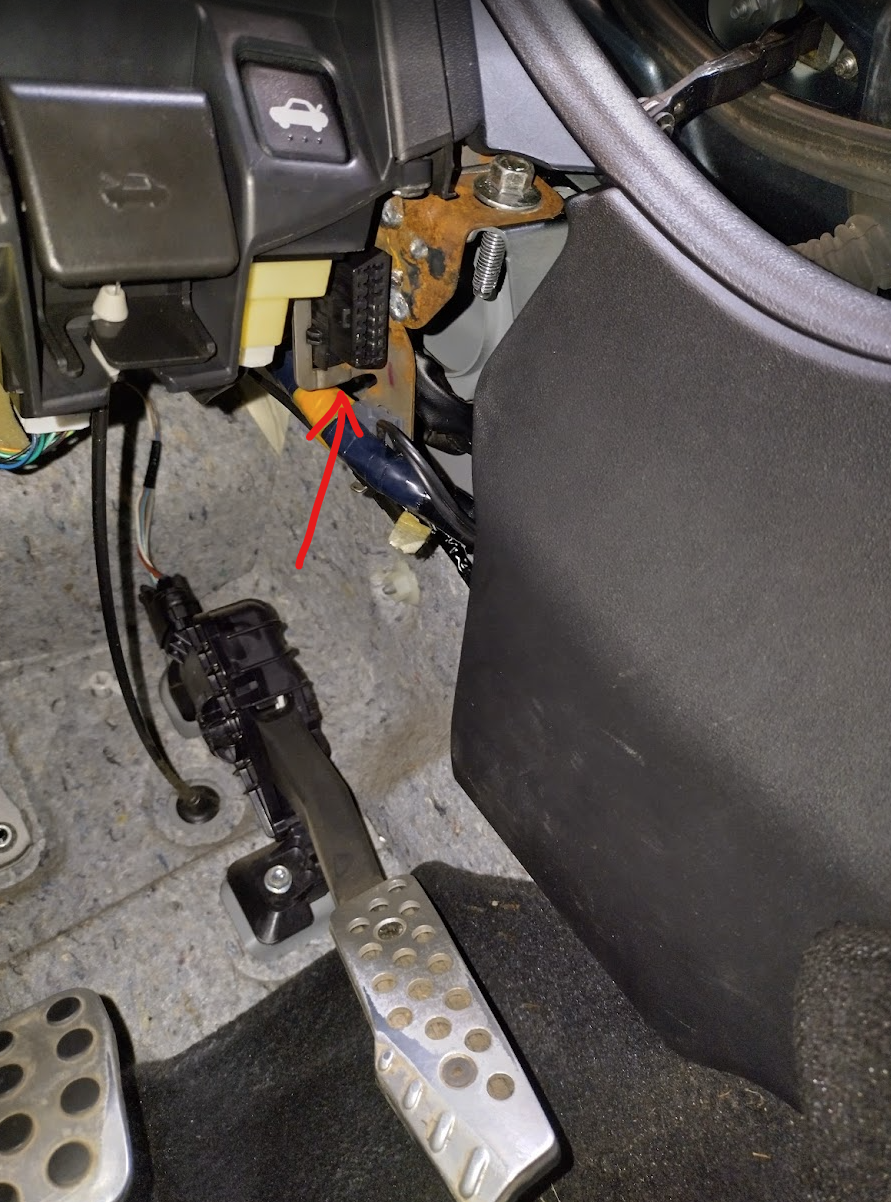
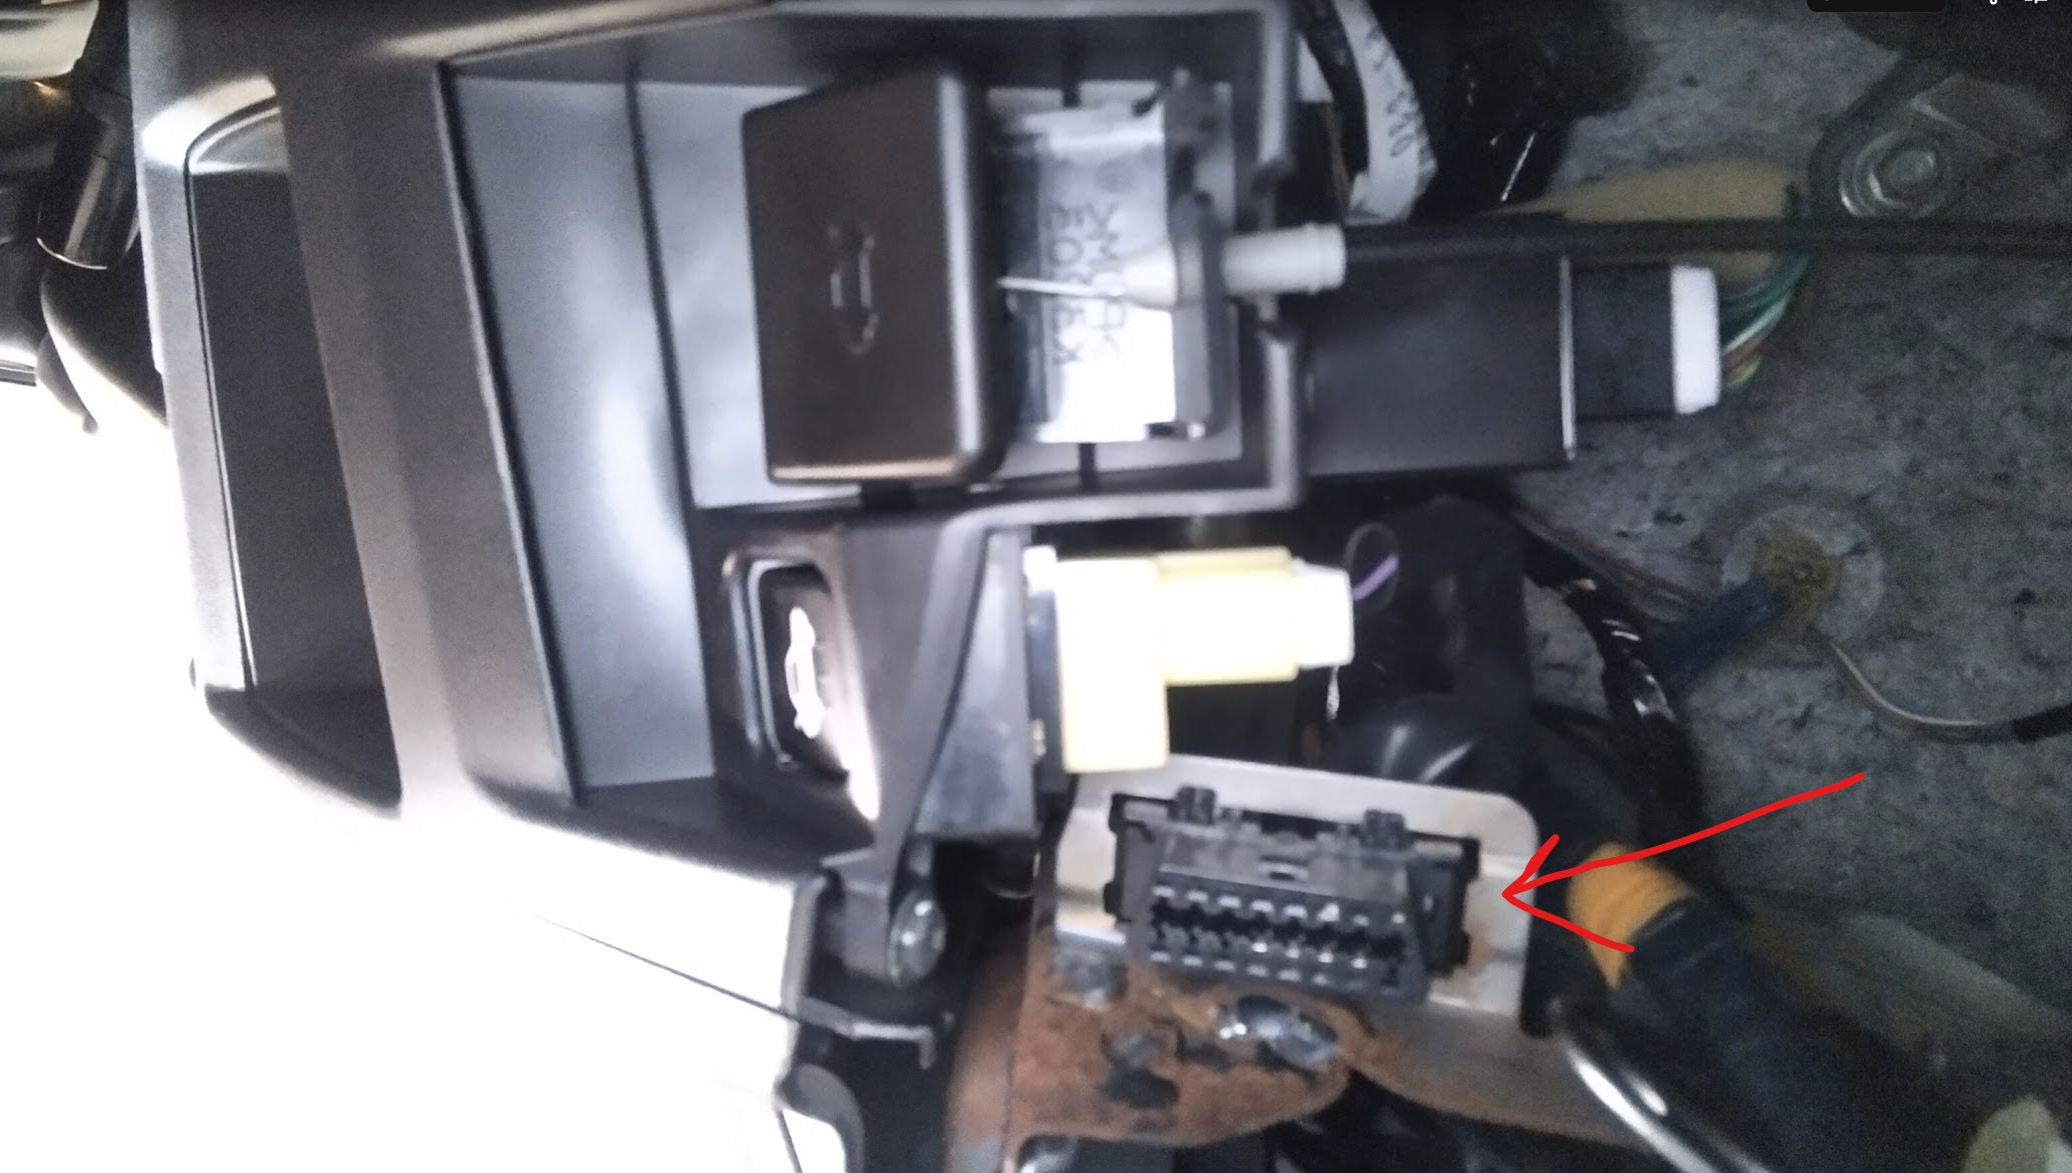
I’ve also decided to try and get OBD2 working on it since it supports it – I have to see if I can find the socket in the car.
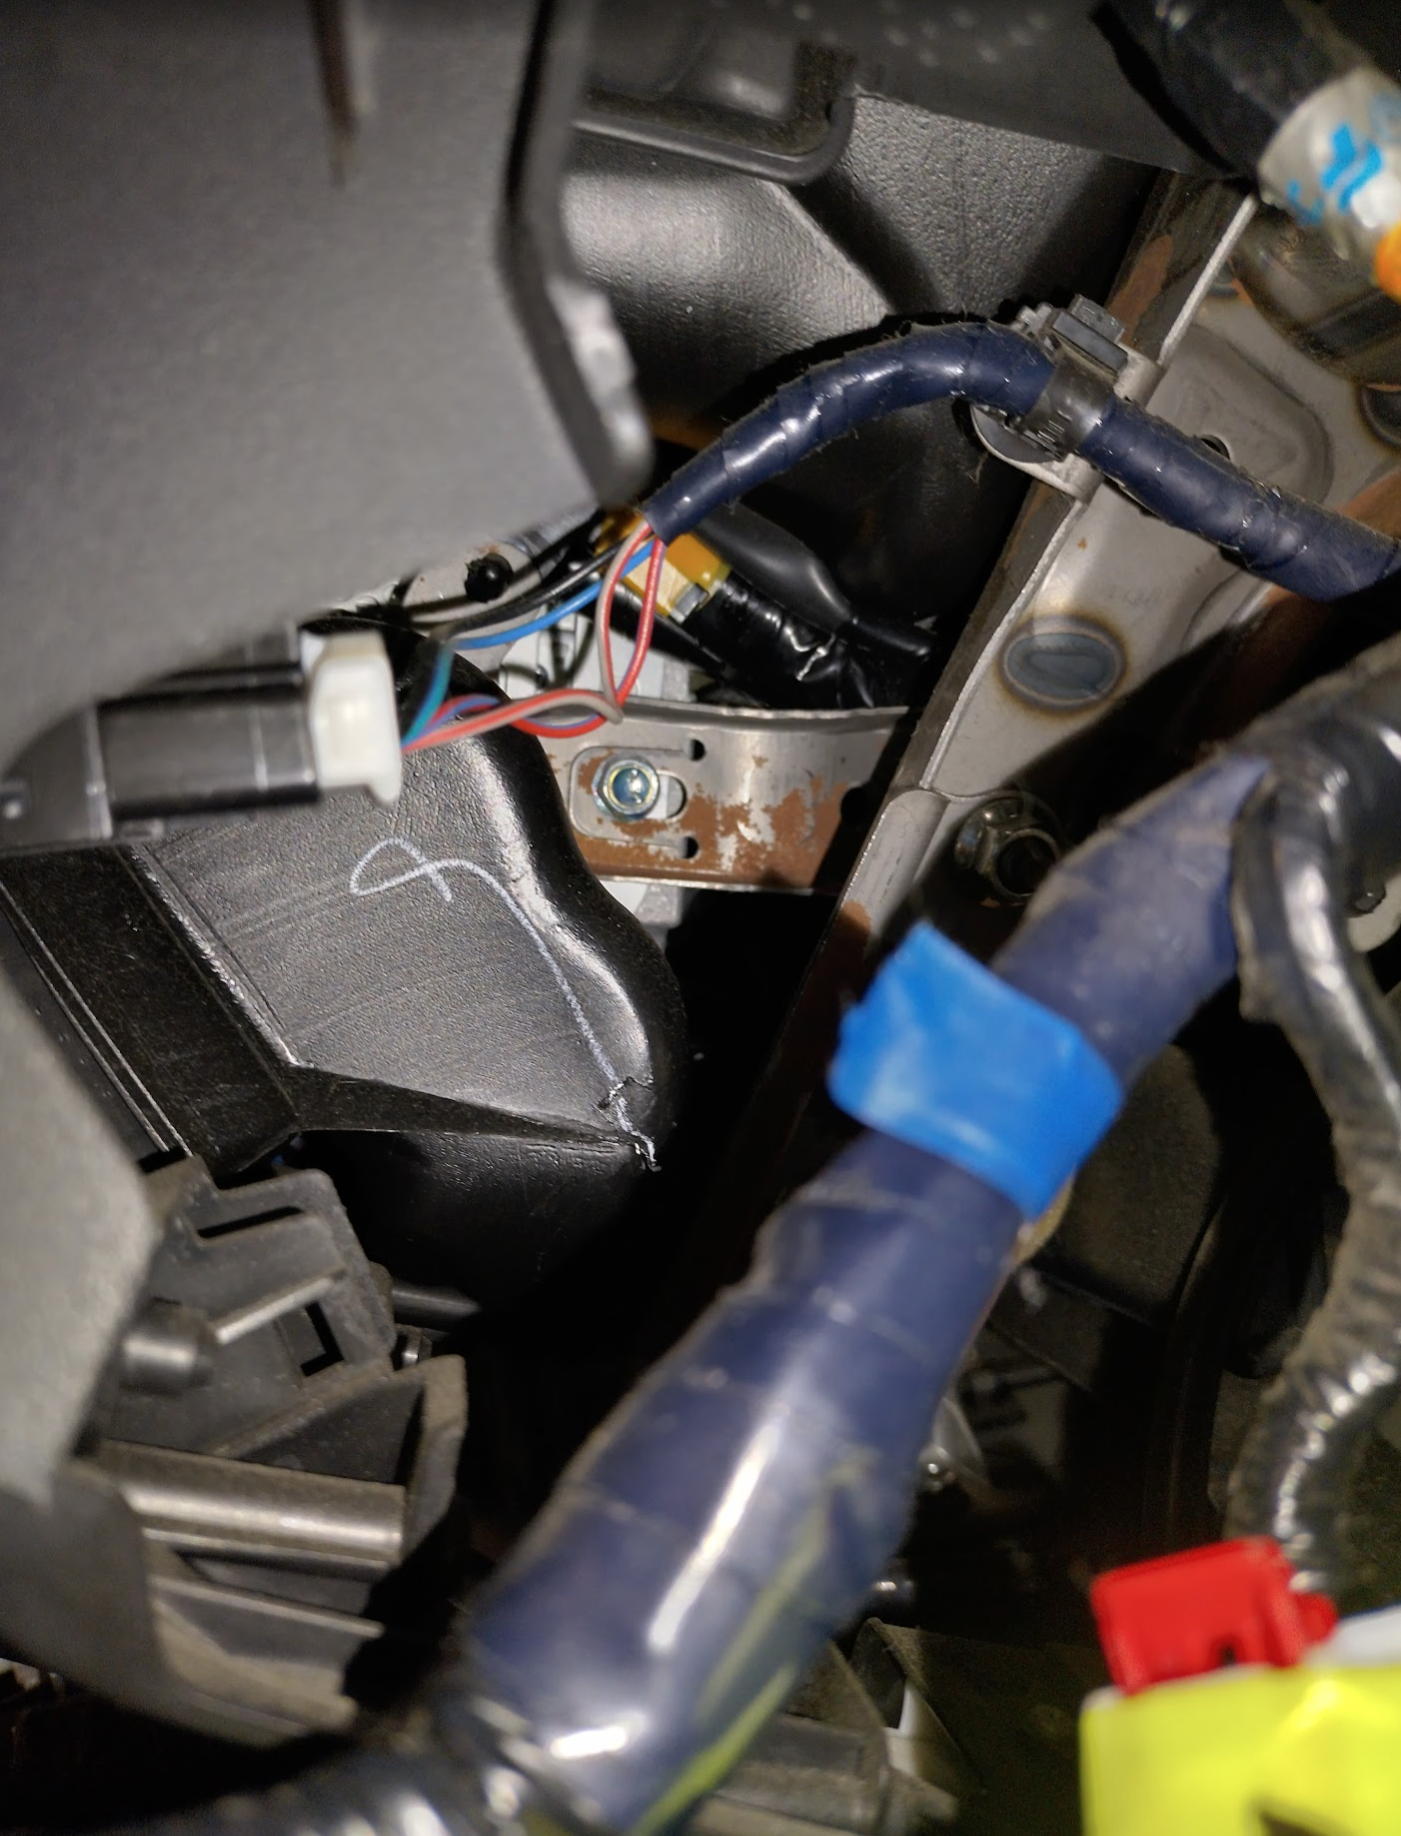
For those trying to locate where the OBD2/OBDII port is in an MX5 Miata NC 2006-2015, it’s right next to the boot release button in the drivers side, pushed through a bit of the dashboard metal skeleton.
All the parts
The parts are slowly arriving, so this will continue to be updated until they’re all here.
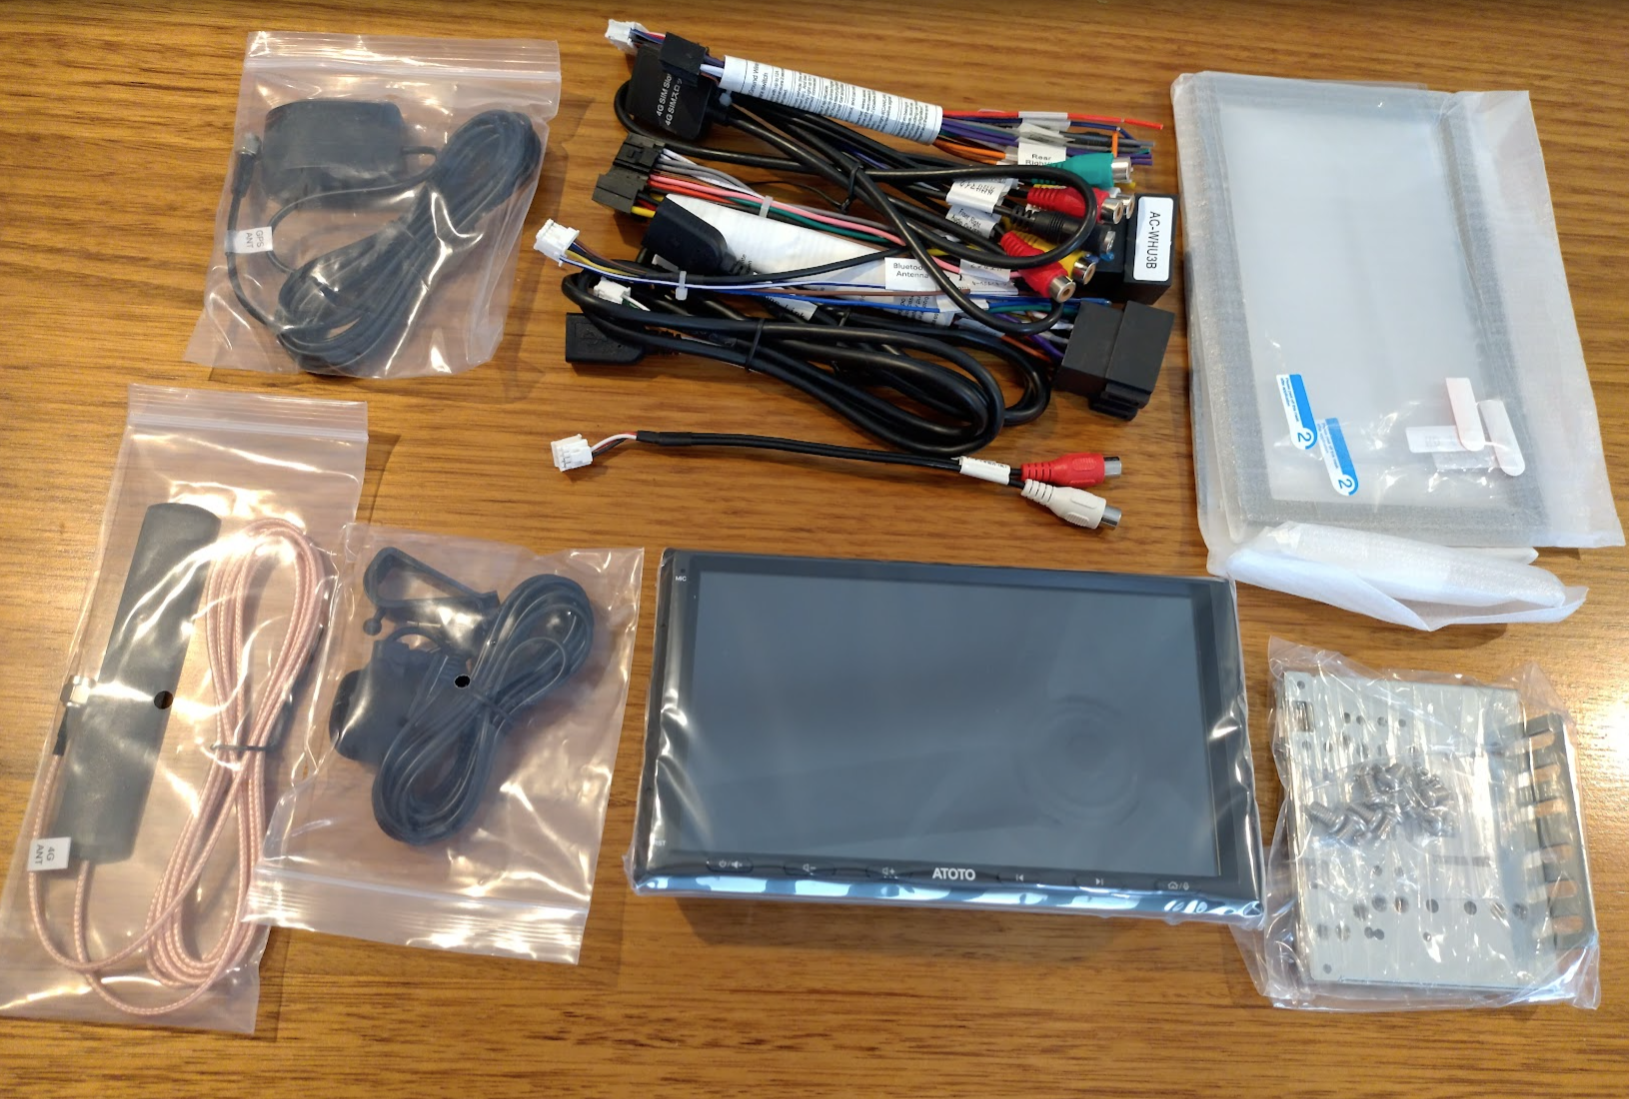
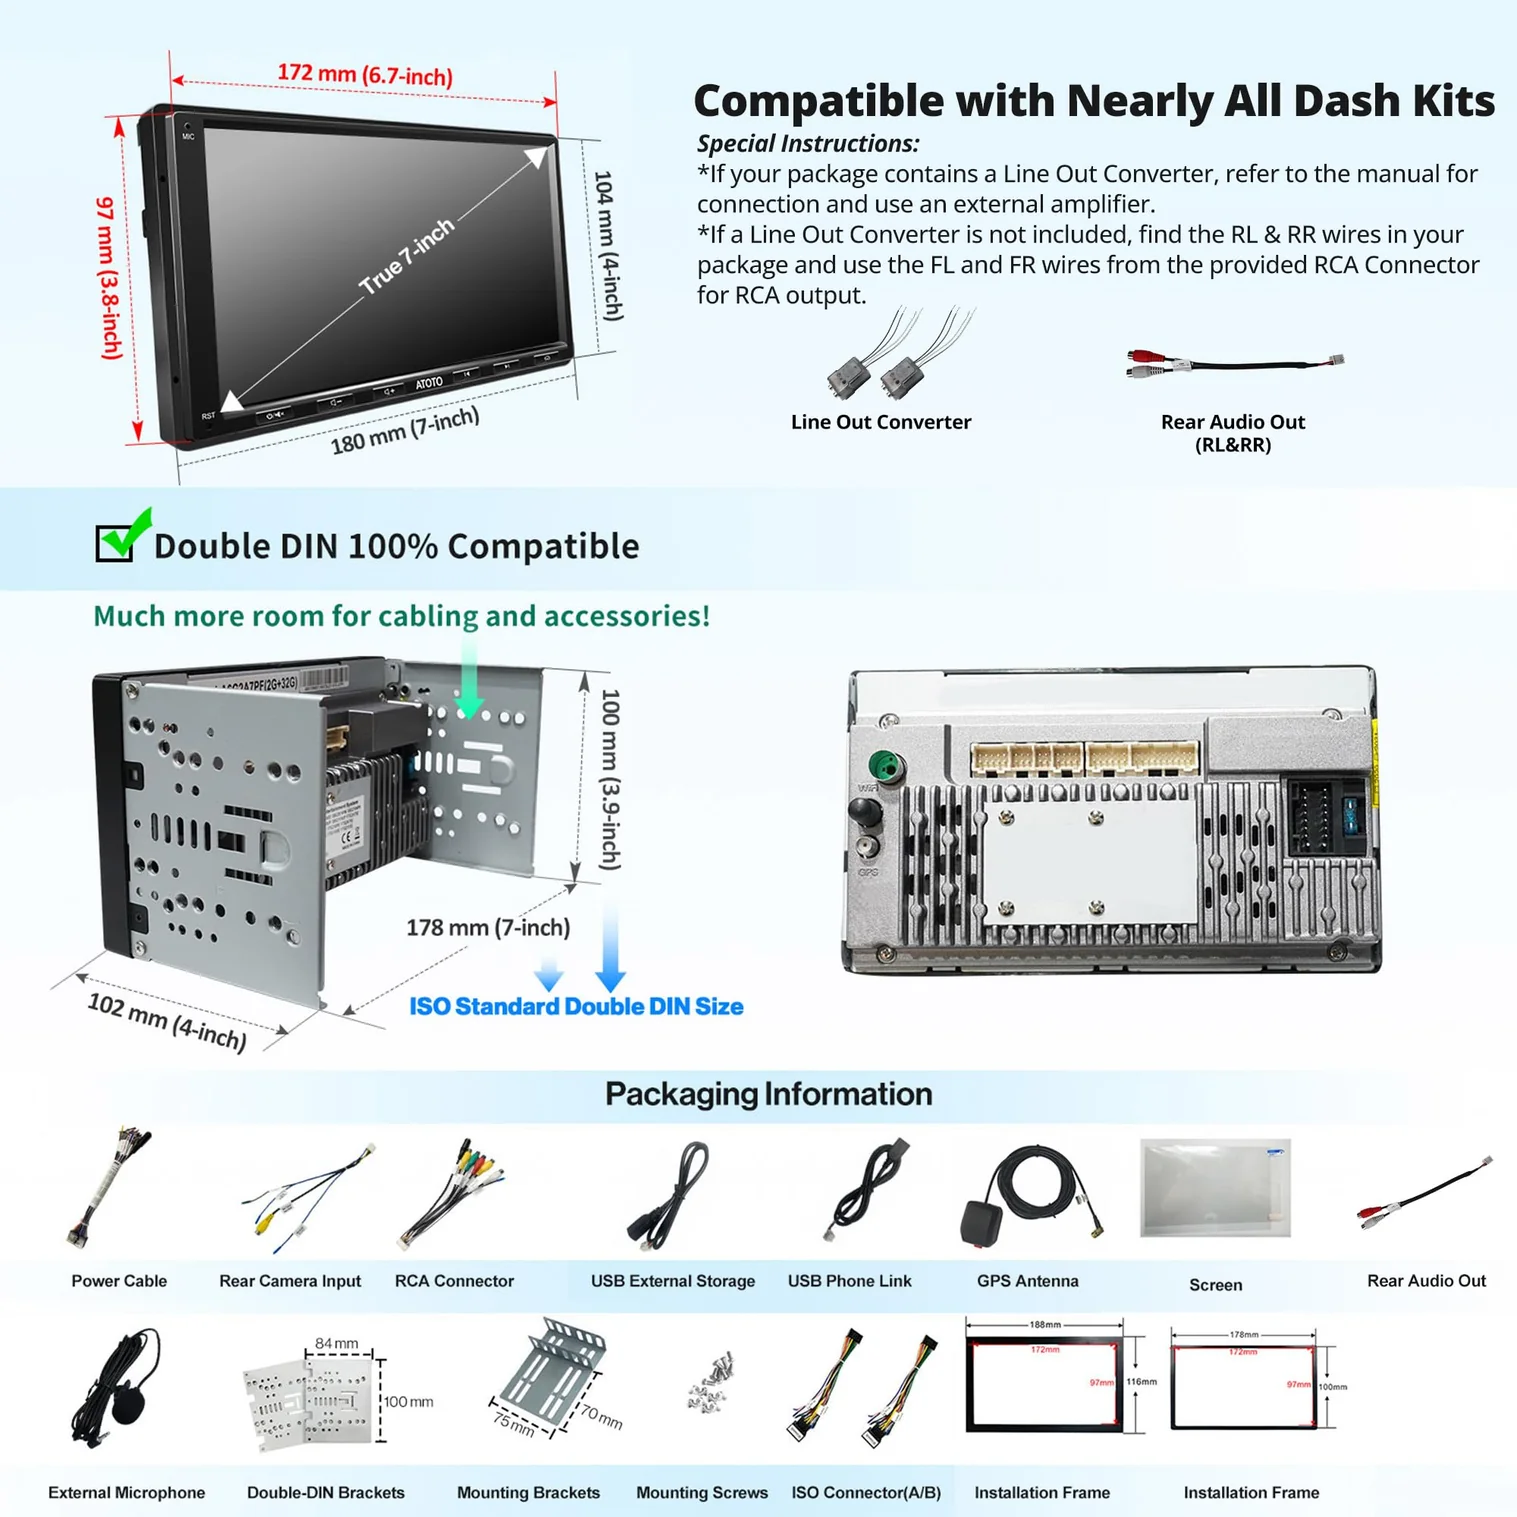
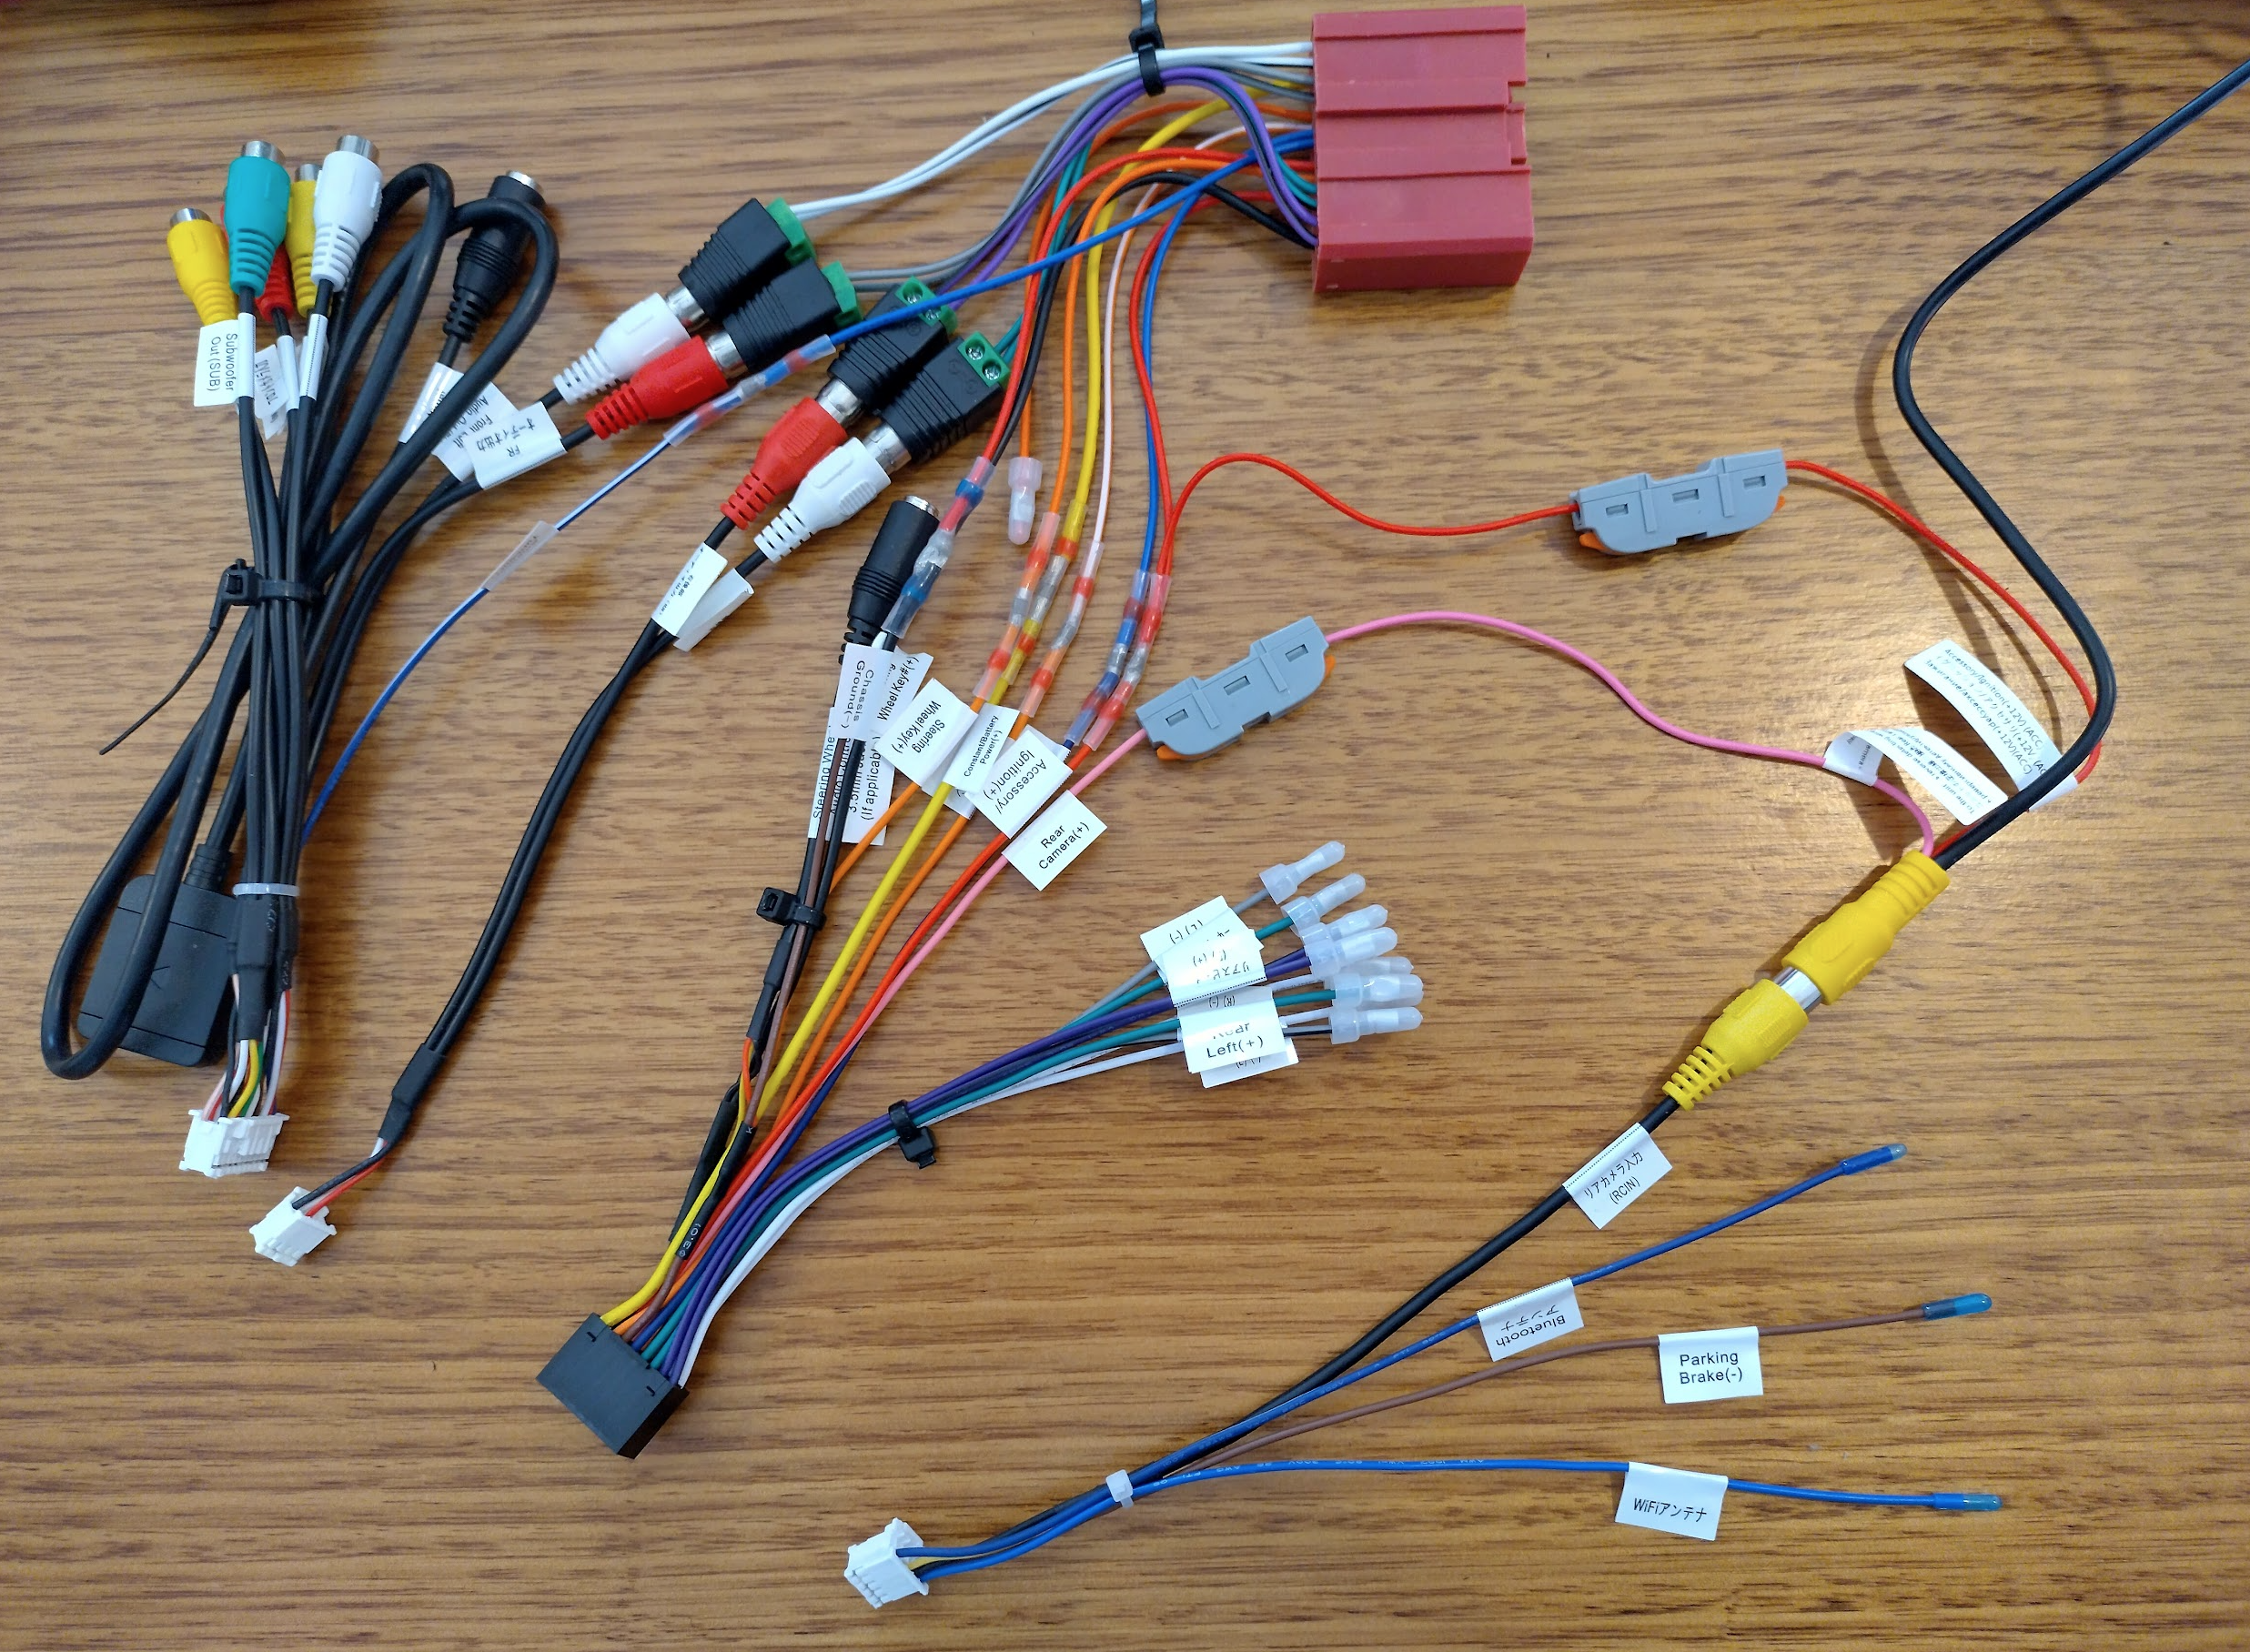
This is the Atoto A6EG2A7PLB (or A6PL – a refreshed A6PF?) and all of it’s contents which includes (clockwise from top left):
- GPS antenna
- All the assorted cables that plug into the back of the A6PL unit
- Two sized shrouds that surround the screen when mounted, along with 2 screen protectors
- Side mounting brackets
- The A6PL unit itself
- External microphone
- 4G cellular antenna
So even though there isn’t much mention of this model anywhere online, with the 4G cellular along with the 4G of Ram it brings it very close to the S8 model.
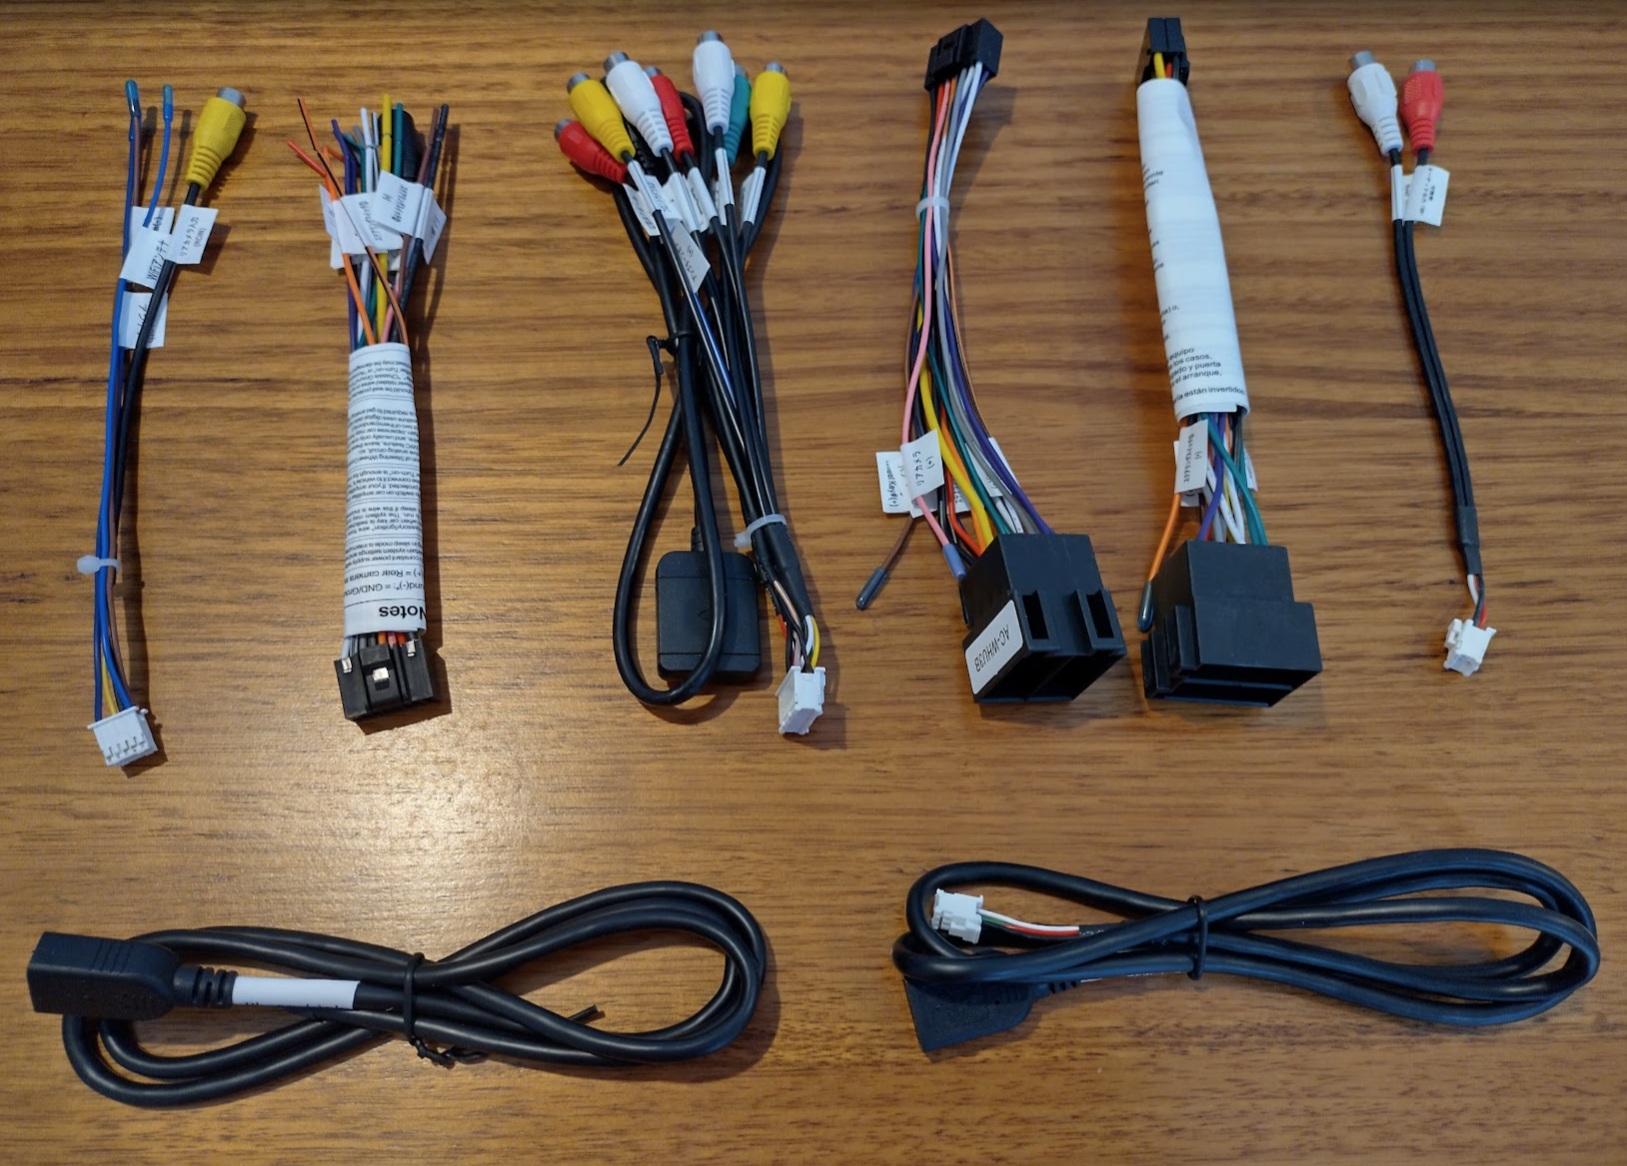
I’ve also provided a separate picture of all the cables so you can see what’s there. The 2nd, 4th, and 5th are all for the same purpose, so you’ll use only one of these. The lower two are just USB sockets but are labelled external storage (for the dashcam), and phone connector (for wired carplay)
What isn’t required is a steering wheel control decoder which is done via an app in the unit, making this an incredibly affordable option.
I noticed there’s no line-out converters. Apparently for the (recent) models, they have dedicated RCA outputs (you can see many here) which can be used in-place of those converters. The converters original job was to change a high signal that went directly to speakers down to a low RCA signal for amps.
That’s everything required as far as I can tell, aside from any little items I can source locally such as cable ties, bolts, and black tape. Lezdoit!
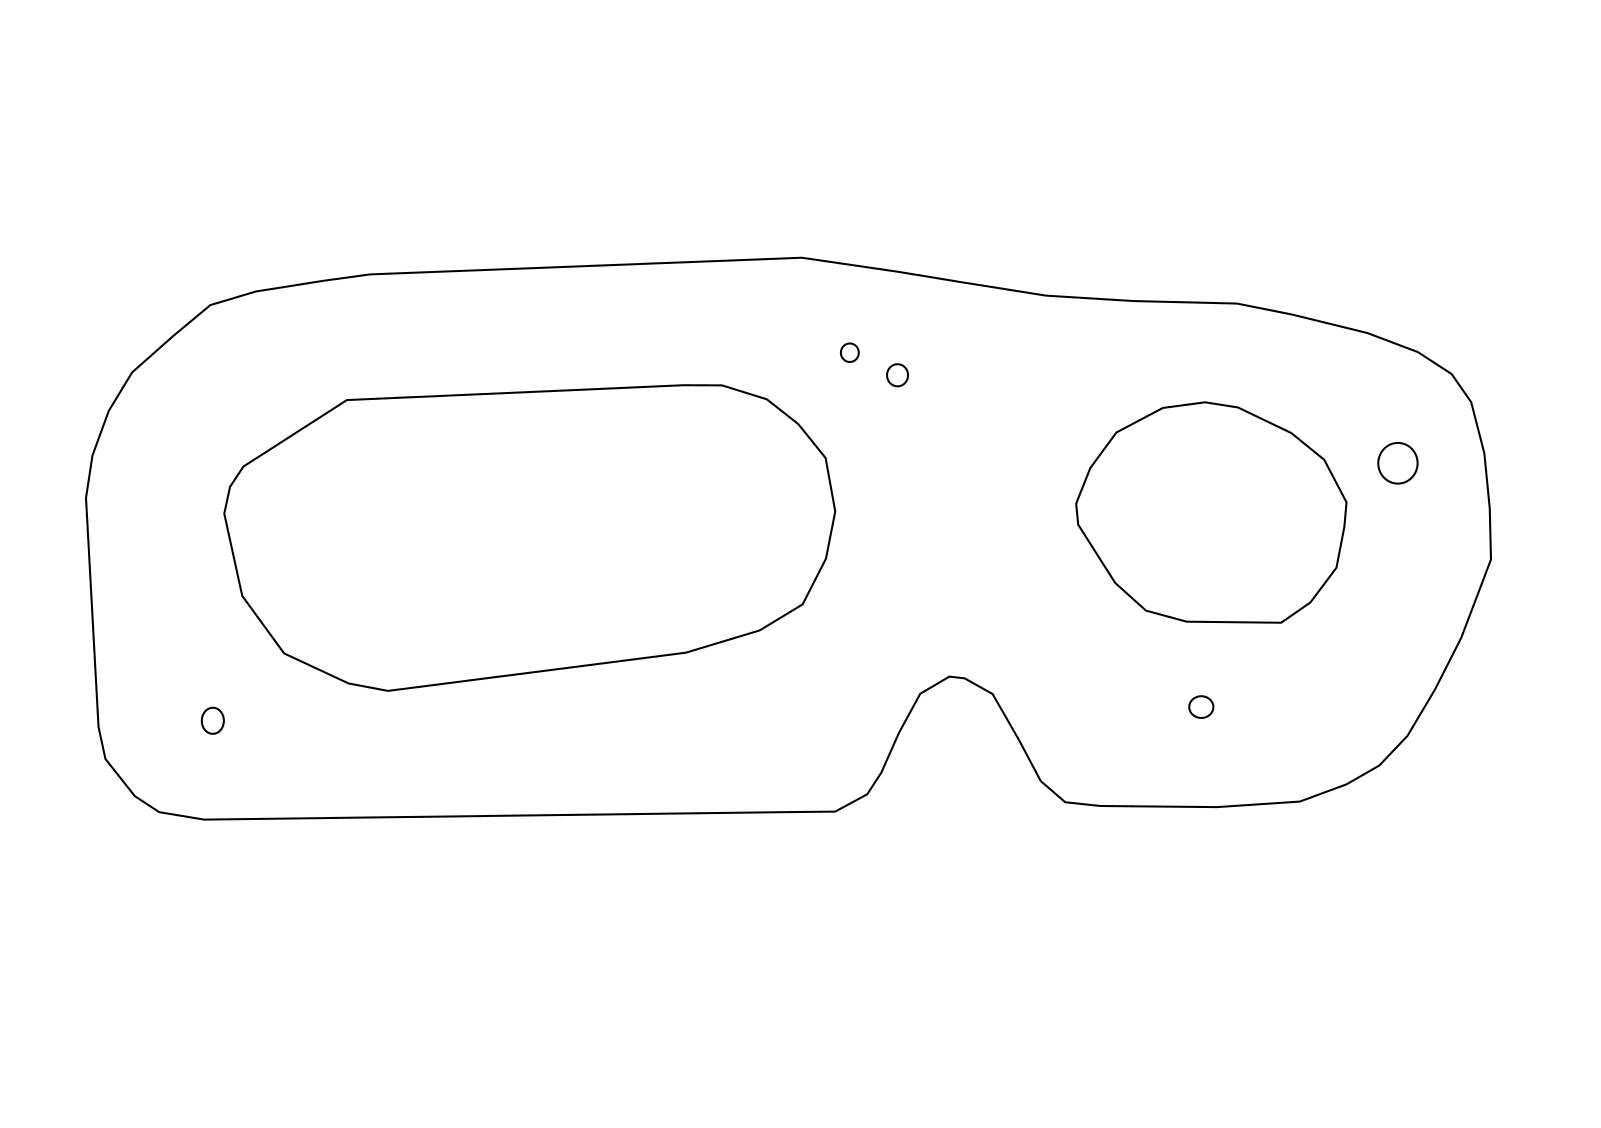
Fitting the radio in the faceplate/bezel/fascia
I ordered the Scosche MA1550B double DIN fascia but what arrived was the Metra 99-7519B that most people are using in the videos. While it’s the correct equivalent it has different styling which I was trying to go as close to OEM as I could. I have been refunded and this allows the project to go ahead, but if the looks aren’t quite right I might still try and source a Schosche. Let’s see!
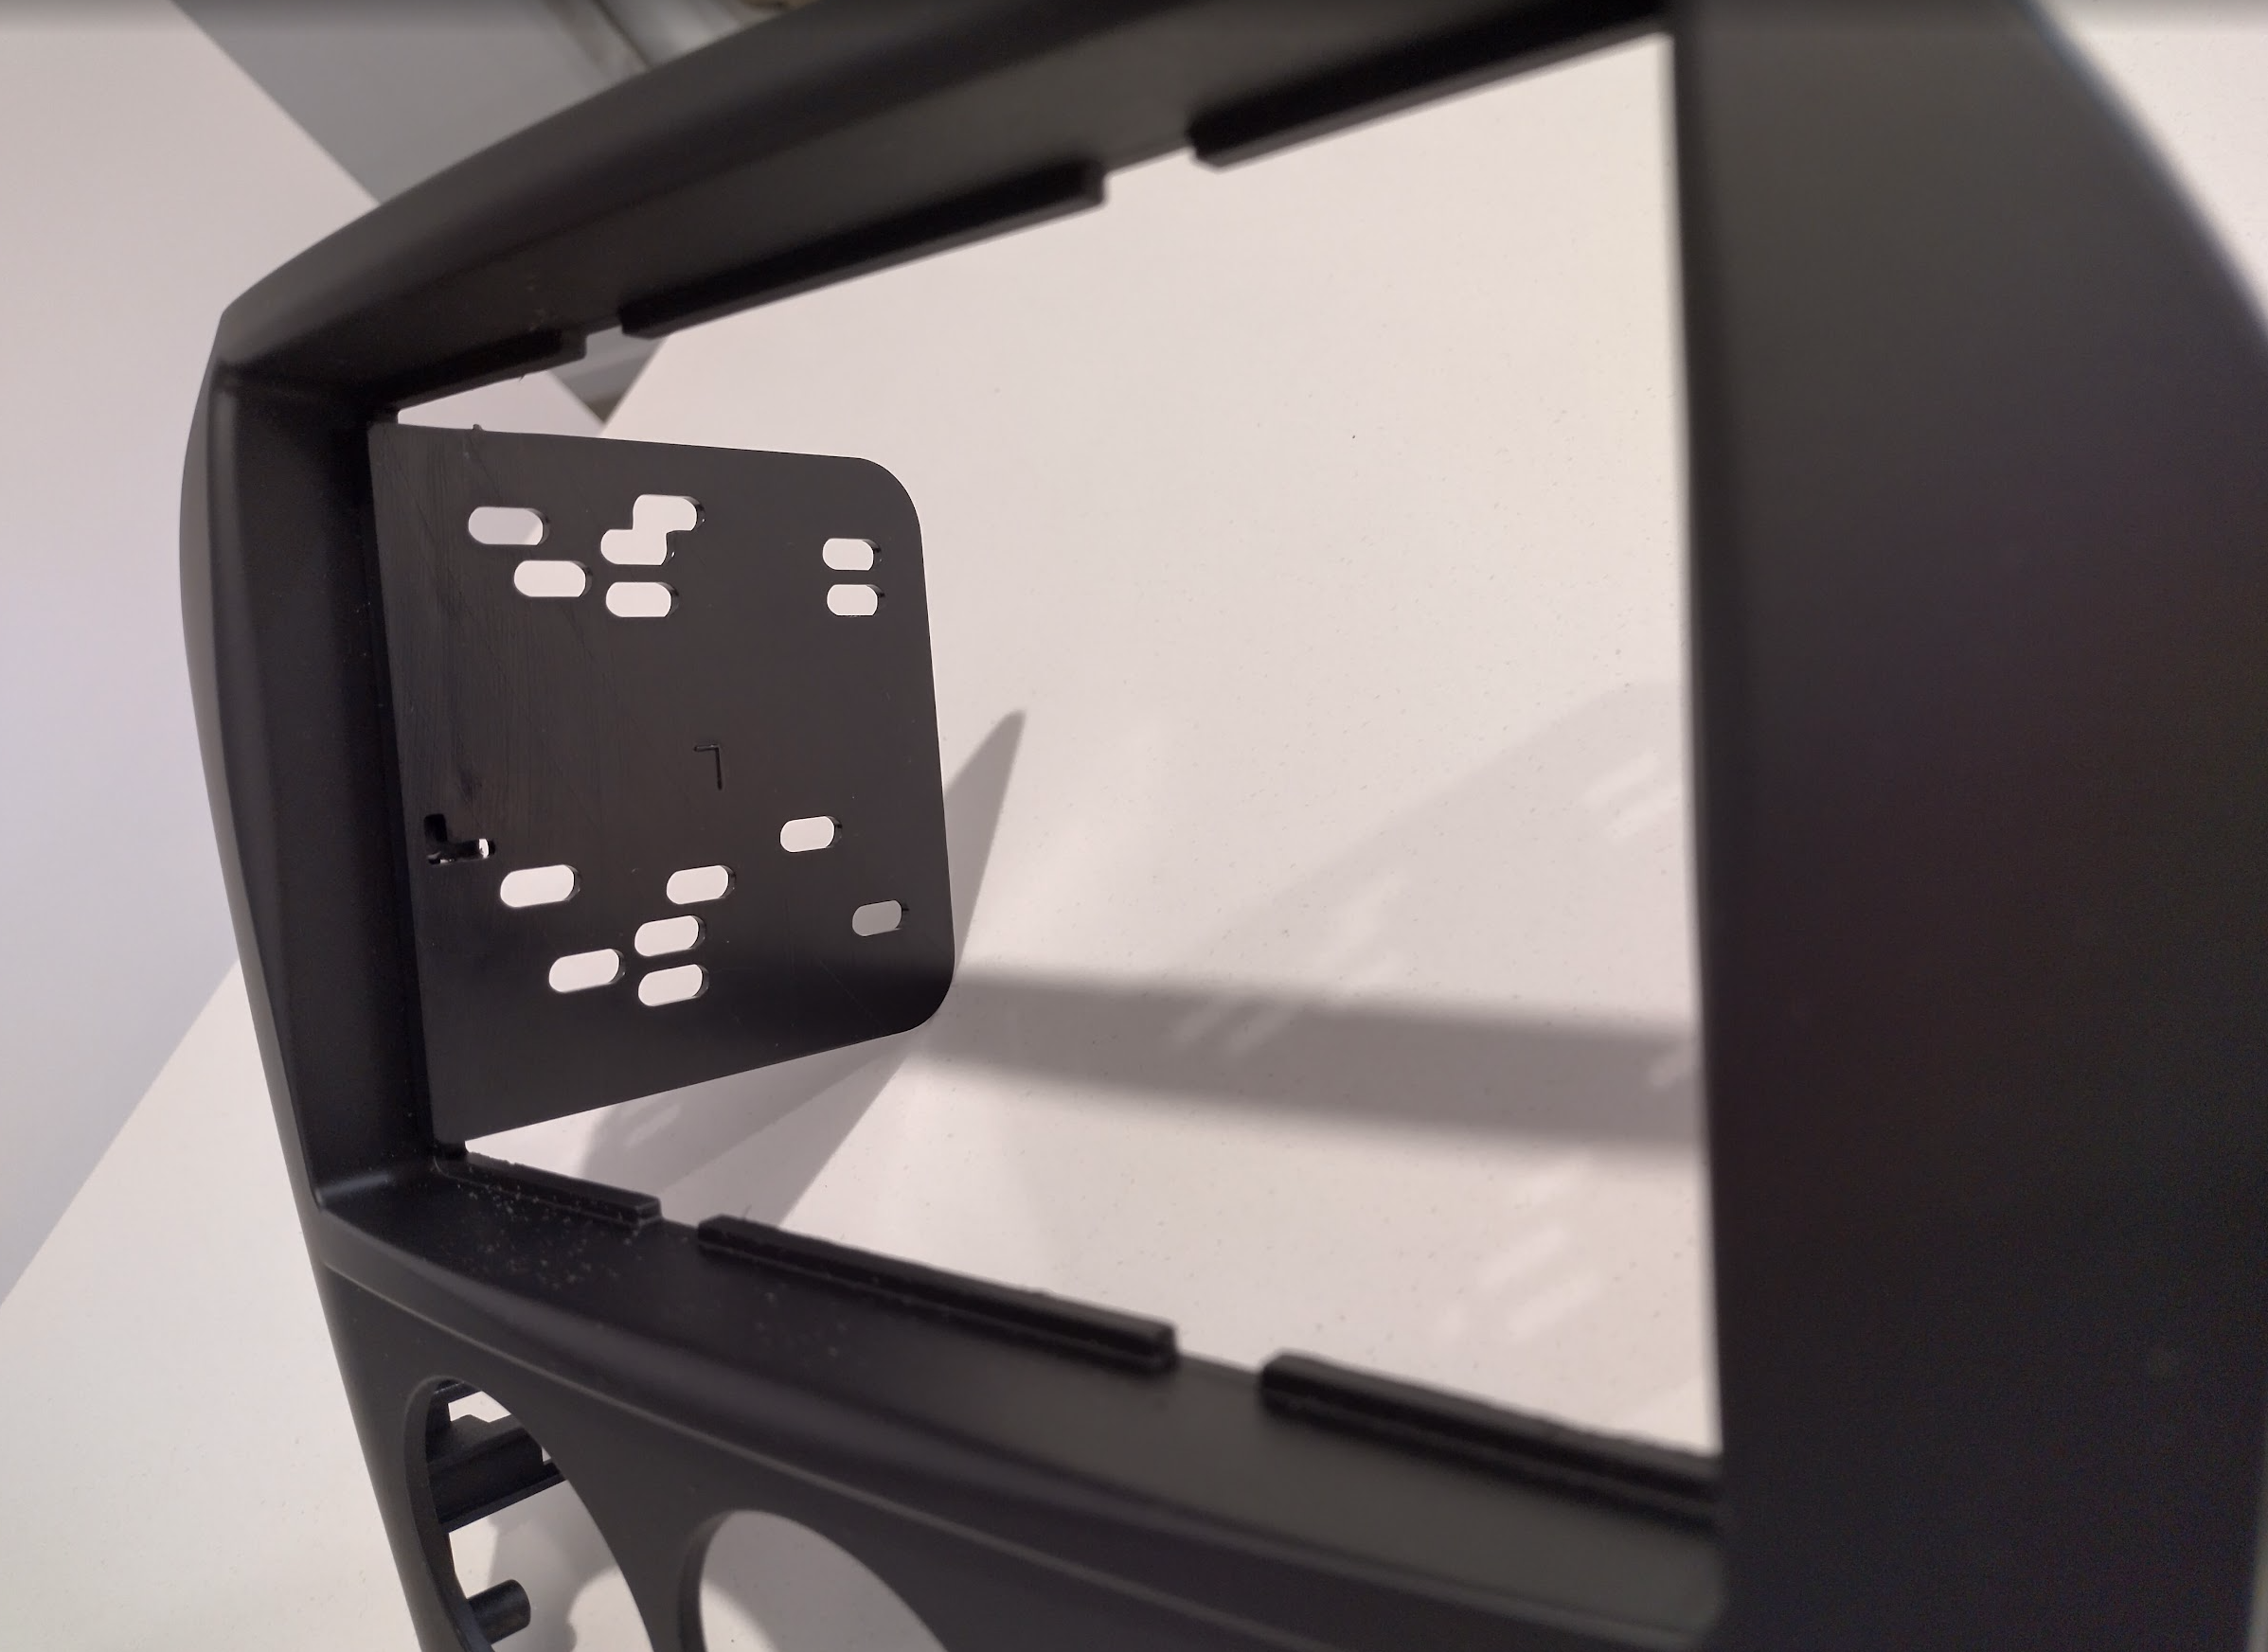
This is how someone made it fit really well for the very similar NC1’s Metra 99-7506. Images and hints thanks to Tony here: https://forum.miata.net/vb/showpost.php?p=11068200&postcount=18 . For the NC2 the faceplate is a little more rounded so it will turn out a bit different.
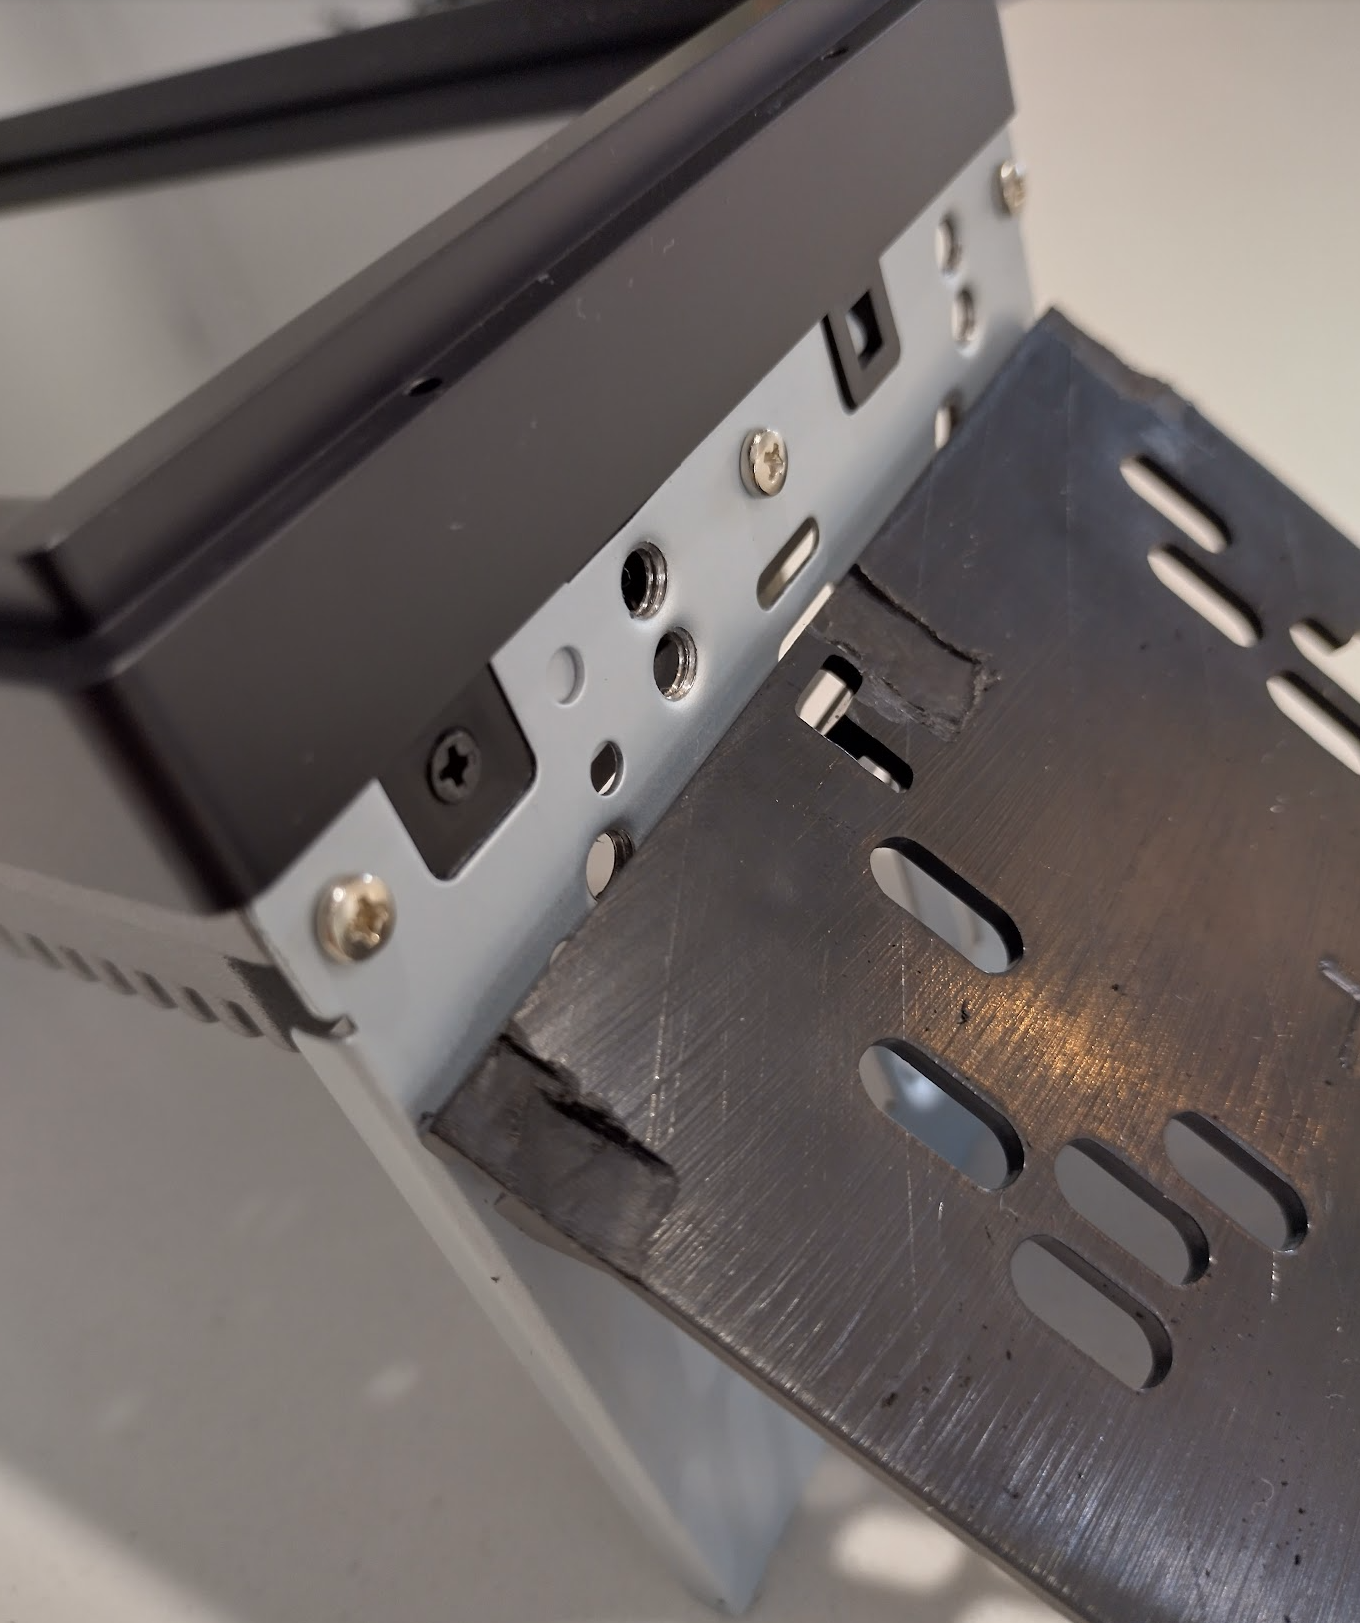
- shaved ~1/8” off the bottom of the opening.
- cut out indents on each of the plastic tabs that screw to the Atoto to make more room for the screws the protrude from the Atoto mounting bracket.
- made the opening for the trim clips bigger by filing the two lower ones down ~1/8”
- filed ~1/16” off the top two corners of the Metra double din opening. When I tried to stretch the dash piece over the Atoto, I found this to be the last spot that conflicted.

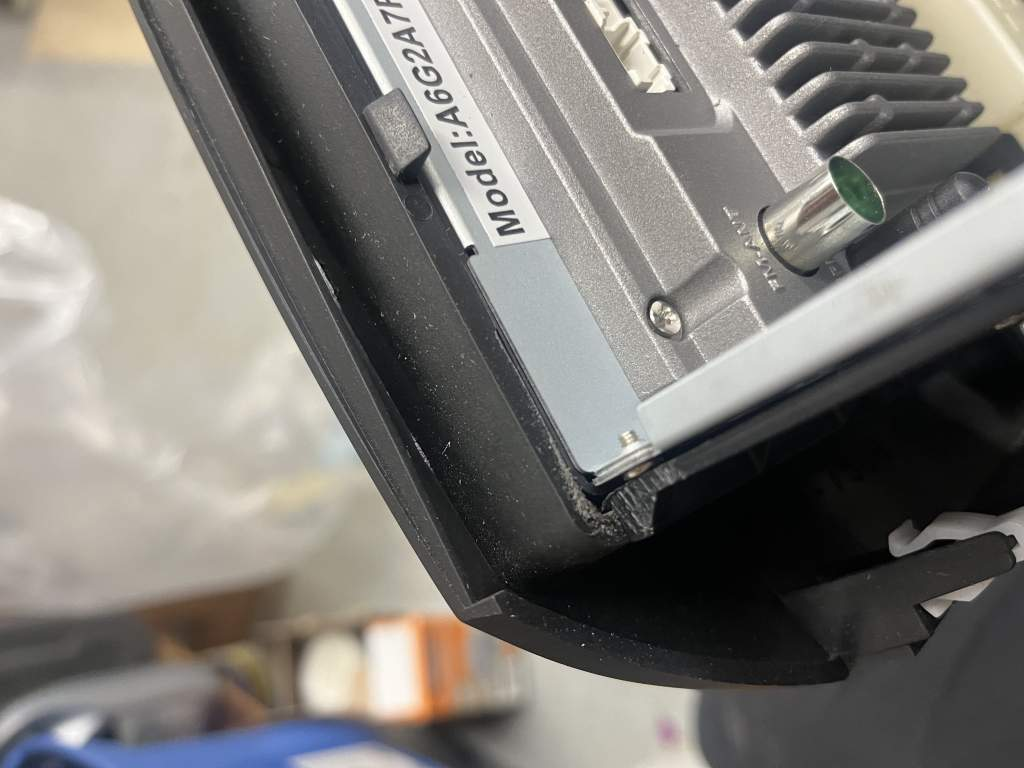
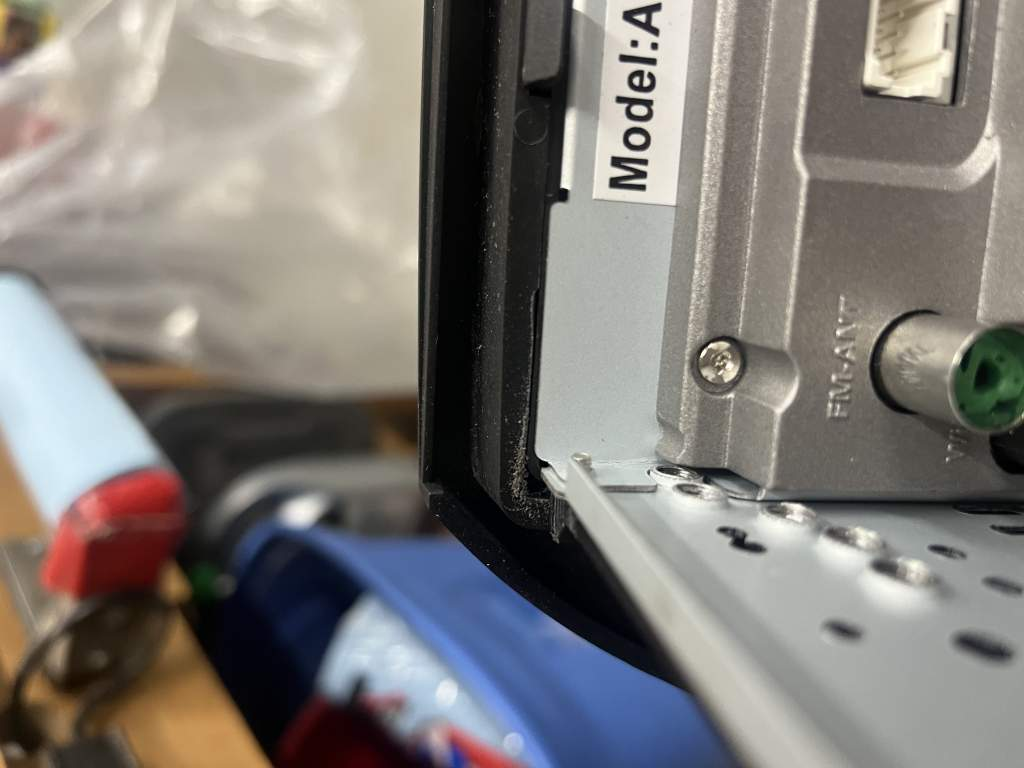
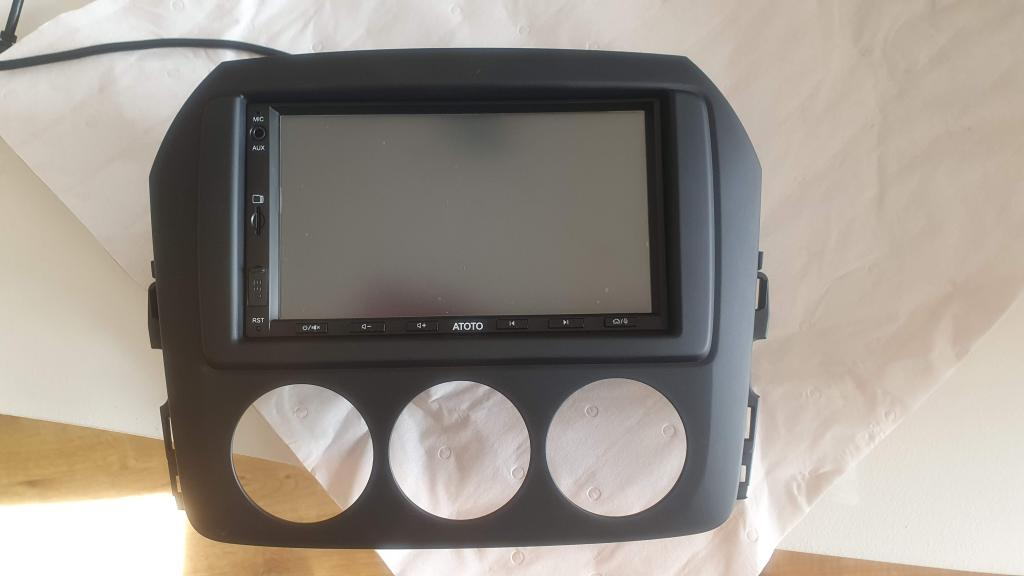
Fitting the radio in the Metra (WITHOUT the double din side rails) shows that indeed the opening is slightly too small, so the Atoto’s plastic faceplate rests on the lip surrounding the opening. Once the side rails are put in it makes the radio sit on top of those rails which results in it poking out a little too far. So the aim is to modify the rails only and I think it’ll be good enough.
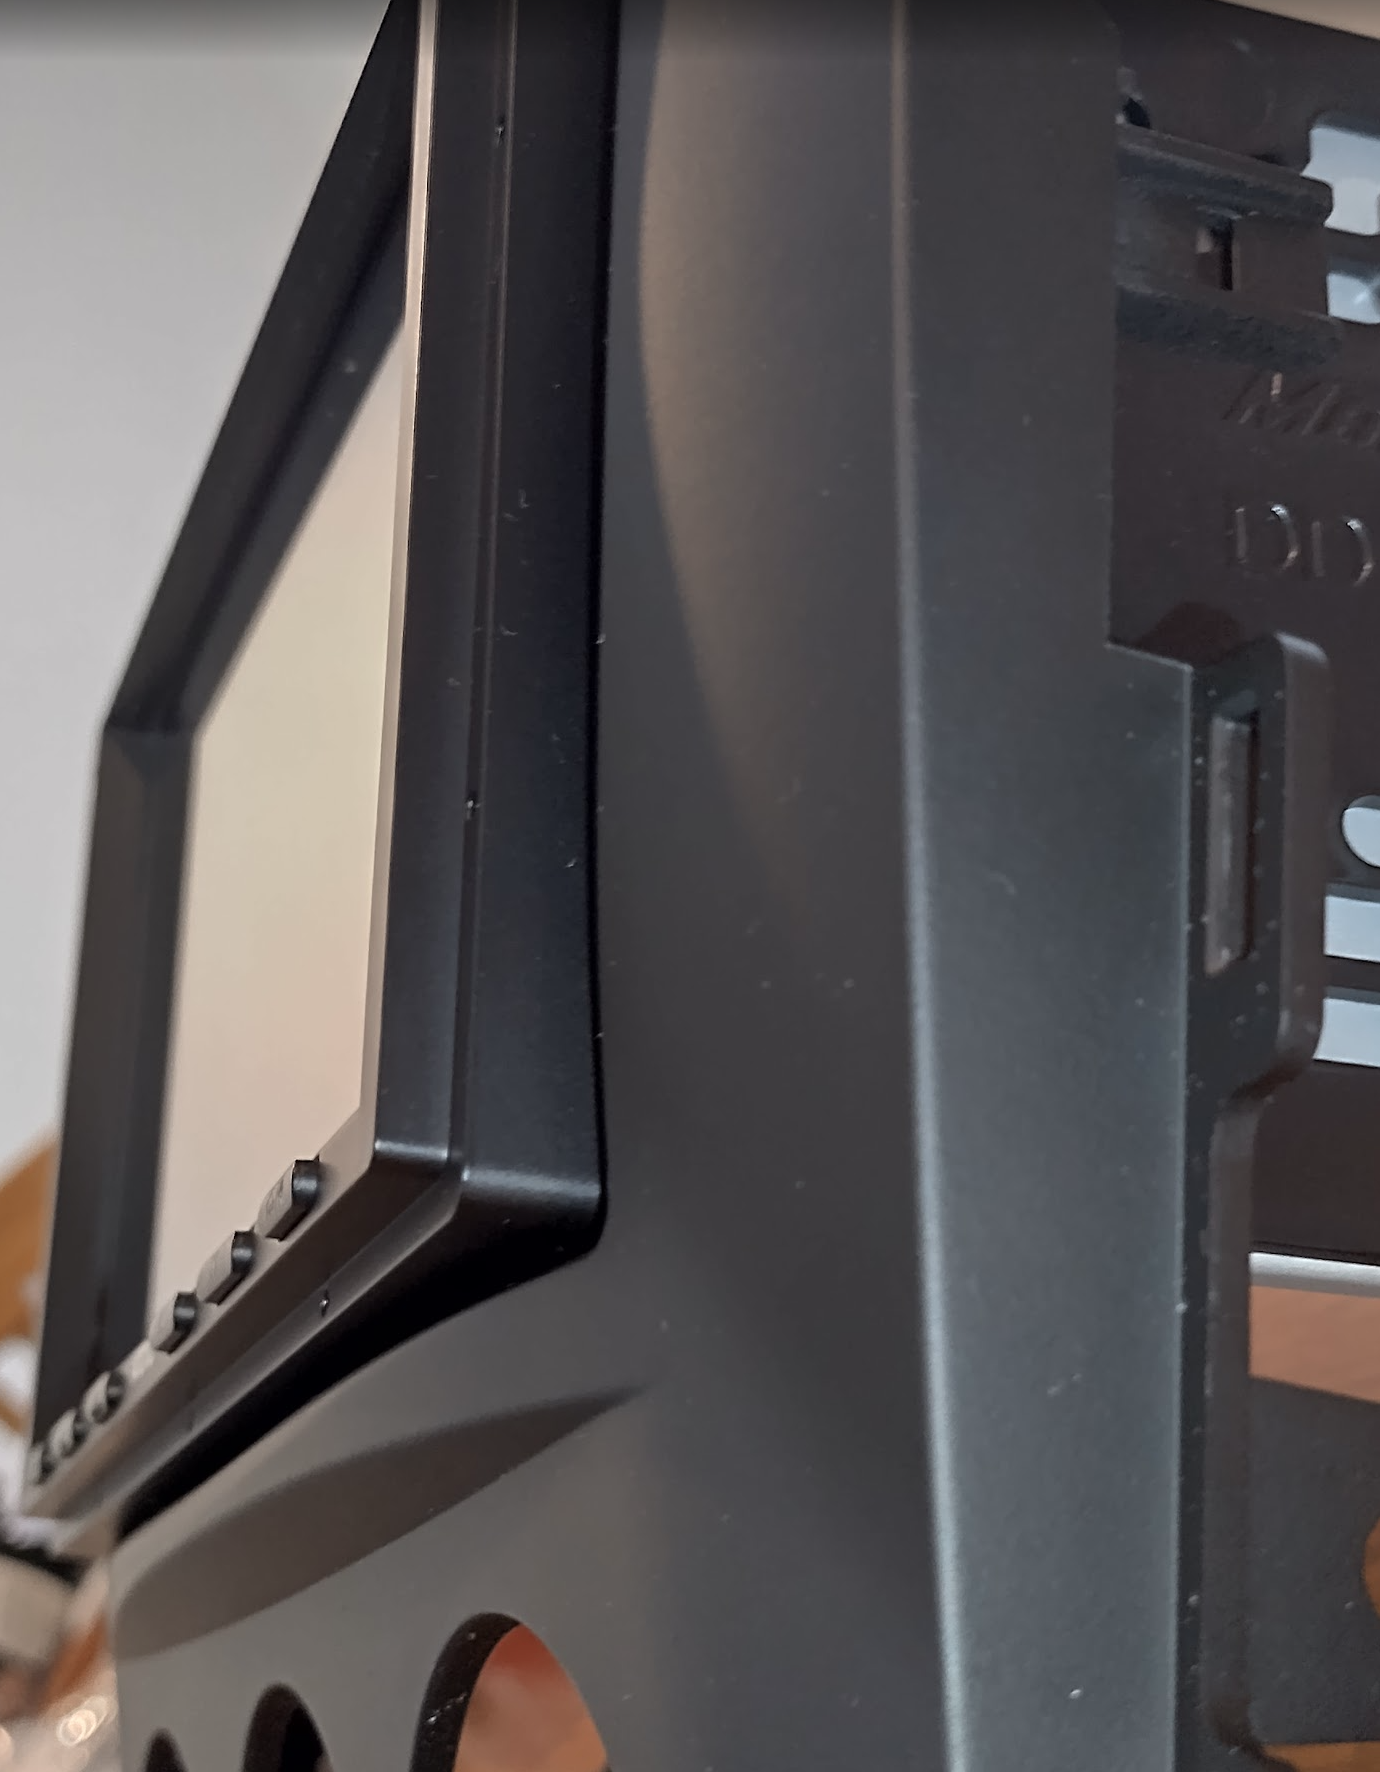
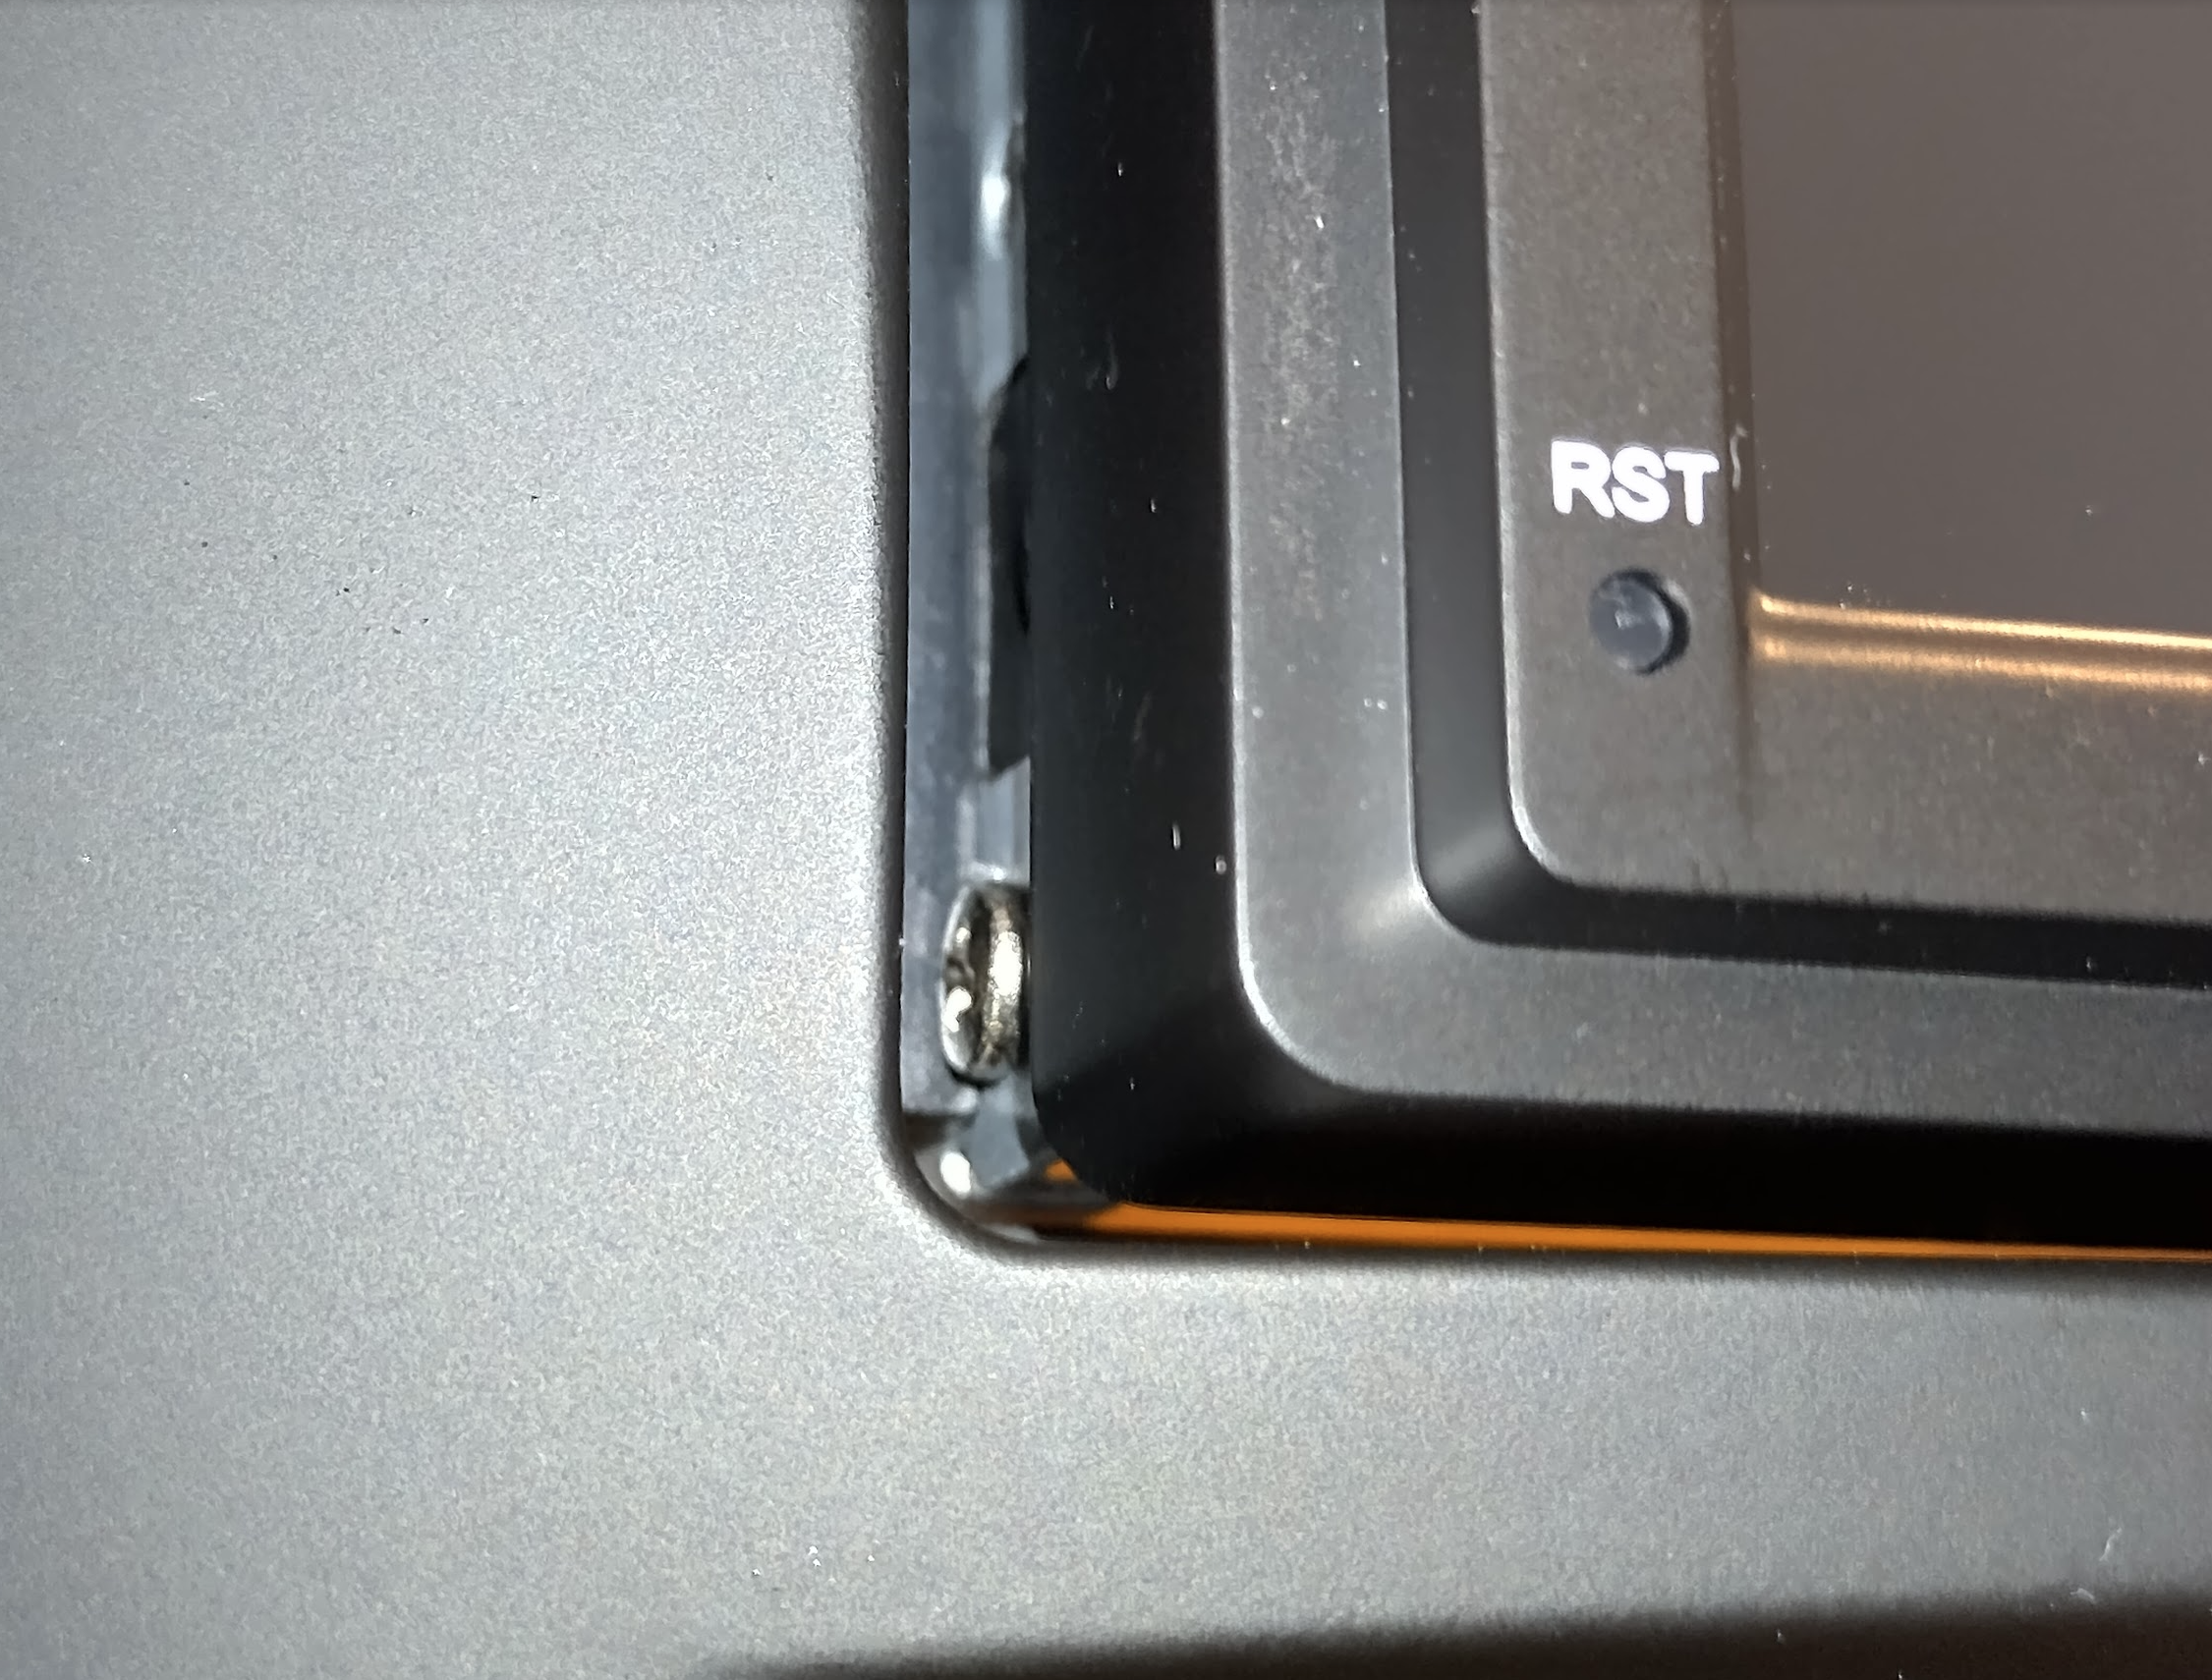
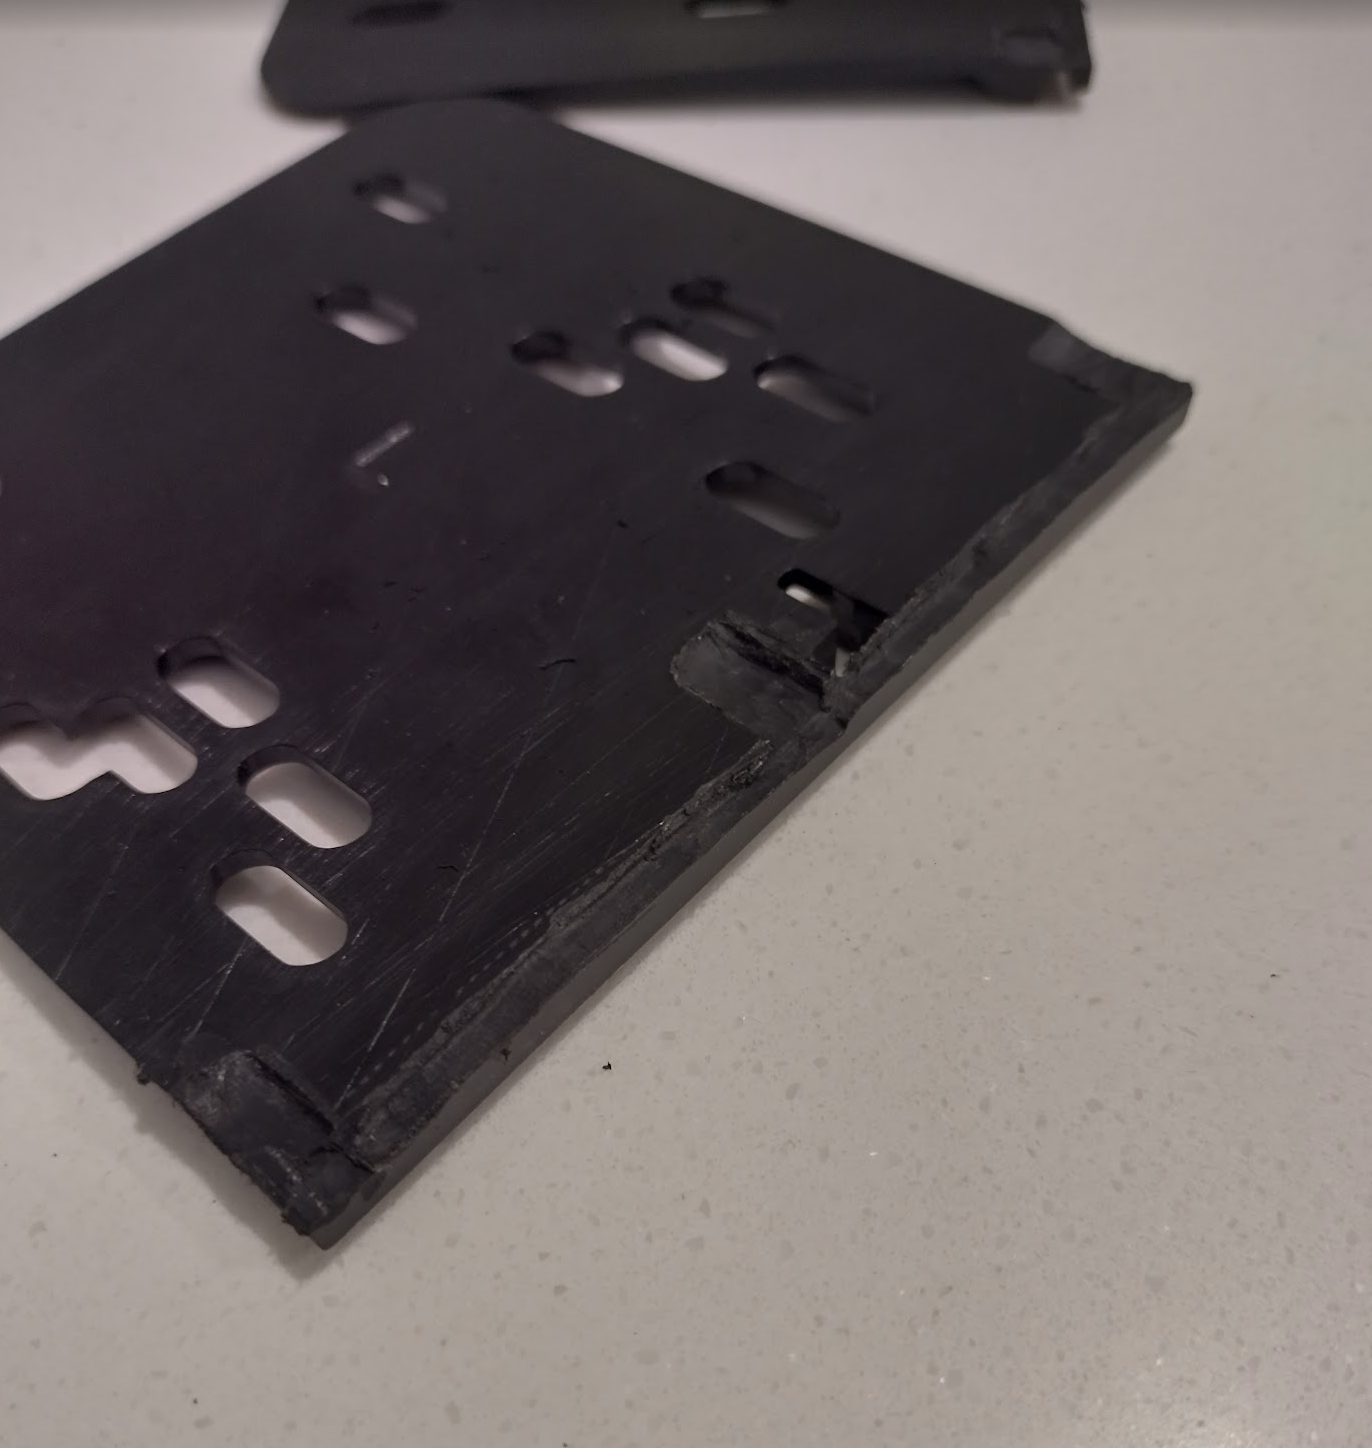
So what the other person suggested is a good start, making some little slots for the screws to slide in to which I did on both sides but the radio still sat a little too far out as now with the screws slotting in, the radio’s faceplate is now sitting on top of the DIN rails. So I had to cut a channel all along the top of the rails (not too deep) which then allowed it to sit as flush and securely as possible and just barely align with the screw holes behind. With that the radio sat flush against the inside lip again.
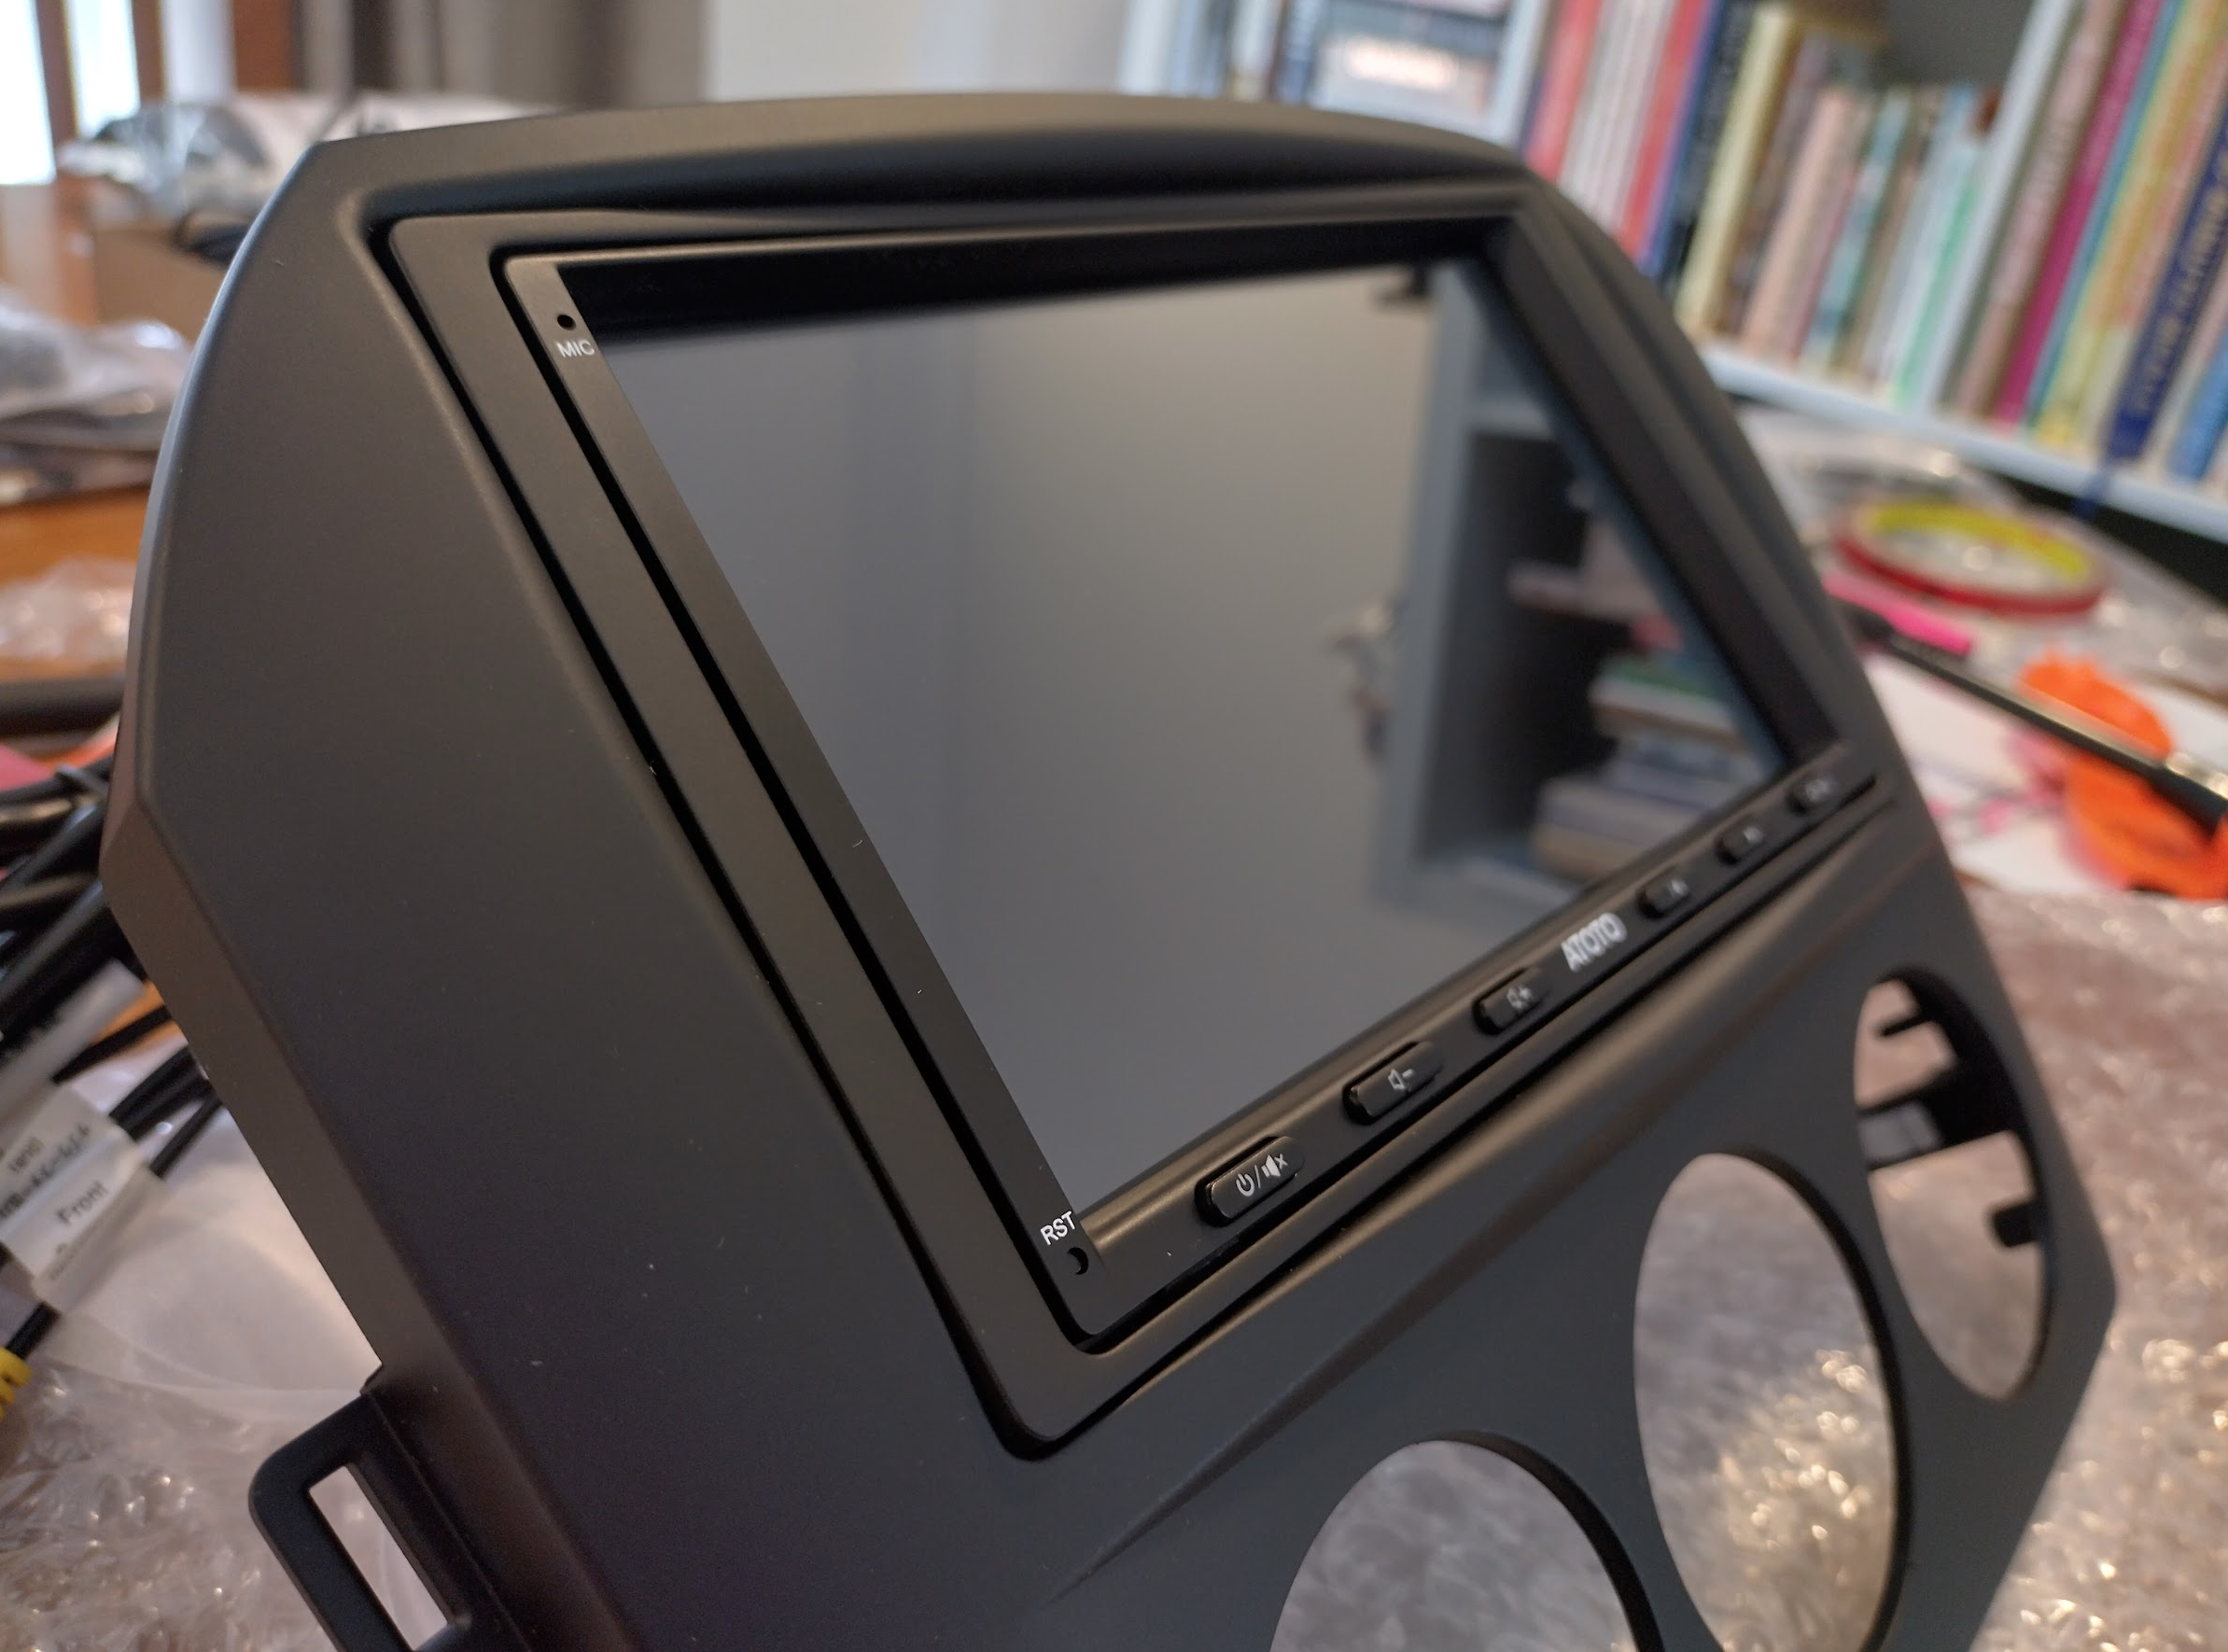
The included Atoto surrounds don’t fit in the metra, so the Metra-included surround needed to be modified by having its long clips removed. It’s also not as deep as the Atoto front so it’s now attached using strong (and thick) adhesive tape to both the front and sides of the radio which holds it firmly in place and raises it to roughly the correct depth.
Hooking it all up
I followed a combination lf all diagrams.
The Atoto “official” wiring diagram.
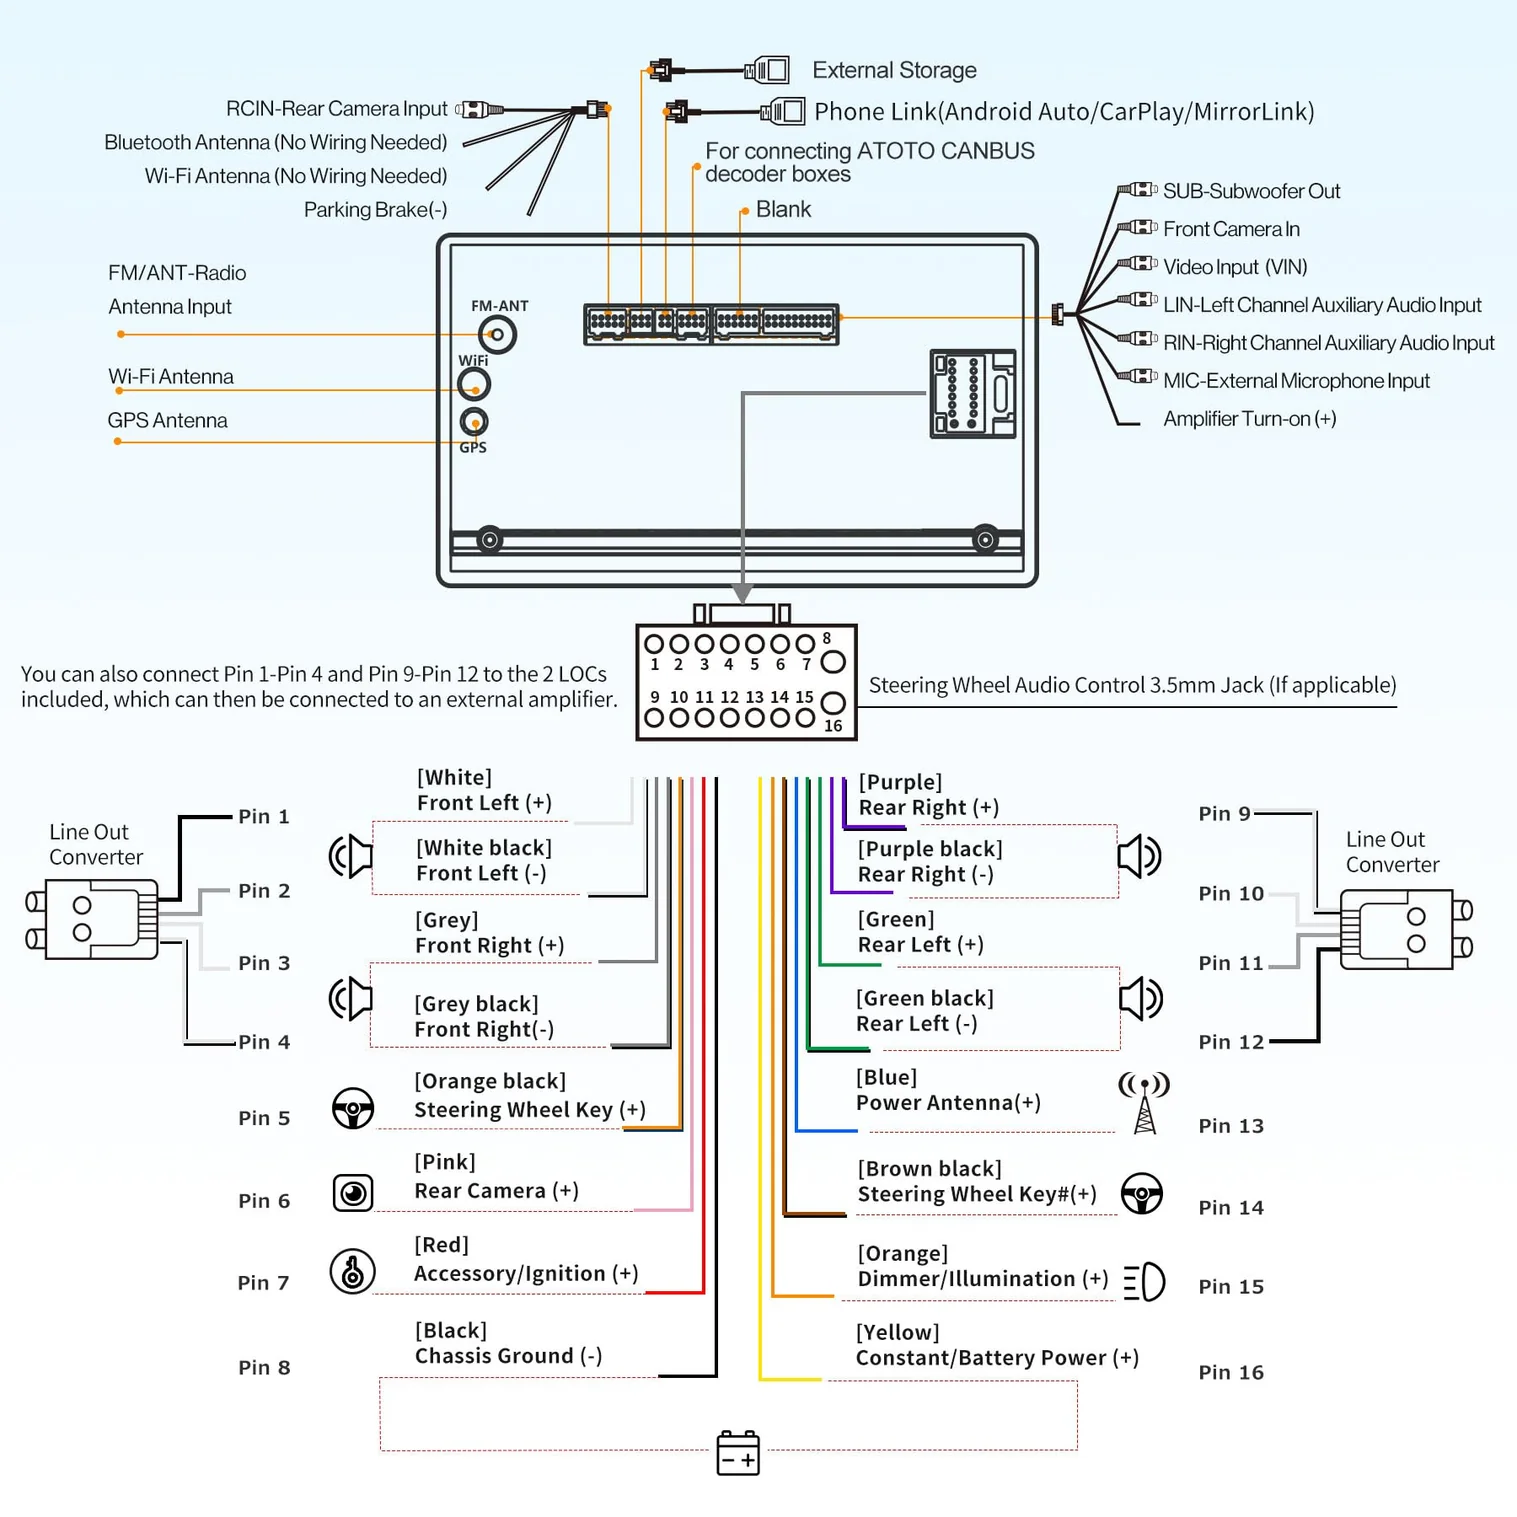
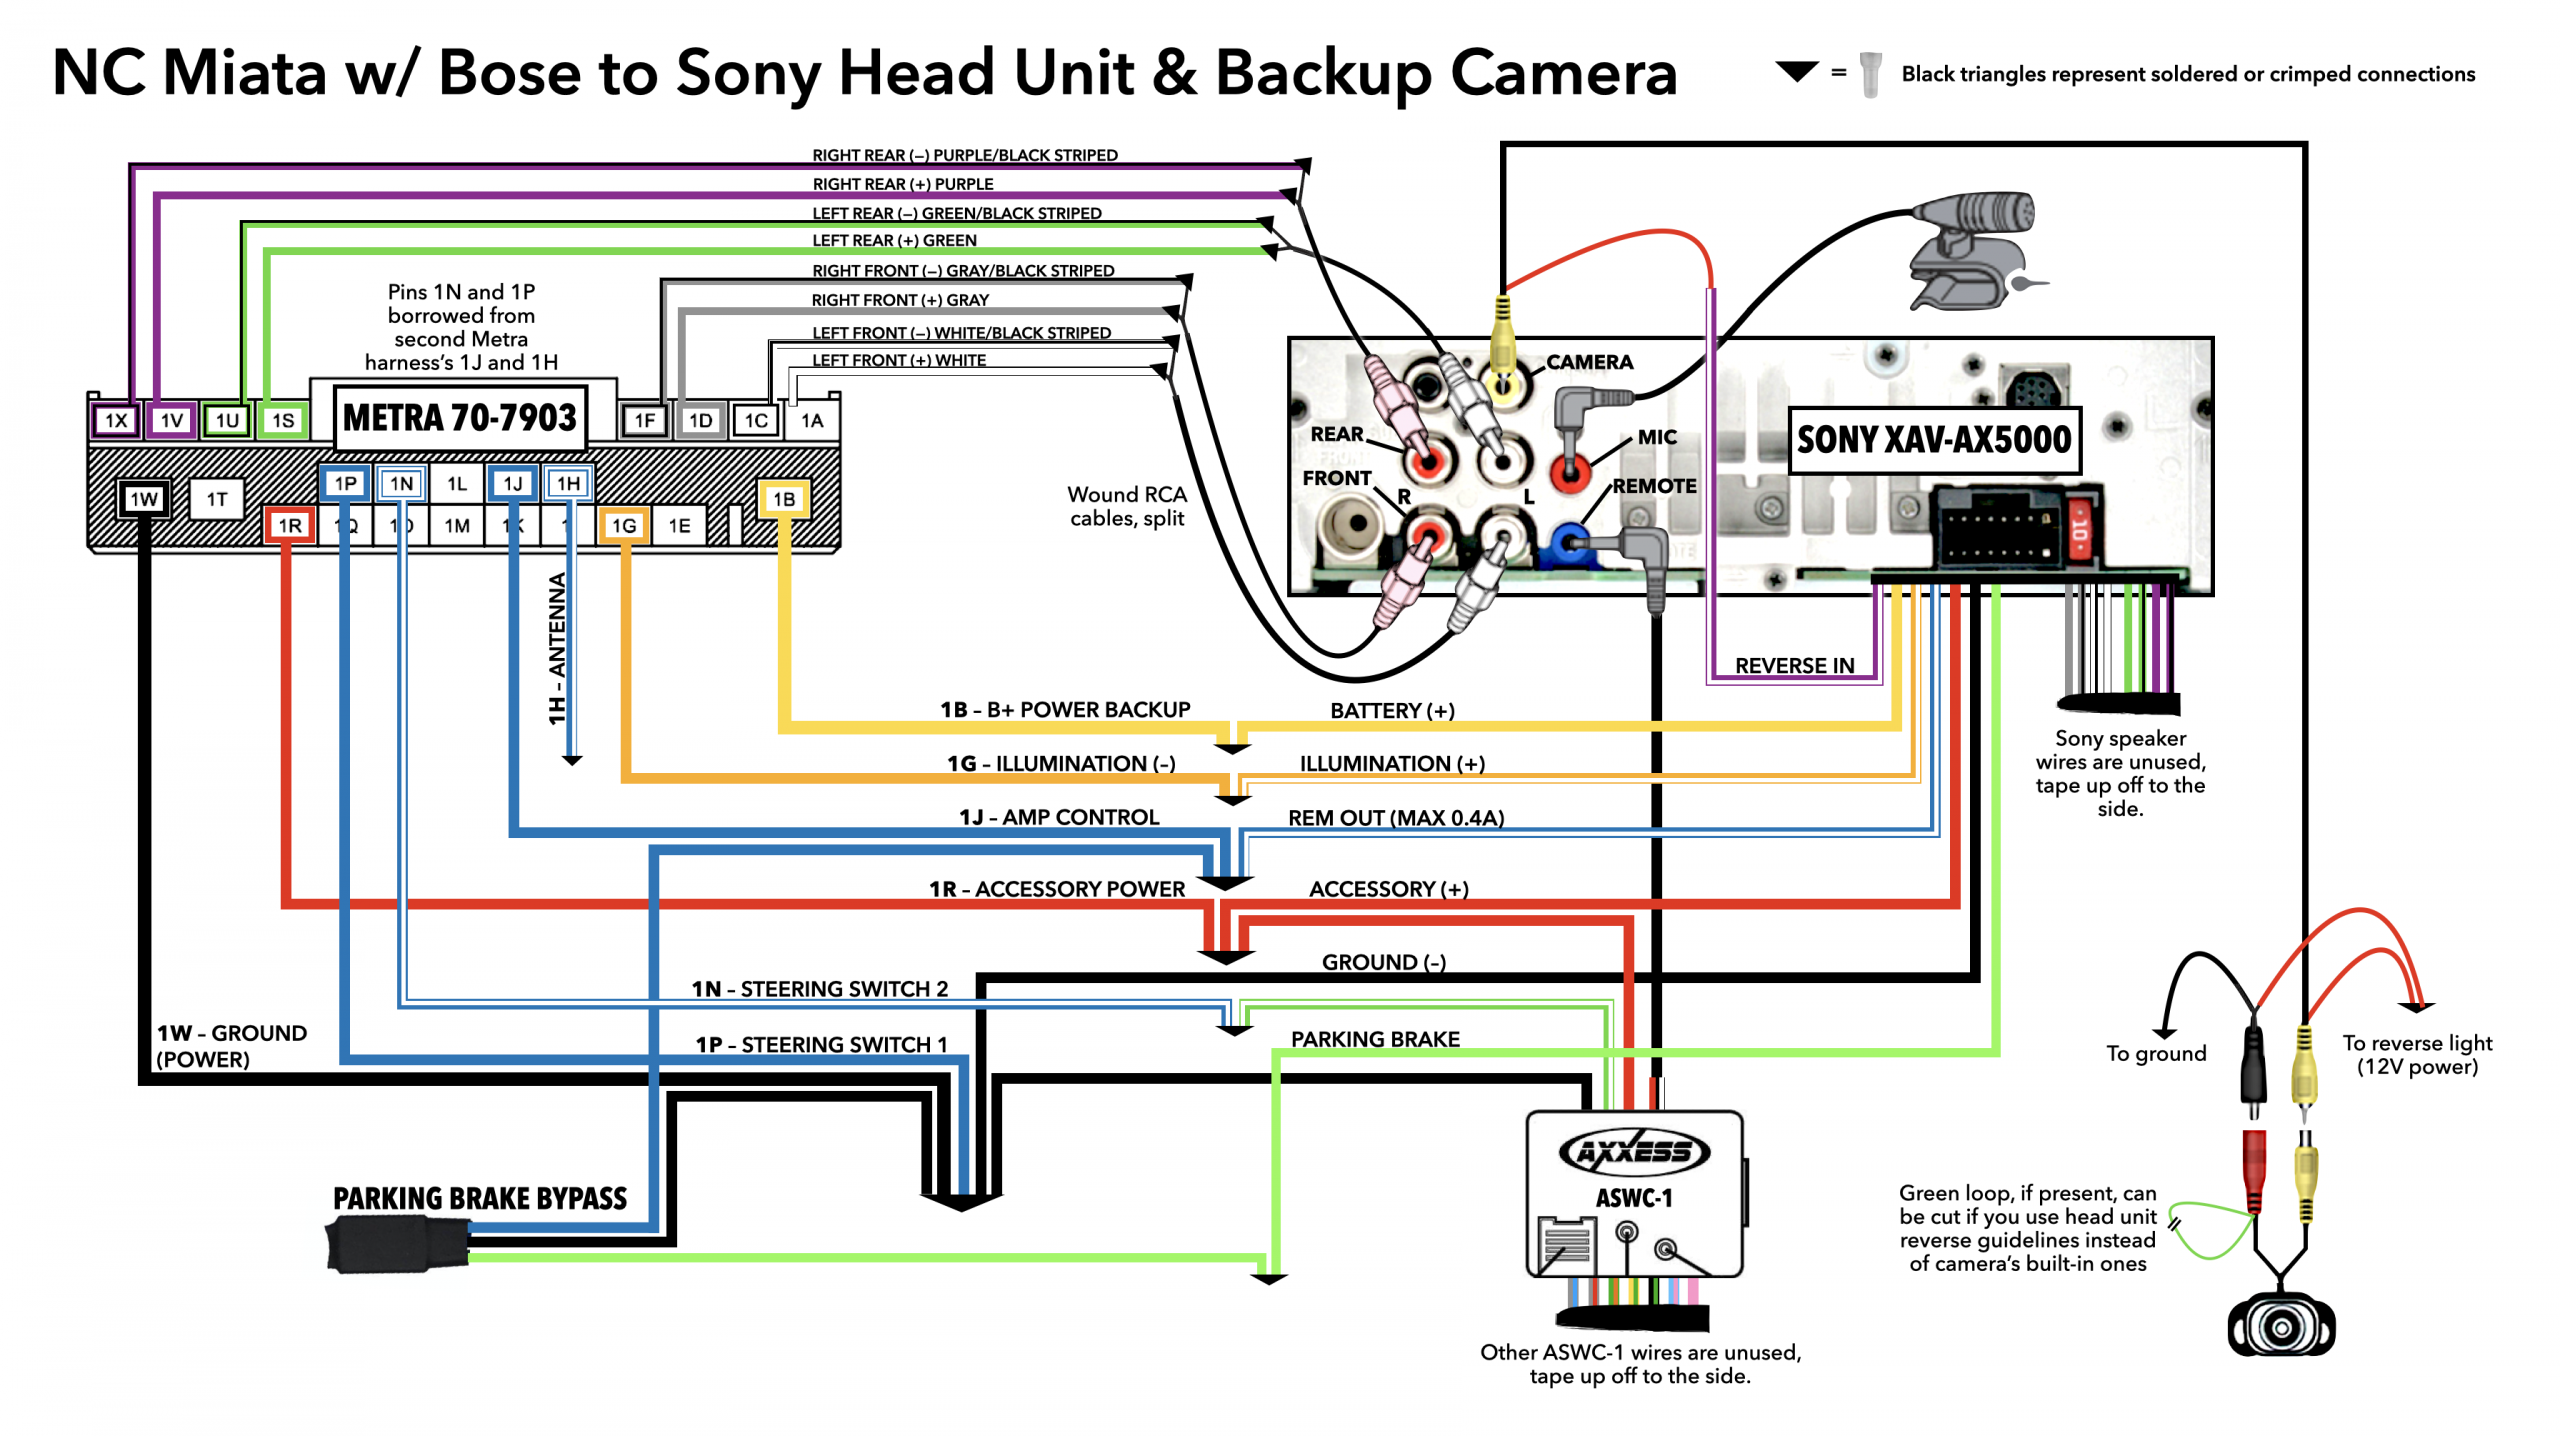
This wiring diagram is courtesy of Flywheel Films who made the first video I linked earlier.
Here’s the result of all of that wiring:
There’s a lot of mention about borrowing two pins from one harness and adding them to the other (1P, 1N) for Steering Wheel Controls (SWC). Mine was actually missing a third (1J) for AMP control, which I have added in also. There were two different opinions about this – wire the Antenna up to both 1J and 1H, or wire them directly and adjust an amplifier setting within the Atoto itself. I’m attempting the second approach.
Also from what I could find online with 1P and 1N, the trick is to combine Steering Wheel Key# (+) to both 1N and 1W (these are the joined red, black, and brown wires in the centre of my picture, effectively ground), and Steering Wheel Key (+) to 1P. Update: This is confirmed to work perfectly.
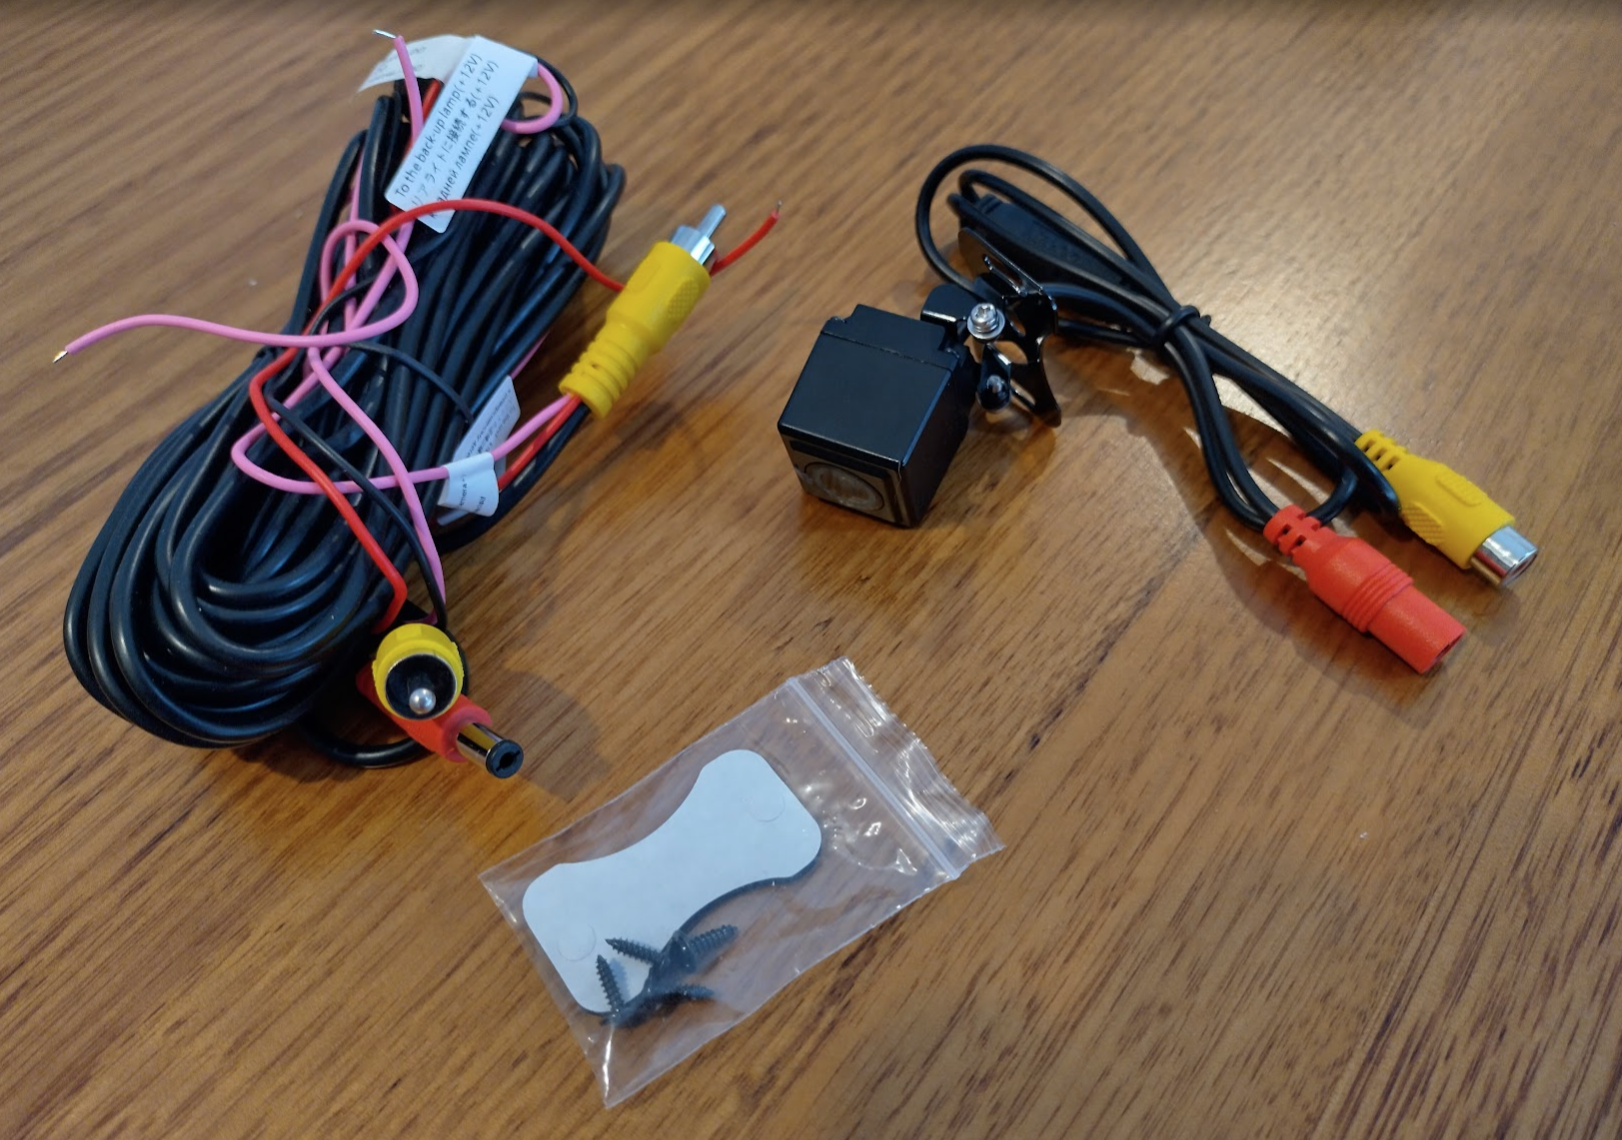
The only other multiple join is the reverse camera, needing to splice in to the ACC wire. On the other end of the reverse camera there was a lot of work as the wiring isn’t long enough.
A few wiring-related notes I have found on my travels:
- If you want to see the reverse camera while driving, there may be a way to do this using an override switch to power up the camera manually instead of relying on the reverse light. Update: You can open an app anytime to view it – the pink wire on the reverse camera is more of a ‘trigger’ to let the headunit know to automatically show the camera at that time.
- I’ve seen 3 different placements for the 4G & GPS antennas:
- On the passenger side of the dash right next to the air intake vent/side window pillar – this allows for the cabling to be hidden until the very last moment.
- Within the centre speaker grill – I read a while ago that the centre speaker isn’t used anymore, but I haven’t found anywhere to confirm this yet.
- On top of the radio unit itself – This is where it was on the NC that came with the GPS double DIN unit from the factory.
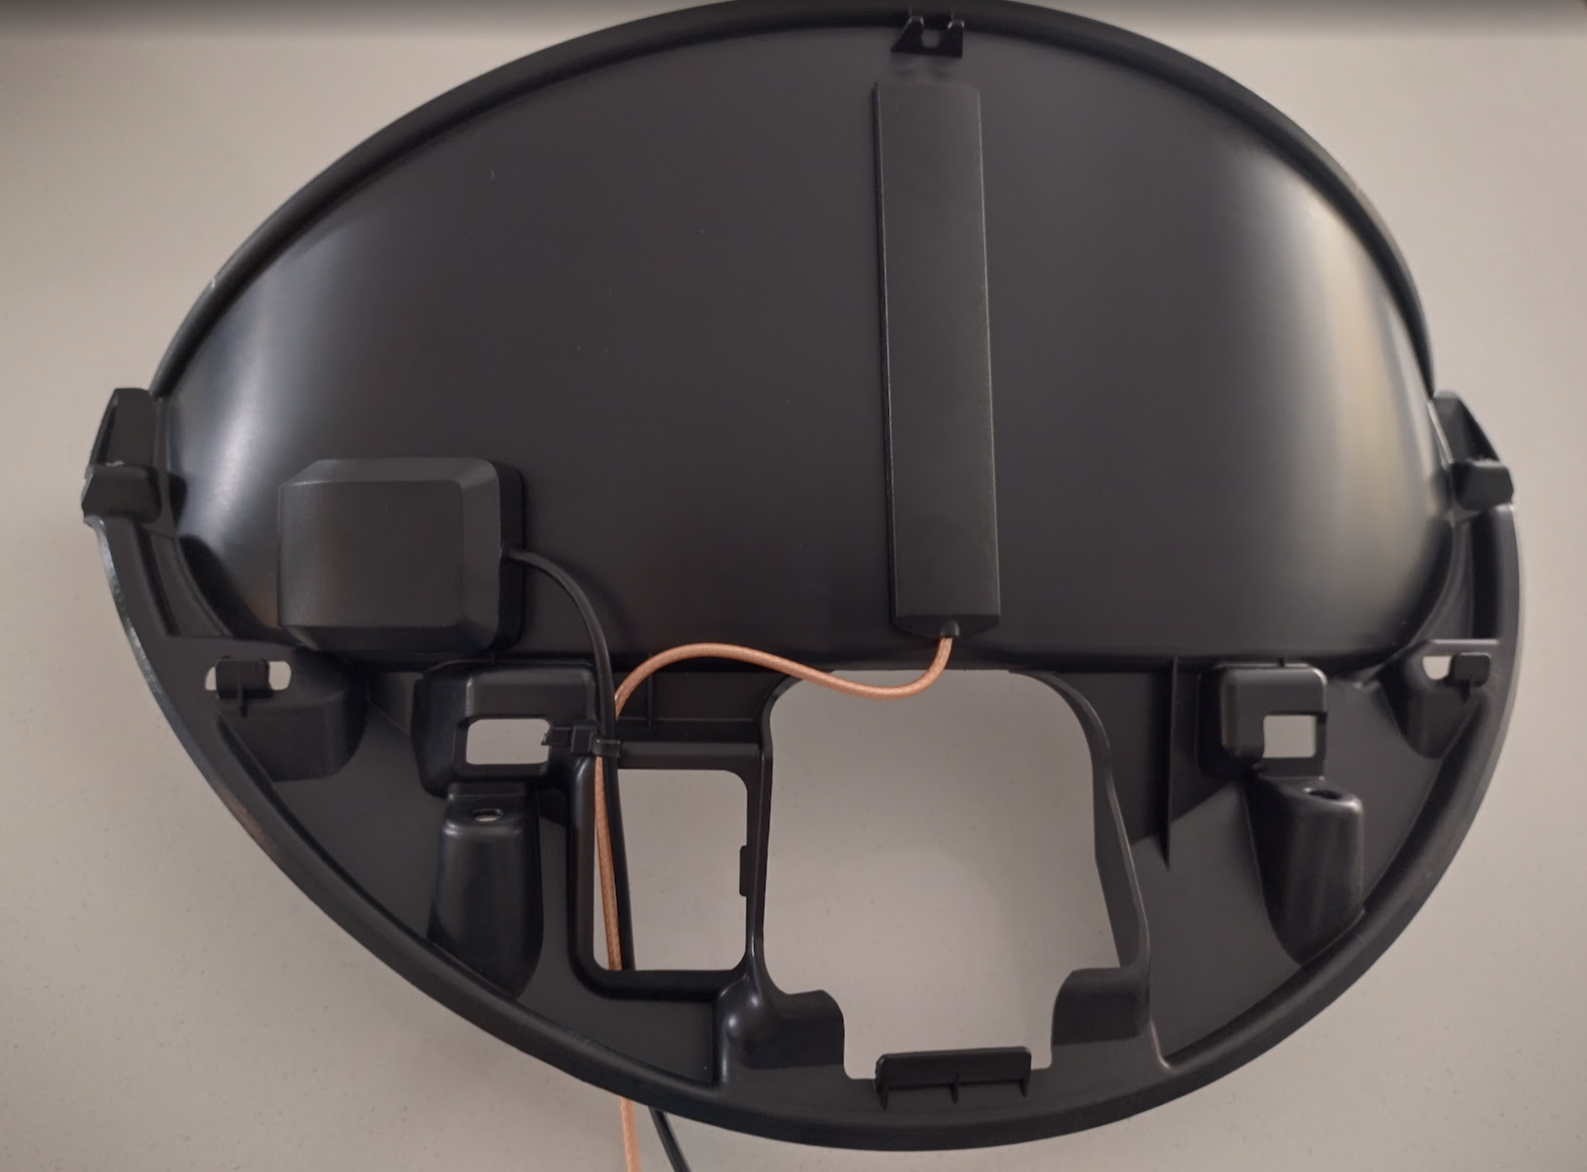
- Underneath the drivers side gauge hood/instrument cowl – I really like this one, apparently there’s a gap and it’s where the GPS antenna is officially installed on the ND. This may be able to house both antennas nicely hidden while having no metal above them.
- Update: This works – both antennas fit perfectly underneath. I have attached some photos later.
- If you have no power or audio, it’s most likely that the blue/white wire (Amplifier Turn On (+)) isn’t connected. Troubleshooting the blue wire / no power: https://forum.mx5oc.co.uk/t/nc-bose-atoto-s8-swap/150675/12 and https://www.reddit.com/r/ATOTO/comments/1pnf2q3/atoto_x10_in_mazda_mx5_nc_2012/
- I saw in a video someone pushed their reverse camera wire down the middle of the car (transmission hump) rather than along the bottom door tracks. I’m thinking this makes more sense now that I have removed the whole dash once as it will be easier to have it disconnected incase that needs to happen again (hope not!).
- Update: I wasn’t able to get a cable down the middle – maybe due to it being a PRHT? So I ran the cable along the side door panel.
Routing the wires
The front wiring was fairly straight forward – most of it is hidden under the front cowl which is easy to get back to the radio hole.
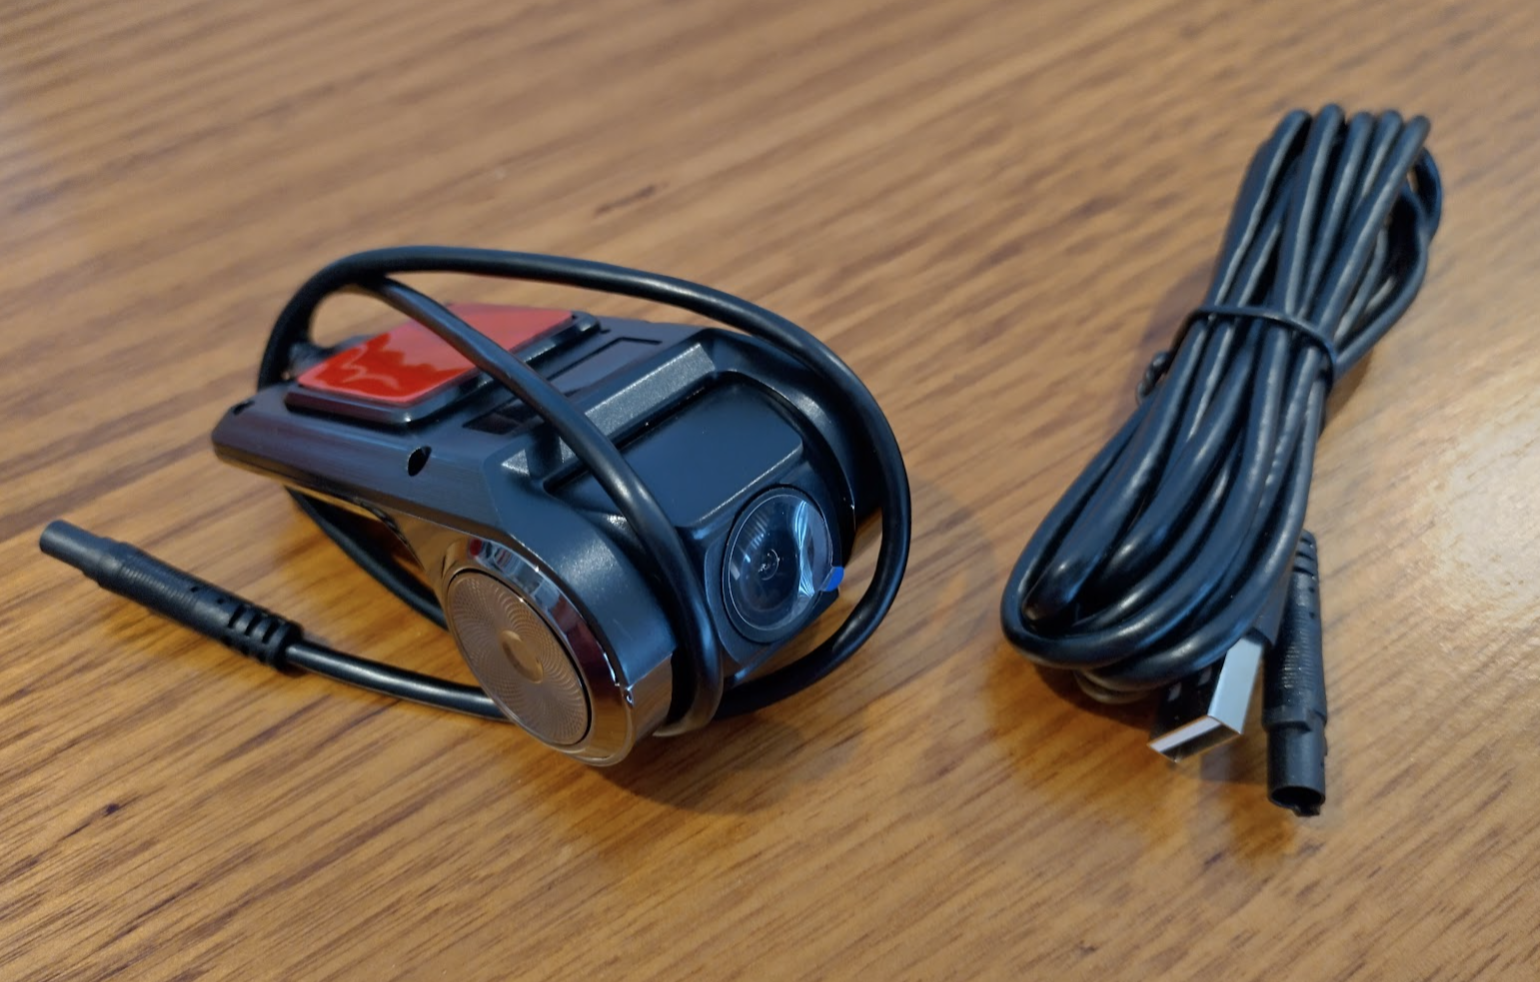
The Dashcam is fairly straight forward to push under the top plastic, and I took the side plastic off also (you have to remove the bracket the roof slots in to first). Then it all channels through the glovebox to get to the radio hole. Very easy. The reverse camera is an entirely different story.
The initial plan was to run the cable through the middle channel, but I just couldn’t get anything to poke through to the boot from there (maybe due to PRHT?). So I reluctantly ran the cable along the passenger door to come out alongside a wiring loom near the fuel pipe.
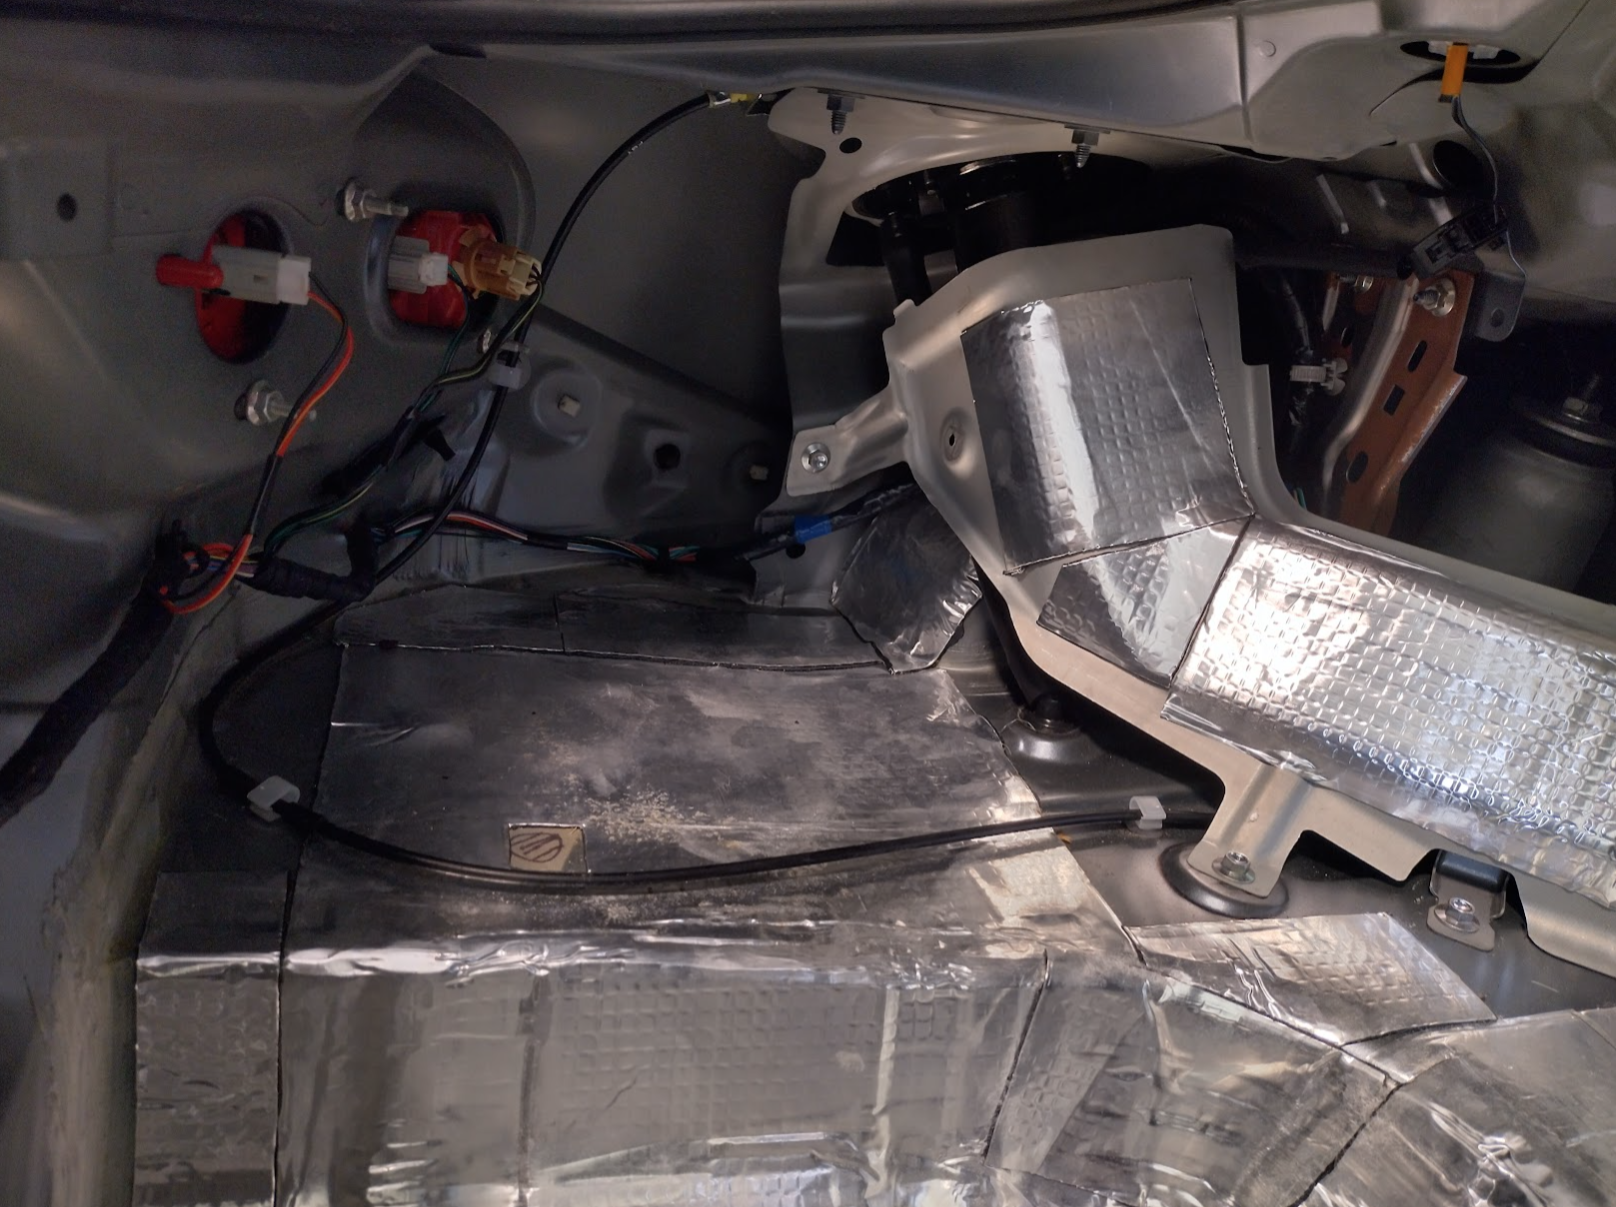
Update: I have completed this and the camera is mounted and functioning perfectly – but I HIGHLY recommend just doing the typical number plate/rego plate camera (with the wide mounting bracket). That way all the cables are in place at the correct length and you’ll save yourself a day of extending every wire, with practically the same result.
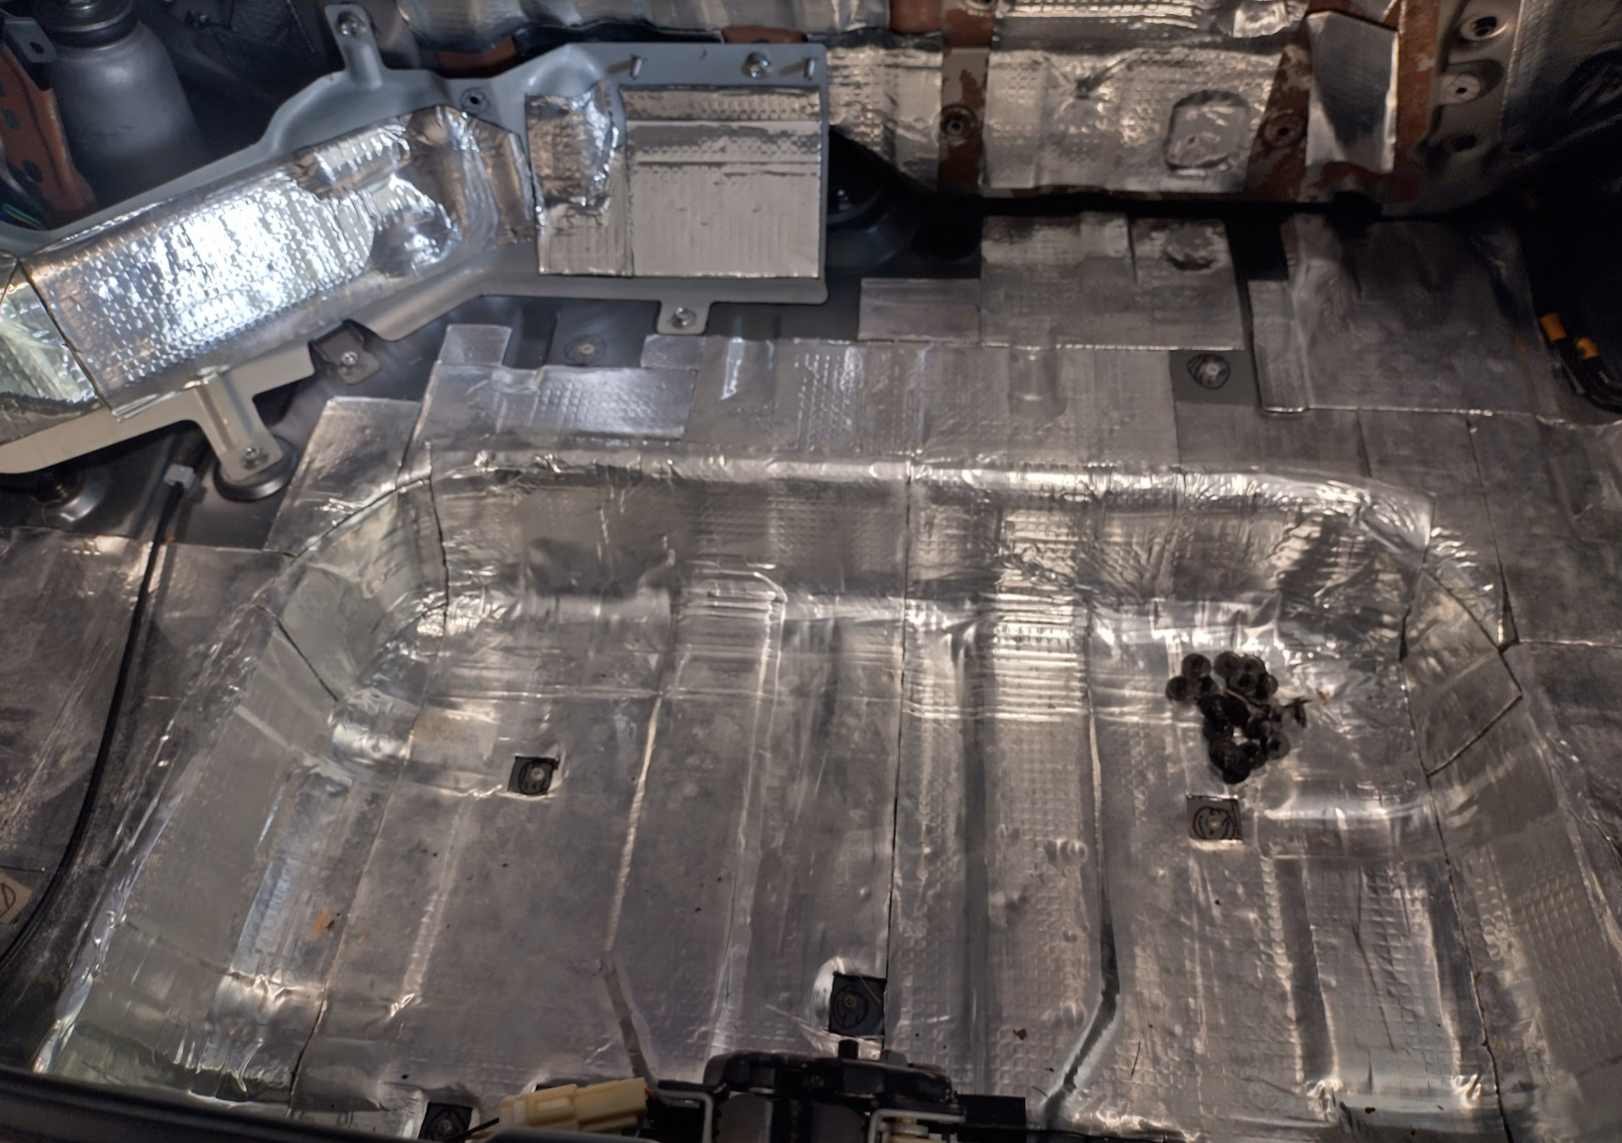
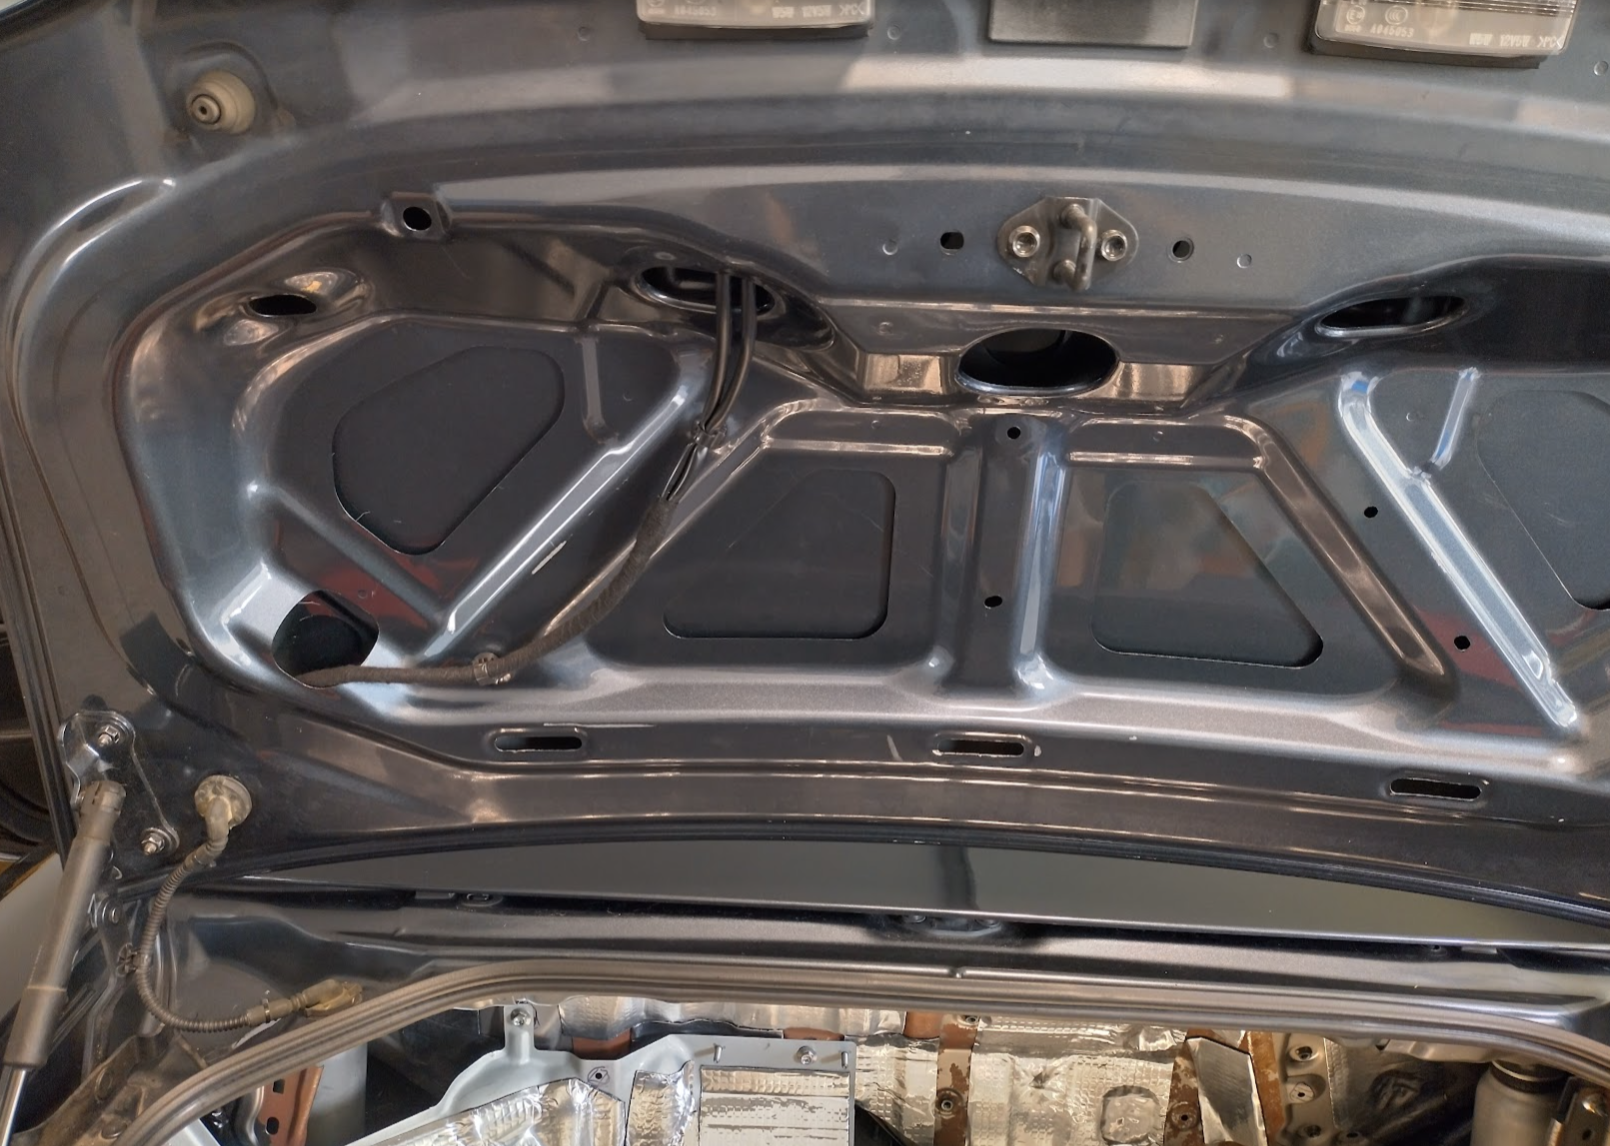
Ok I can see the rust too
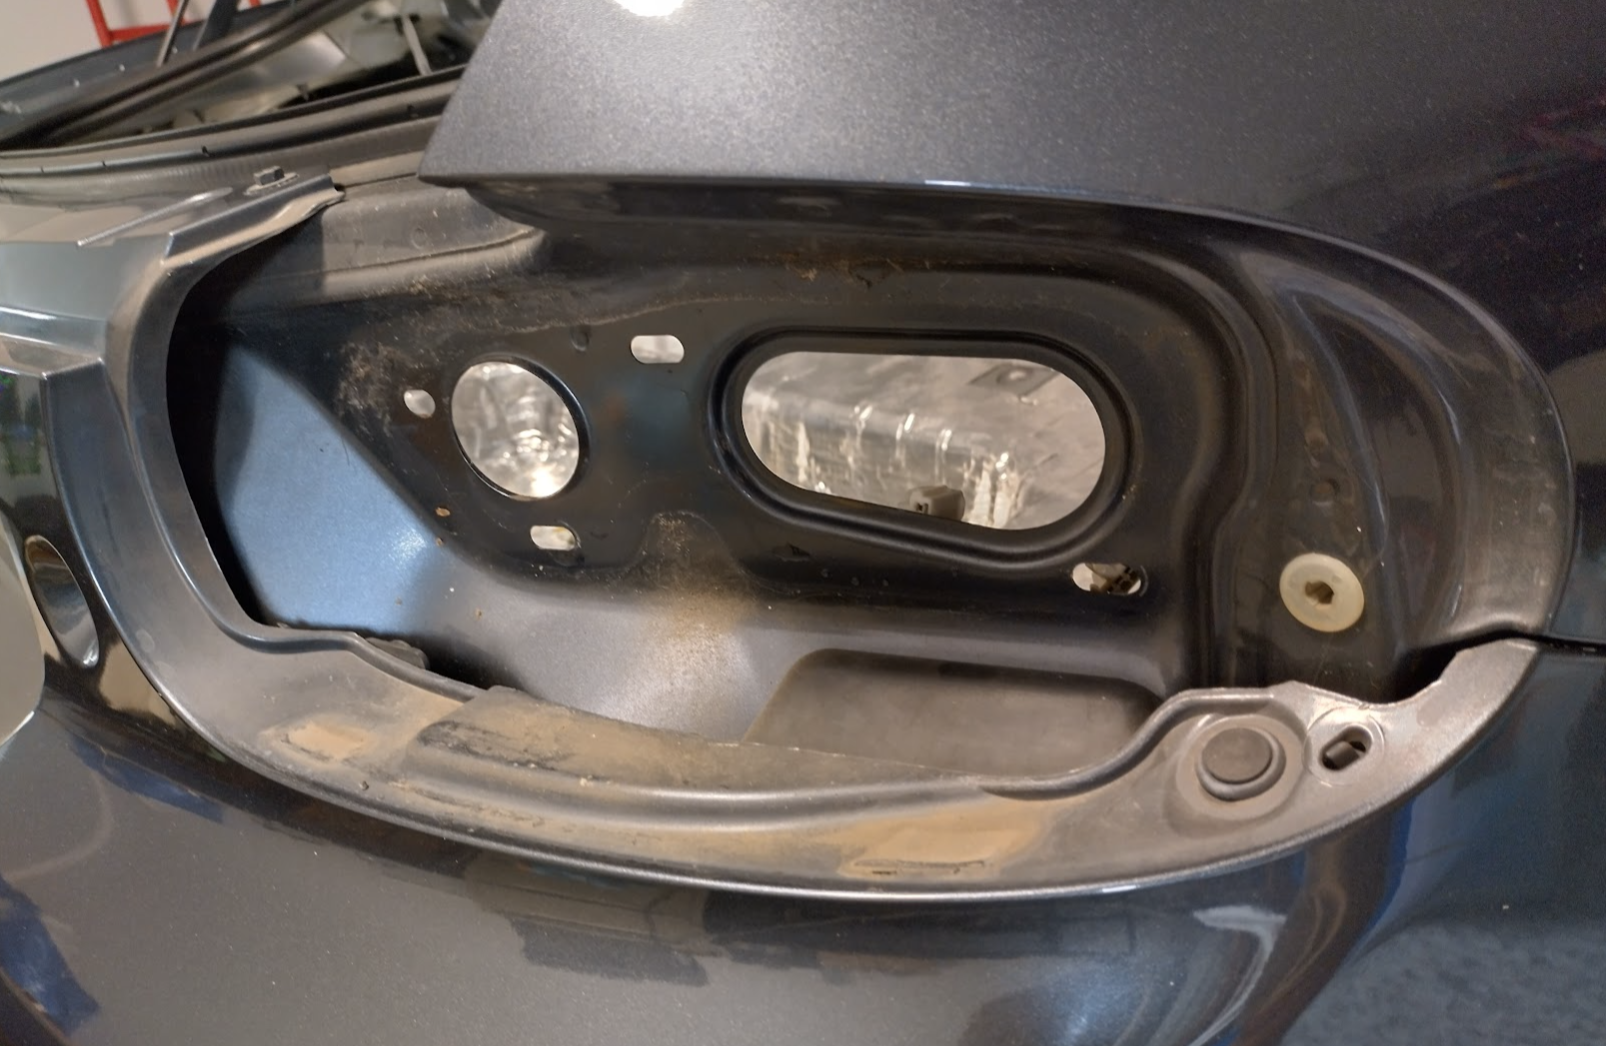
When removing the carpet to take the plastic panels off in the boot, I noticed it was damp at the rear which the car was in a storm the previous day so I wasn’t overly surprised. Also when I took the panels off I was faced with rust (surface, nothing scary) which when I looked at photos from when I did the sound deadening 5+ years ago there was no rust there. So something is leaking. The common issues are the rear lights needing new gaskets, and the top brake light (sometimes called the 3rd brake light) needing sealing. So may as well check and/or fix those at the same time since we have it apart. I did notice I was able to push the right hand brake light a little when washing the car.
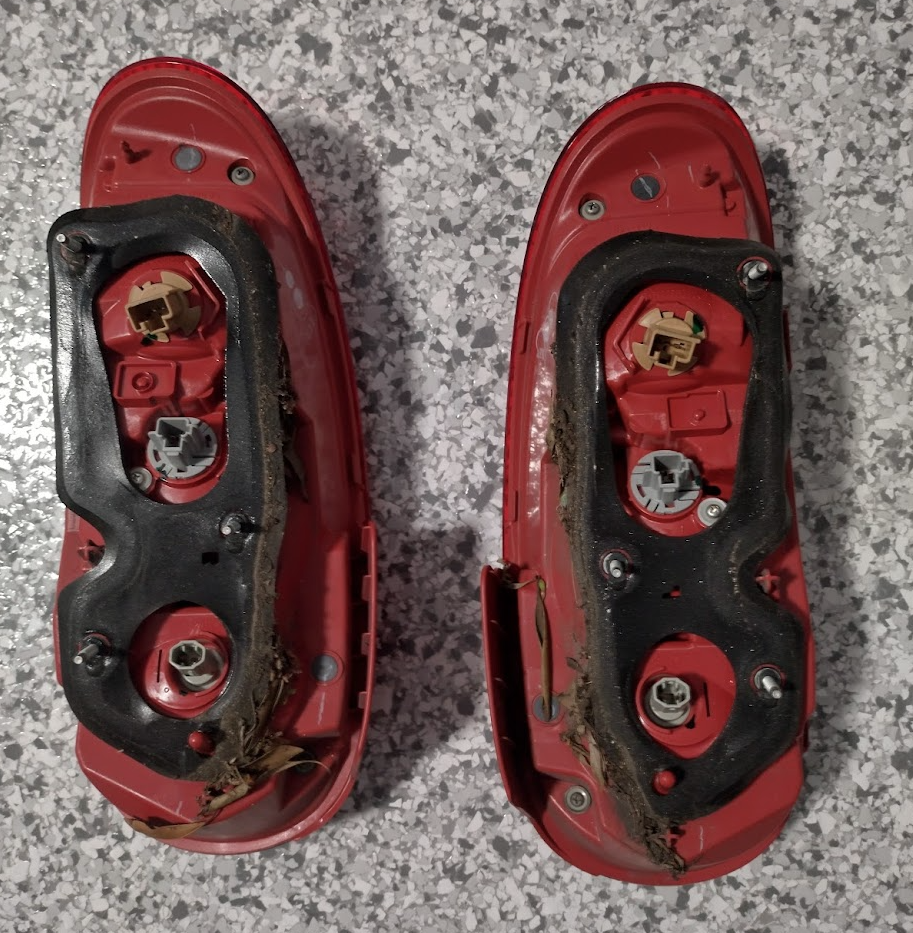
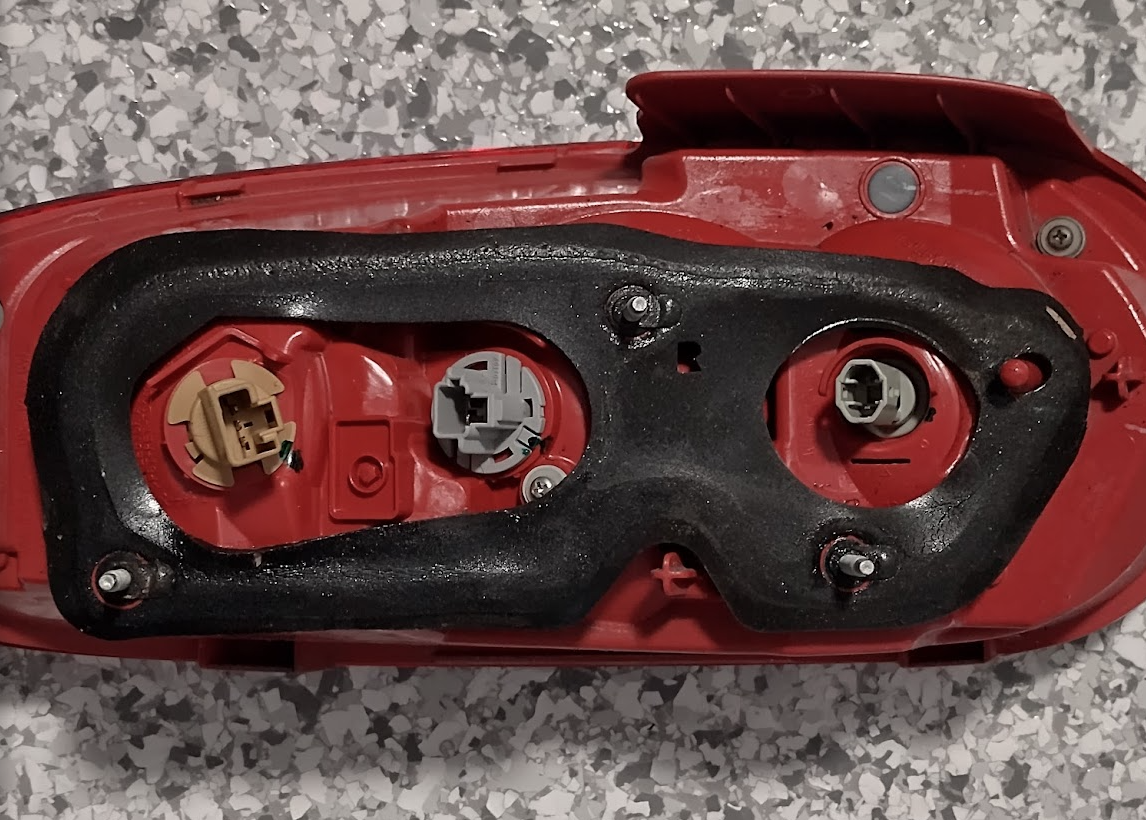
I have removed the old seal, and fashioned new gaskets out of neoprene rubber that I have left over from the Airconditioner fix that I did a few months ago. It seems to fit snugly so I’ll see how it goes in the rain! I have a feeling the right light was only leaking because it was very slightly loose.
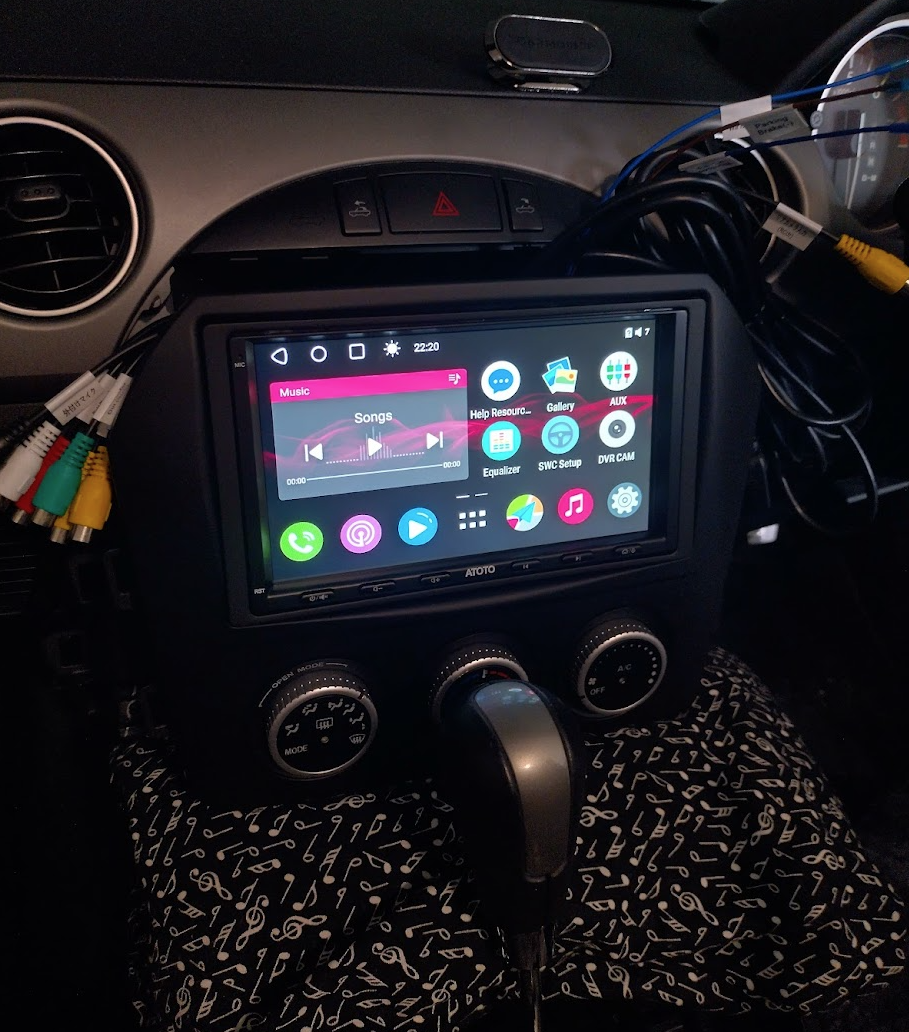
It works!
I have taken it for a few test drives over the last couple of days and everything works – the OBDII, stereo, radio, GPS, both cameras and reverse triggers correctly when reversing. It took a bit of fiddling to get data and google maps going, there’s a phone setting and a few other methods people have used which I have noted below.
Overall, the A6PL is genuine and an incredibly cost-effective alternative to expensive radios, definitely bringing this car up to a more modern standard!
A few handy hints
- Offline google maps requires you to sign in, and google maps don’t load or work at all unless you have a locked GPS signal
- OBD2 on this car is incredibly useful, as you get fuel levels and remaining range in the tank amongst other nifty things.
- I haven’t used android auto yet, but apparently for a more reliable android auto experience (if required), get “Head Unit Reloaded (HUR)” from the play store.
- If you wired up the lights wire, the screen apparently has two brightness settings – one while the lights are on, one while off. There’s a setting somewhere to auto blank the screen after inactivity, and this is apparently a good screen blanking app if you need it: https://play.google.com/store/apps/details?id=in.binarybox.blackscreen&hl=en_US
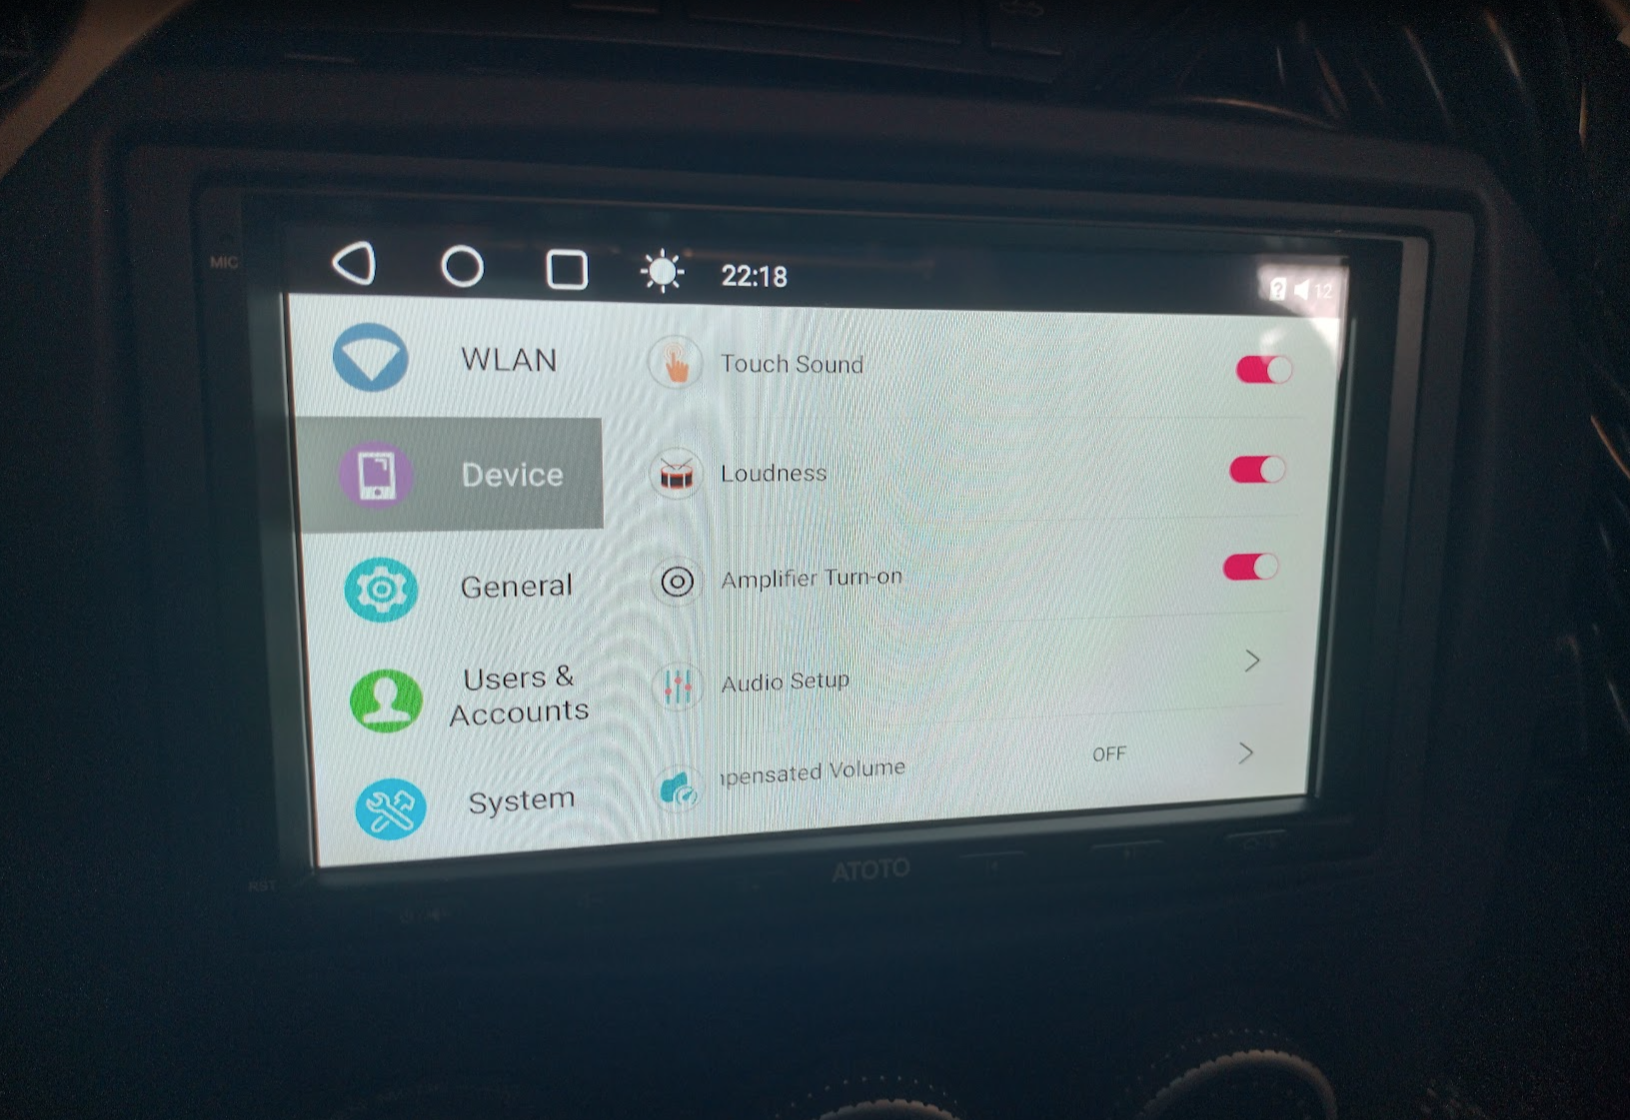
- Update: The Atoto A6PL contains an auto blanking setting, and also 3 levels of brightness in the quick status menu. I would recommend the auto blanking if driving at night.
- There’s been a few mentions online about these units draining peoples batteries depending on different driving habits. They apparently have a standby time of 3 or so days, so if you just move your car out of the garage every 3 days it keeps it semi-awake and the battery doesn’t charge enough. If you drive every day it’s not a problem as it’ll charge back up. So an override power switch (on yellow?) might be a good idea.
- Update: There is a secret settings menu that allows you to set it to shutdown every time instead of standby. In settings, tap “System” 4 times, put in 3368 as the code, then set “System is turned off Sleep/Shutdown” to disabled or no sleep.
- Update2: Here’s how Atoto explains it: https://www.atotodirect.com/en-au/blogs/guides/atoto-car-stereo-bgsleep-with-instant-wake-backup-priority
- Update3: I had the shutdown option set as that suits my driving habits more, but what then happens is if you are sitting with the car on ACC fiddling with the radio, and start the car, the whole unit resets. So I have changed it back to the default sleep option to see if my battery survives!
- The Atoto A6PF (and hopefully PL) has dual bluetooth radios, so you can pair a bluetooth OBDII scanner in BUT this takes the 2nd bluetooth channel so you can no-longer use that for phone data.
- This unit can do data over bluetooth with your phone – if it’s not working then check your phone has bluetooth tethering enabled within the network and internet settings (NOT in the bluetooth settings!), and your phone also needs to be connected to both Bluetooth 1 (for calls) and Bluetooth 2 (for data)
- Update: Apparently bluetooth phone data is unreliable, so others are using macro apps to enable & disable their phone’s hotspot when it’s connected to bluetooth. https://xdaforums.com/t/atoto-s8-general-discussion.4114493/post-85815077 . This would also allow the OBDII scanner to continue to be connected.
- Update2: I have set this method on mine resulting in bluetooth phone calls, OBD2, and wifi hotspot data all going at the same time.
- When setting Steering wheel controls, set the < and > to |<< and >>|, that way they will pass through to android auto/apple carplay also.
- There doesn’t seem to be a dedicated Night Mode or Dark Mode in this unit, you can only change individual apps and brightness, and use the auto screen blanking setting.
What’s next?
Changing the interior lights to leds (now done!) so I don’t worry if they are left on, and maybe routing a dedicated 12v ACC line and socket to the boot for charging things on the go. Will see.
Observations after the dust has settled…
Here’s a few things I have noticed since using it for a while
- The phone bluetooth data connection doesn’t always stay connected. It might be when the system powers off completely that it loses this?
- For data, wifi hotspot on your phone is the way to go.
- The lowest brightness is far too bright at night. Use the auto off display setting.
- The radio reception isn’t as good as it was before. It picks up everything but there will be areas you’ll drive to that used to work 100% that work maybe 50% now.